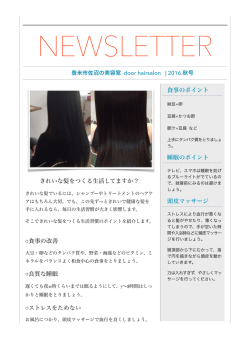
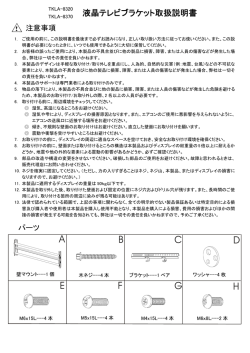
R
UDD ユニバーサルディスクダンパー 取扱説明書
●このたびは、弊社製品をお買い上げいただき、まことにありがとうございます。取り付け前に本書をよくお読みのうえ、正しく施工いただきますようお願いいたします。
誤った取り付けは、思わぬけがをする恐れがありますのでおやめください。施工後は、ご使用になられる方へ本書をお渡しいただき、いつでも読めるよう保管してください。
●本製品は、家具などの比較的軽量な扉に使用するダンパーです。本来の使用目的とは異なる使用方法や、使用範囲外の扉に使用したことが原因による故障、けが等の事故
につきましては、その責任を一切負いかねますのでご了承ください。
●本書の製品内容は、部品としての品質範囲です。本製品を使用した最終製品の機能・性能・安全性を保証するものではありません。必ず最終製品でのご確認をいただくよう、
お願いいたします。
●製品につきましては万全を期しておりますが、万一不良品があった場合、ご購入先へお問い合わせください。
●保証期間は、弊社納品書発行日から1年間とさせていただき、良品との交換をもって責任の範囲とさせていただきます。
●製品改良などにより、予告なく寸法、材料などの仕様変更を行う場合があります。念のため現品にてご確認ください。
●汚れがひどい場合は、中性洗剤を水で薄めてふきとってください。アルコールやシンナーなどの揮発性のものは表面の仕上げを傷めるので、使用しないでください。
! 注意 以下の注意事項を守らないと、思わぬけがをしたり、周辺の家財に損害を与えたりする恐れがあります。
●インパクトドライバーは使用しないください。故障および破損の原因となります。
●キャビネットおよび扉の設計、本製品の取付位置は必ず指定寸法、水平、垂直度をお守りください。1枚の扉に複数個の製品を使用する場合、取付位置に差異
がありますと、いずれかの製品に荷重負担が集中し、製品の寿命や機能に影響する可能性があります。取付時には十分にご注意ください。
●本製品の側板および扉への取付けは、垂直度を確実にお守りください。
●必要以上の力で扉を開けたり、扉を手で持って無理に押し下げないでください。
●本製品の使用温度範囲は、5℃∼35℃です。温度によりダンパーの作用速度が変わることがありますが、故障ではありません。極端な温度条件下でのご使用については、
弊社営業担当者までお問い合わせください。
●本製品の分解、改造は決して行わないでください。
●取付ねじにゆるみがないことを定期的にご確認ください。ゆるみがあった場合は、増し締めしてください。
製品内容
カバー
③マウンティング
プレート
(以下、Mt.P)
機種の選定
Φ
3
ダンパー
本体
⑤ 十字穴付き ⑥ 十字穴付き
⑦ 十字穴付き
⑧十字穴付き
②カバー
トラスねじ
サッシねじ
トラスタッピンねじ 皿タッピンねじ
Mt.P
M5×8
M4×L ※1
呼び5×12
呼び3.5×L ※2
(ダンパー本体用) (Mt.P用)
(ダンパー本体用)
(Mt.P用)
【断面図】
4ケ
2ケ
4ケ
④取付ねじ 2ケ
扉側板厚
図.3 木製什器の場合
図.2 アクリルや板金什器の場合
図.1
クリアランス
)
スペーサー
什器本体
20
①ダンパー本体
3
T (※
8
お客様にてご用意いただく部品
20
4×Φ4.2穴
図.4 スペーサー
固定側
・本製品は、表1の使用範囲に従って機種を選択してください。
表.1 使用範囲(L/R 2個使い)
・ダンパーが作用する方向は右回転(R)、左回転(L)の2種類があります。
品番
モーメント [ N・m]
・左右同じ機種( S、M、H )を使用してください。
UDD - S - L (R)
1.0∼2.0
・扉の形状や可動角度によってモーメントが異なりますので、下記の計算式に
回転中心
従ってモーメントを確認後に機種を選択してください(図5)。
2.0∼4.0
UDD - M - L (R)
回転中心から重心までの距離は、回転中心を基準に重心が水平もしくは、
4.0∼6.0
UDD - H - L (R)
水平に最も近づく時の距離(最大モーメントの時)を算出してください。
図.5
4×M4×0.7ねじ
最大モーメント = 扉質量 [kg] × 9.8 × 回転中心から重心位置までの距離 [m]
※1 ⑥サッシねじの長さ(L)は、スペーサーの厚み(T)+5mm以上をご用意ください。
※2 ⑧皿タッピンねじの長さ(L)は、スペーサーの厚み(T)+14mmをご用意ください。
回転中心
また、Mt.Pを取り付ける側板厚は、15mm以上を使用してください。
※3 スペーサーの厚み(T)は、下記の計算式に従って計算してください (図4、9)。
スペーサーの厚み (T) = クリアランス [mm] + 扉側板厚 [mm] − 2.7 [mm]
20
扉の重心
20
重心までの距離
取付方法
図.6
1. 什器の設計・加工 (施工準備)
(1) 什器の設計
・什器を設計し、あらかじめ扉の回転中心を決めてください(図6、図7)。
(2) 什器本体の加工
・扉の回転中心を基準に、③マウンティングプレートを取り付ける箇所に、
M4×0.7のねじ穴を、左右4箇所ずつ開けてください(図6)。
木製什器の場合は、下穴を左右4箇所ずつ開けてください(図6)。
(3) 扉の加工
・扉の回転中心を基準に、扉にMt.Pが入るΦ42の穴を、左右共に開けて
ください(図7)。
・扉の回転中心を基準に、①ダンパー本体を取り付ける箇所に、M5×0.8
のねじ穴を左右2箇所ずつ開けてください(図7)。
木製什器の場合は、下穴を左右2箇所ずつ開けてください(図7)。
2×M5×0.8ねじ
2
Φ4
回転中心
60
図.7
スペーサー
③Mt.P
⑥又は⑧
2.マウンティングプレートの取り付け
(1) 什器本体と扉を重ね、それぞれの取付位置を合わせます(図8)。
(2) ③マウンティングプレートとスペーサーを重ね、⑥又は⑧の取付ねじで、
左右共に取り付けます(図9)。
3. 本体及び、カバーの取り付け
(1) ①ダンパー本体の穴に、③Mt.Pの軸を挿入し、⑤又は⑦の取付ねじで
左右共に固定します(図10)。
(2) ①ダンパー本体を④取付ねじで固定します(図10)。
(3) ②カバーを①ダンパー本体に被せて押し込み、固定します(図11)。
カバーの内側にあるツメが確実に入るまで押し込んでください。
! カバーを取付ける際は、工具などを使用して必要以上に強く叩かないで
ください。
図.9
図.8
⑤又は⑦
④取付ねじ
図.10
②カバー
図.11
2014.02 PRINTED IN JAPAN 0511-2 UDD R
Installation instructions
●Please read this instruction sheet carefully for proper installation and operation. Incorrect installation and improper use of the product may damage the
unit or cause injury.
●This damper is designed for furniture or lightweight door and is equipped with a damping function.
●Sugatsune guarantees the quality of this product as for all its parts. It cannot however guarantee the final assembly as a whole.
●This product was manufactured and delivered with our utmost care. Should you however find any defect, please contact your dealer immediately.
●Sugatsune warrants that this product is free from defect for a period of one(1) year from the date of shipment.
●Sugatsune liability is limited to the replacement of this product by a similar one free of charge. In no case does this extend to the replacement of the installation and/or
the cabinet as a whole.
●Please keep these instructions at hand for future use.
●Sugatsune cannot be held liable for any damage or injury caused by improper use of this product or by use for purposes other than the one originally designed.
●Specifications and dimensions are subject to change without prior notice for improvement, etc. Please check the details by the product.
●To remove tough dirt, wipe it off using mild detergent diluted in water. Do not use alcohol or thinners as such volatiles may cause damage to the
surface finish of the product.
! CAUTIONS Any failure to observe the following precautions may result in personal injury or damage to the cabinet.
●Do not use the impact screwdriver. This may lead to malfunction and breakage of the product.
●Make sure that installation position and specifications are followed. Unsuitable installation position may damage the mechanism when in case
two body are used together.
●Make sure that the damper is parallel with the side panel of the cabinet.
●Do not apply excessive force to open the door or push down the door to close it with a hand.
●This product is designed to operate at room temperatures between 5℃ to 35℃.
●Do not disassemble the body.
●It is necessary to periodically check the fixing screws for looseness. Tighten the loose screws as required.
Parts list
)
Cover
Φ
3
3
T (※
Body
⑥ Countersunk
⑤ Truss
⑦
Truss
⑧Countersunk
machine screw
① Body
②Cover
screw
Mt.P
tapping screw
tapping screw
(small head )
M5×8
5×12
3.5×L
※2
【Cross(for main body) M4×L ※1
section】
(for main body)
(for Mt.P)
(for Mt.P)
2pcs
2pcs
4pcs
③Mounting plate ④Fixing
Thickness of
4pcs
(Mt.P)
door side panel
screw
fig.3 In case of wooden furniture
fig.2 In case of acrylic/
fig.1
Clearance
metal furniture
20
Spacer
Cabinet
20
4×Φ4.2hole
fig.4 Spacer
Model selection
・Select a model of this product according to the range as shown ■Specifications (L/R pair) Fixed side
in the table.
Torque moment [N・m]
Model
・There are two directions of rotation that the damper operates:
clockwise (R) and counterclockwise (L).
1.0∼2.0
UDD - S - L (R)
・Be sure to select the same model out of S, M, and H models for
center
2.0∼4.0
UDD - M - L (R)
the right and left sides.
・The torque is different depending on the form and movable angle
4.0∼6.0
UDD - H - L (R)
of doors. Select a model after making sure the torque according
fig.5
to the following formula (Fig 5). Measure the distance between the
rotation center and the gravity center when the gravity center becomes
level (or closest to level) with the rotation center (the maximum torque).
4×M4×0.7
Torque moment = Door weight [kg] × 9.8 × Distance [m]
※1 Length of countersunk head machine screw (L) shall be at least:
thickness of spacer (T) + 5 mm
center
※2 Length of countersunk tapping screw (L) shall be at least: thickness of
spacer (T) + 14 mm.The thickness of side plate to fix the mounting plate
shall be at least 15 mm.
20
※3 Thickness of spacer (T) shall be calculated according to the following
formula (Fig 4, 9).
Thickness of spacer (T) = Clearance [mm] + Door Side panel thickness [mm] - 2.7 [mm]
fig.6
Center of
gravity
Distance to the
center of gravity
20
Installaiton
1. Design/processing of furniture (Preparation of installation)
(1) Design
・Design the furniture and determine the door’s center of rotation
before installation (Fig 6, 7).
(2) Preparation of furniture main body
・Based on the door’s rotation center, drill 4 screw holes (M4 x 0.7)
each on the right and left sides at the location where the mounting
plate should be fixed (Fig6). In case of wooden furniture, drill 4 pilot
holes each on both sides (Fig6).
(3) Preparation of door
・Based on the door’s rotation center, bore a Φ42 hole for a
mounting plate on both sides (Fig7).
・Based on the door’s rotation center, drill 2 screw holes (M5x0.8)
each on both sides (Fig7). In case of wooden furniture, drill 2 pilot
holes respectively (Fig7).
2×M5×0.8
2
Φ4
center
60
fig.7
Spacer
③Mt.P
⑥or⑧
2.Attaching the mounting plate
(1) Place the door on the furniture body with damper mounting
locations aligned (Fig8).
(2) Overlap the mounting plate and the spacer and fix them with fixing
screws on both sides (Fig9).
fig.9
fig.8
⑤or⑦
3. Mount the main body and cover
(1) Insert the axle of the mounting plate into the hole on the body of damper
and fix it using the mounting screws (⑤or⑦) on both sides (Fig10).
(2) Fix the damper body using fixing screw (Fig10).
(3) Put the cover on the damper body and push it to fix (Fig11).
Push the cover until tabs inside click into place.
④Finxing screw
②Cover
fig.10
ISO9001(Japan Offices and Sugatsune America) and ISO14001(Chiba Production division and Logistics center), certified.
8
Parts that Customer should provide
fig.11
© Copyright 2026 Paperzz