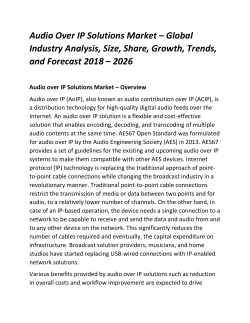
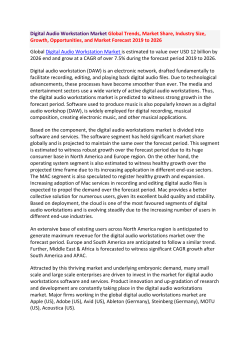
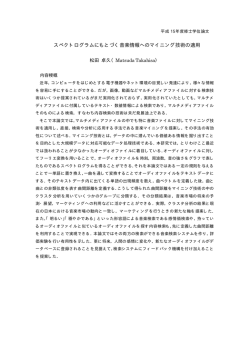
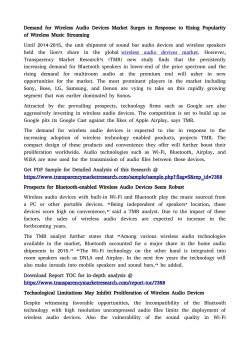
1 ADOBE PREMIERE: 3.1 MERGE AND SYNCHRONIZE VIDEO AND AUDIO Oftentimes when shooting a film or an interview, you will have your camera recording video and audio, but also have an external microphone recording audio for better quality. In this tutorial, you will learn how to merge these clips so that the video and audio recordings are synchronized. TIP: To make merging easier and more accurate, slate your video and audio with a clap. Merge Clips Select the video clip and its corresponding audio in the Project Panel. Right-‐ click and select “Merge Clips…” or go to Clip > Merge Clips… • A window will pop up where you can choose how you want the program to merge your video and audio. There are several ways to merge video and audio. The easiest method to merge is to go with “Audio”. The program will automatically scan audio waveforms from the video and the audio and line them up. (slating makes it easier to line up since there will be a distinct peak in the waveforms from a clap or a film slate). 2 If you try this method and the video and audio do not synchronize correctly, you may have to try the other options. The incorrect synchronization may be due to the lack of a slate or clap, and loud background noises that disrupt wave forms. If this is the case, set In or Out points in your video and audio clips at a distinguishable moment, whether that be the absolute beginning or the absolute end. Then, after selecting Merge Clips, set your synchronize point to “In Point” or “Out Point”. “Timecode” should only be used if your video and audio started and ended recording at the exact same moment, making the duration of each exactly the same. Under “Audio” you will find two options to check or leave unchecked. • To use timecode from an audio master clip to create a merged clip, click the “Use Audio Timecode From Clip” checkbox. Once it is clicked, choose the audio track you want to synchronize video with from the pop-‐up menu. To delete source camera audio from a clip, click the “Remove Audio From AV Clip” checkbox. Change the name of the clip to something distinguishable. The merged clip can be found in your Project Panel. If you did not change the name of the clip, it can be found as the name of the video clip that was merged with “-‐ Merged” at the end. 3 To add the clip to your timeline, drag it and drop it onto your timeline. Preview it to make sure that the audio synchronized correctly. If it did not synchronize correctly, try another method of merging found above. You will find in your timeline that your audio has two waveforms. Do not mistake these two waveforms as your camera vs your external microphone audio. These two waveforms are the left and right channel waveforms for Stereo Audio. Synchronize Clips Another way of synchronizing video and audio without creating a new clip in your project panel, drag your video and your audio onto your timeline on top of each other. They do not need to be lined up correctly. Now select the source audio (audio from the video) and the external microphone audio. Make sure you do not select the video as well. Right clip the selected audio tracks and select “Synchronize”. This window will pop up. To automatically synchronize them using the waveforms, select “Audio” , then “OK”. The audio tracks will line up. Listen to the playback to make sure that they lined up correctly.
© Copyright 2026 Paperzz