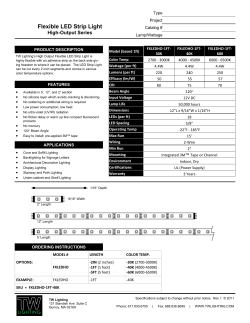
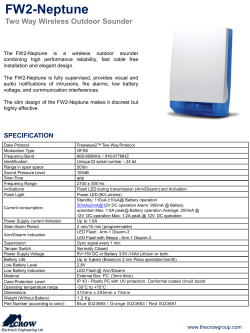
Wiring diagram LINEARdrive 180D
(LIN180D2)
Other connectors:
VDC and LED connectors:
1
AWG 24-16
0.2-1.5 mm 2
{
12 -28VDC IN
-
R
G
B
W
R
R
R
R
9 mm
0.35 inch
9 mm
0.35 inch
Ext in +
Ext in -
LED groups
2
2
+
AWG 20-16
0.5-1.5 mm 2
1
Max | Vdc+
TC
32V | Vdc-
LED supply +
DMX in -
DMX in +
DMX in DMX in shield
Ext in Ext in +
Group 1
DMX in +
DMX in shield
LedSync thru +
LedSync thru LedSync shield
Group 2
LINEARdrive 180D
12-28V / 6A Direct voltage controlled LED driver
Group 3
Group 4
M
LedSync thru +
LedSync thru LedSync shield
CAUTION: The device may only be connected and installed by a qualified electrician. All applicable regulations, legislation and building codes must be observed. Incorrect installation of the device can cause irreparable damage to the device and the connected LEDs.
12V - 28V DC IN
DMX in/LedSync thru
To connect the driver to a DC power supply unit (PSU), con-
Use these connectors when the driver is used in a DMX net-
nect the PSU’s positive voltage supply wire to the VDC+ con-
work.
nector and the PSU’s negative voltage supply wire to the VDC-
For DMX in, connect the network cable’s data+, data- and
connector.
shielding wire (the orange/white, orange and brown wire in a
CAT5 cable) to the DMX in+, DMX in- and DMX in shield con-
EXT in
You have the possibility to connect an external control device
(0-10V control device, 10kΩ potentiometer or show selection
switch) to the driver’s Ext in+ and Ext in- connector. Configure
the driver for use with an external control device over the 3button user interface.
nector respectively.
For LedSync thru, connect the network cable’s data+, dataand shielding wire (the orange/white, orange and brown wire
in a CAT5 cable) to the LedSync thru+, LedSync thru- and
LedSync shield connector respectively.
LED groups
Indicates the location of the connectors for your LED groups.
R(ed) represents channel 1, G(reen) represents channel 2,
B(lue) represents channel 3 and W(hite) represents channel 4.
The default group color allocation can be changed over the
3-button user interface.
© 2012 eldoLED. All rights reserved. V1.0
More product documentation and eldoLED’s terms and conditions are available at www.eldoled.com.
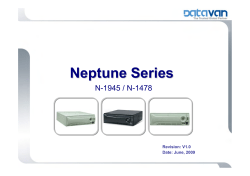
Wiring diagram LINEARdrive 180D
(LIN180D2)
Connecting an RGB LED strip
Maximum current per output at 12V: 2A
TC
Maximum current per output at 24V: 2A
RGB LED strip
LED supply +
Group 1
+
R
G
B
Group 2
Configuration of the LED groups:
Group 3
Group 4
Press M and + simultaneously, in the LED menu choose
RGB and save this setting by pressing M.
Compact
connector
e.g. Wago 222
Connecting an RGB strip and a white LED strip
Maximum current per output at 12V: 1.5A
RGB LED strip
TC
Maximum current per output at 24V: 1.5A
+
R
G
B
LED supply +
Group 1
Group 2
Configuration of the LED groups:
Group 3
Press M and + simultaneously, in the LED menu choose
White LED strip
Group 4
+
RGBW and save this setting by pressing M.
-
Compact
connector
e.g. Wago 222
Warm white LED strip
Connecting warm white and cool white LED strips
+
Maximum current per output at 12V: 1.5A
-
Maximum current per output at 24V: 1.5A
Cool white LED strip
TC
+
LED supply +
Configuration of the LED groups:
Group 1
Press M and + simultaneously, in the LED menu choose
Group 3
-
Warm white LED strip
Group 2
+
Group 4
4-4L and save this setting by pressing M.
-
Cool white LED strip
+
-
Compact
connector
e.g. Wago 222
Connecting four white or self-colored LED strips
White LED strip
Maximum current per output at 12V: 1.5A
+
Maximum current per output at 24V: 1.5A
-
White LED strip
TC
+
Configuration of the LED groups:
Press M and + simultaneously, in the LED menu choose
1-4L and save this setting by pressing M.
LED supply +
-
Group 1
Group 2
White LED strip
Group 3
+
Group 4
-
White LED strip
+
-
eldoLED Europe bv
eldoLED America, Inc.
Luchthavenweg 18a
1762 Technology Drive # 226
5657 EB Eindhoven
San Jose, CA95110
The Netherlands T +31 40 2054050
USA
T +1 408 451 9333
F +31 40 2054058
F +1 408 451 9335
[email protected]
[email protected]
© Copyright 2026 Paperzz