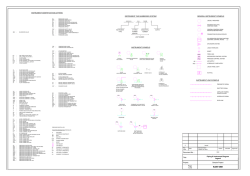
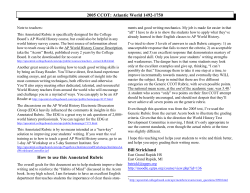
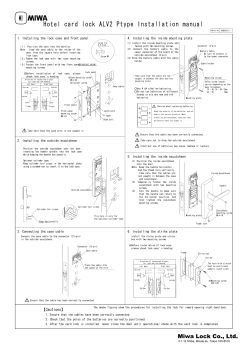
LED-В‐767 В RGBW В II В В В В В В В В В В В В В В В В В В В В В User В Manual В Please В read В the В instructions В carefully В before В use CONTENTS В 1. В Safety В Instructions....................................................................................................2 В 2. В Technical В Specifications............................................................................................3 В 3. В How В To В Set В The В Unit.................................................................................................4 В 3.1 В Control В Panel ......................................................................................................4 В 4. В How В To В Control В The В Unit..........................................................................................5 В 4.1 В Master/Slave В Built В In В Preprogrammed В Function................................................5 В 4.2 В Easy В CA-В‐8 В Controller...........................................................................................5 В 4.3 В DMX В Controller...................................................................................................6 В 5. В DMX В 512 В Configuration ............................................................................................7 В 6. В DMX В 512 В Connection................................................................................................8 В 7. В Troubleshooting .......................................................................................................9 В 8. В Fixture В Cleaning........................................................................................................9 В 1 1. В Safety В Instructions В В WARNING Please В read В the В instructions В carefully В as В they В include В important В information В about В installation, В usage В and В maintenance. В Please В keep В this В User В Manual В for В future В consultation. В If В you В sell В the В unit В to В another В user, В be В sure В that В they В also В receive В this В instruction В booklet. В п‚џ Unpack В and В check В carefully В there В is В no В transportation В damage В before В using В the В unit. В п‚џ Before В operating, В ensure В that В the В voltage В and В frequency В of В the В power В supply В match В the В power В requirements В of В the В unit. В В п‚џ It’s В important В to В ground В the В yellow/green В conductor В to В earth В in В order В to В avoid В electric В shock. В п‚џ The В unit В is В for В indoor В use В only. В Use В only В in В a В dry В location. В п‚џ The В unit В must В be В installed В in В a В location В with В adequate В ventilation, В at В least В 50cm В from В adjacent В surfaces. В Be В sure В that В no В ventilation В slots В are В blocked. В В п‚џ Disconnect В main В power В before В replacement В or В servicing. В В п‚џ Make В sure В there В are В no В flammable В materials В close В to В the В unit В while В operating В as В it В is В fire В hazard. В В п‚џ Use В safety В cables В when В installing В this В unit. В В п‚џ Maximum В ambient В temperature В is В Ta: В 40 В degrees В C. В DO В NOT В operate В it В where В the В temperature В is В higher В than В this. В п‚џ Turn В off В the В power В and В allow В about В 5 В minutes В for В the В unit В to В cool В down В before В servicing. В п‚џ In В the В event В of В a В serious В operating В problem, В stop В using В the В unit В immediately. В Never В try В to В repair В the В unit В by В yourself. В Repairs В carried В out В by В unskilled В people В can В lead В to В damage В or В malfunction. В Please В contact В the В nearest В authorized В technical В assistance В center. В Always В use В the В same В type В spare В parts. В п‚џ DO В NOT В touch В any В cables В during В operation В as В high В voltage В may В cause В electric В shock. В Warning: В п‚џ To В prevent В or В reduce В the В risk В of В electrical В shock В or В fire, В do В not В expose В the В unit В to В rain В or В moisture. В п‚џ The В housing В and В lenses В must В be В replaced В if В they В are В visibly В damaged. В 2 Caution: В There В are В no В user В serviceable В parts В inside В the В unit. В Do В not В open В the В housing В or В attempt В any В repairs В yourself. В In В the В unlikely В event В your В unit В may В require В service, В please В contact В your В nearest В dealer. В Installation: В The В unit В should В be В mounted В via В its В screw В holes В on В the В bracket. В Always В ensure В that В the В unit В is В firmly В fixed В to В avoid В vibration В and В slipping В while В operating. В Make В sure В that В the В structure В to В which В you В are В attaching В the В unit В is В secure В and В is В able В to В support В a В weight В of В 10 В times В of В the В unit’s В weight. В Also В always В use В a В safety В cable В that В can В hold В 12 В times В of В the В weight В of В the В unit В when В installing В the В fixture. В В The В equipment В must В be В installed В by В professionals. В It В must В be В installed В in В a В place В where В is В out В of В the В reach В of В people В and В no В one В can В pass В by В or В under В it. В 2. В Technical В Specifications В В п‚ё В 3 В DMX В channels: В Dimmer/Strobe, В Colour, В Rotation; В п‚ё В 3 В operation В modes: В DMX, В Master/Slave, В Sound В Active; В п‚ё В Built-В‐in В programs В in В Master/Slave В operation В triggered В by В music; В п‚ё В Full В range В dimmer В and В variable В strobe В effects; В п‚ё В Optional В easy В controller В CA-В‐8 В for В instant В lighting В shows; В в—‡ В Power В Voltage: В В В В В В В В В В В AC В 100~240V, В 50/60Hz В в—‡ В Power В Consumption: В В В В В В 23W В В Power В Cable В Daisy В Chains: В В 24 В Fixtures В Max. В (230V, В 50Hz) В В В В В В В В В В В В В В В В В В В В В В В В В В В 16 В Fixtures В Max. В (120V, В 60Hz) В в—‡ В LED В Sources: В В В В В В В В В В В В В 1 В Г— В 10W В CREE В Quad-В‐Color В LED В в—‡ В Weight: В В В В В В В В В В В В В В В В В 3.3Kgs В в—‡ В Dimension: В В В В В В В В В В В В В В 215 В Г— В 172 В Г— В 195mm В 3 3. В How В To В Set В The В Unit В В 3.1 В Control В Panel В В 1. В MICROPHONE: В Receives В music В signals В for В sound В active В mode; В 2. В ONLY В FOR В REMOTE В CONTROL: В Connects В with В the В optional В CA-В‐8 В to В control В the В unit; В В 3. В DMX В IN: В DMX В 512 В link, В use В a В 3-В‐pin В XLR В cable В to В link В the В unit В to В the В DMX В controller; В В 4. В DMX В OUT: В DMX В 512 В link, В use В a В 3-В‐pin В XLR В cable В to В link В to В the В next В unit; В В 5. В DIP В SWITCH: В Manually В selects В the В start В address; В 4 6. В FUSE В (T В 6.3A): В Protects В the В unit В from В over-В‐voltage В or В short В circuit; В 7. В POWER В OUT: В Connects В to В the В next В unit; В 8. В POWER В IN: В Connects В to В power В supply; В В 4. В How В To В Control В The В Unit В В You В can В operate В the В unit В in В three В ways: В В 1. В Master/slave В built-В‐in В pre-В‐program В function В В 2. В Easy В controller В (optional В CA-В‐8) В 3. В Universal В DMX В controller В You В do В not В need В to В turn В the В unit В off В when В you В change В the В DMX В address, В the В new В DMX В address В setting В will В take В effect В immediately. В В 4.1 В Master/Slave В Built В In В Preprogrammed В Function В В The В unit В can В be В linked В together В in В a В daisy В chain В using В as В many В units В as В you В need В in В master/slave В mode В to В perform В great В built-В‐in В pre-В‐programmed В lighting В shows В triggered В by В music. В In В Master/Slave В mode В refer В to В the В DMX В settings В below: В В Master В unit: В DMX В start В address В MUST В be В set В to В 001. В (First В DIP В switch В = В ON, В all В other В are В OFF) В Slave В units: В DMX В start В address В may В have В any В value В but В NOT В 001 В (example: В set В the В first В 3 В DIP В switches В to В ON) В п№ЎDipswitch В 2  “ON” В has В two В functions: В В 1. Performs В the В built-В‐in В pre-В‐programs В to В the В music. В 2. Auto В mode: В Eight В Chase(In В this В mode В press В dip В switch В 3 В and В this В will В change В the В direction В of В rotation, В press В dip В switch В 4,5,6 В to В change В the В speed) В п№Ў2-В‐light В show В Dipswitch В 10”off” В means В the В unit В works В normally В and  “on” В means В inversion. В In В order В to В create В a В great В light В show, В you В can В set В dip В switch В 10  ”on” В on В any В unit В that В is В linked В to В the В master В unit В to В get В contrast В movement В to В the В master В unit В even В if В you В only В have В two В units. В Dipswitch В 10 В on В the В first В (Master) В unit В is В no В use В for В the В 2-В‐light В show В as В it В is В the В master В unit В that В operates В the В light В show. В 5 4.2 В Easy В Controller В В The В CA-В‐8 В remote В control В is В used В only В in В master/slave В mode. В By В connecting В to В the В 1/4” В jack В socket В to В the В first В unit В you В will В find В that В the В remote В control В will В control В all В the В other В units В in В Stand В by, В Function В and В Mode В selection. В Stand В by В В Blackout В the В unit В 1. В Synchronous В Strobe В Rotation В Speed В 2. В Two В light В Strobe В Function В 1-В‐8 В 3. В Sound В Strobe В Mode В Strobe В (LED В OFF) В Rotation В (LED В ON) В 4.3 В DMX В Controller В В When В using В a В universal В DMX В controller В to В control В the В chain В of В units В you В have В to В set В a В DMX В address В with В Dip В switches В 1 В to В 9. В Dip В switch В 10 В is В used В to В select В channel В mode, В it’s В ON В means В 1 В channel В mode В and В OFF В means В 3 В channel В mode. В Please В refer В to В the В following В diagram В to В address В your В DMX В 512 В system В using В binary В code. В DMX В 512 В Address В Chart: В В Dip-В‐switches В # В 1 В # В 2 В # В 3 В # В 4 В # В 5 В # В 6 В # В 7 В # В 8 В # В 9 В #10 В Value В 1 В 2 В 4 В 8 В 16 В 32 В 64 В 128 В 256 В CH В mode   • В Examples: В 1-В‐CH В mode: В (Dip В switch В 10 В ON) В Channel В 1: В dip В / В on: В #1 В (=1) В Channel В 2: В dip В / В on: В #2 В (=2) В Channel В 3: В dip В / В on: В #1, В #2 В (1+2=3) В Channel В 4: В dip В / В on: В #3 В (=4) В В В В 6 3-В‐CH В mode: В (Dip В switch В 10 В OFF) В Channel В 1: В dip В / В on: В #1 В (=1) В Channel В 4: В dip В / В on: В #3 В (=4) В Channel В 7: В dip В / В on: В #1, В #2, В #3 В (1+2+4=7) В Channel В 10: В dip В / В on: В #2, В #4 В (2+8=10) В 5. В DMX В 512 В Configuration В В 1/3 В Channels В Mode: В 7 6. В DMX512 В Connection В В 1. The В last В units В DMX В has В to В be В terminated. В Use В a В 120 В ohm В 1/4W В resistor В between В pin В 2(DMX-В‐) В and В pin В 3(DMX+) В of В a В 3-В‐pin В XLR-В‐plug В and В plug В it В in В the В DMX В output В of В the В last В unit. В 2. Connect В the В units В together В in В a В `daisy В chain` В with В an В XLR В cable В from В the В output В of В the В unit В to В the В input В of В the В next В unit. В The В cable В can В not В branched В or В split В to В a В `Y` В cable. В В 3. The В DMX В output В and В input В connectors В are В pass-В‐through В type В to В maintain В the В DMX В circuit В even В when В one В of В the В units’ В power В is В disconnected. В 4. Each В fixture В unit В needs В to В have В an В address В set В to В receive В the В data В sent В by В the В controller. В The В address В number В is В between В 0-В‐512 В (usually В 0 В & В 1 В are В equal В to В 1). В 5. DMX В cabling В configuration В is В as В follows: В 3 В pin В XLR: В Pin В 1: В GND, В Pin В 2: В Negative В signal В (-В‐), В Pin В 3: В Positive В signal В (+) В В 8 7. В Troubleshooting В В Following В are В a В few В common В problems В that В may В occur В during В operation. В Here В are В some В suggestions В for В easy В troubleshooting: В A. В The В unit В does В not В work, В no В light В and В the В fan В does В not В work В 1. Check В the В connection В of В power В and В main В fuse. В B. В Not В responding В to В DMX В controller В 1. DMX В LED В should В be В on. В If В not, В check В DMX В connectors В and В cables В to В see В if В linked В properly. В 2. If В the В DMX В LED В is В on В but В no В response В check В the В address В settings В and В DMX В polarity. В 3. If В you В have В intermittent В DMX В signal В problems В check В the В cables В and В connectors. В 4. В Try В another В DMX В controller. В В В C. В No В response В to В the В sound В 1. Make В sure В the В unit В is В set В into В the В correct В mode. В 2. Check В the В microphone В by В tapping В it. В 3. Make В sure В the В fixture В is В not В set В into В Blackout В mode В 8. В Fixture В Cleaning В В Cleaning В must В be В carried В out В periodically В to В optimize В light В output. В Cleaning В frequency В depends В on В the В environment В in В which В the В fixture В operates: В damp, В smoky В or В particularly В dirty В surrounding В can В cause В a В greater В accumulation В of В dirt В on В the В unit’s В optics. В п‚џ Clean В with В soft В cloth В using В normal В glass В cleaning В fluid В or В mild В soapy В water. В п‚џ Always В dry В the В parts В carefully. В п‚џ Clean В the В external В optics В at В least В every В 30 В days. В В В В В В В 9 Declaration В of В Conformity В В We В declare В that В our В products В (lighting В equipments) В comply В with В the В following В specification В and В bears В CE В mark В in В accordance В with В the В provision В of В the В Electromagnetic В Compatibility В (EMC) В Directive В 89/336/EEC. В В EN55103-В‐1: В 2009 В ; В EN55103-В‐2: В 2009; В EN62471: В 2008; В EN61000-В‐3-В‐2: В 2006 В + В A1:2009 В + В A2:2009; В EN61000-В‐3-В‐3: В 2008. В В & В Harmonized В Standard В В EN В 60598-В‐1:2008 В + В All:2009; В EN В 60598-В‐2-В‐17:1989 В + В A2:1991; В В EN В 62471:2008; В EN В 62493: В 2010 В Safety В of В household В and В similar В electrical В appliances В Part В 1: В General В requirements В В В 10 Innovation, В Quality, В Performance В 11
© Copyright 2026 Paperzz