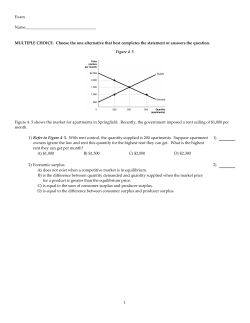
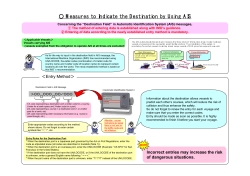
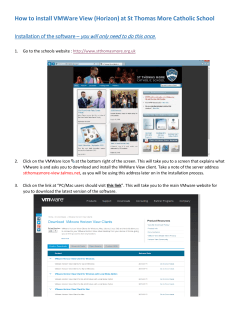
/A F PD AG ls o o FT PD 3-Heightsв„ў PDF Desktop Producer Version 4.3 User Manual Contact: [email protected] Owner: PDF Tools AG Kasernenstrasse 1 8184 BachenbГјlach Switzerland http://www.pdf-tools.com Copyright 2001-2014 3-Heightsв„ў PDF Desktop Producer, Version 4.3 Page 2 of 50 February 11, 2014 Table of Contents 1 Introduction .......................................................................................... 4 1.1 Description ............................................................................................4 1.2 Functions ...............................................................................................4 1.2.1 Features ...........................................................................................5 1.2.2 Formats ............................................................................................5 1.2.3 Compliance .......................................................................................6 1.3 Operating Systems..................................................................................6 1.4 Applications ...........................................................................................6 1.5 Understanding the 3-Heightsв„ў PDF Producer .............................................6 1.6 Packages ...............................................................................................8 1.6.1 Software Kits.....................................................................................8 1.6.2 Documentations.................................................................................8 1.7 Glossary ................................................................................................9 2 Installation .......................................................................................... 11 2.1 Interactive Installation .......................................................................... 11 2.2 Automated Installation using MSIEXEC .................................................... 13 2.3 Uninstall .............................................................................................. 15 2.4 Troubleshooting .................................................................................... 16 2.4.1 Un-installation fails .......................................................................... 16 2.4.2 Error 126 ........................................................................................ 16 2.4.3 Error 1722 ...................................................................................... 16 2.4.4 Printing via PDF Producer blocks Applications ...................................... 16 3 Configuration ....................................................................................... 17 3.1 3.2 3.3 4 Printer Properties .................................................................................. 17 Document Settings ............................................................................... 18 MS Office Add-In .................................................................................. 18 Configuration of the 3-Heightsв„ў PDF Producer .................................... 20 4.1 Printer Properties .................................................................................. 20 4.1.1 General .......................................................................................... 20 4.1.2 Sharing........................................................................................... 21 4.1.3 Ports .............................................................................................. 21 4.1.4 Advanced ........................................................................................ 24 4.1.5 Color Management ........................................................................... 24 4.1.6 Security .......................................................................................... 24 4.1.7 Device Settings................................................................................ 25 4.2 Document Settings ............................................................................... 26 4.2.1 Paper/Output .................................................................................. 26 4.2.2 Graphics ......................................................................................... 27 4.2.3 Document Options ........................................................................... 28 4.3 XML Stamp File..................................................................................... 31 4.3.1 Syntax............................................................................................ 32 4.3.2 Example ......................................................................................... 33 5 Configuration of the 3-Heightsв„ў TIFF Producer ................................... 35 5.1 Printer Properties .................................................................................. 35 PDF Tools AG – Premium PDF Technology 3-Heightsв„ў PDF Desktop Producer, Version 4.3 Page 3 of 50 February 11, 2014 5.1.1 General .......................................................................................... 35 5.1.2 Sharing........................................................................................... 35 5.1.3 Ports .............................................................................................. 36 5.1.4 Advanced ........................................................................................ 36 5.1.5 Color Management ........................................................................... 36 5.1.6 Security .......................................................................................... 37 5.1.7 Device Settings................................................................................ 37 5.2 Document Settings ............................................................................... 38 6 How to print from a Windows Application ............................................ 41 7 Document Conversion Accuracy ........................................................... 43 7.1 7.2 7.3 7.4 8 Convert from Office Document to PDF ................................................. 46 8.1 8.2 8.3 9 Known Issues of the GDI and EMF Spooler System ................................... 43 Conversion Accuracy Settings ................................................................. 43 GDI Specification Coverage .................................................................... 44 Conversion Accuracy Testing Tool ........................................................... 45 Convert MS Excel Tables ........................................................................ 46 Print from the Internet Explorer .............................................................. 48 Create a Print Job using Windows Calls .................................................... 49 Client and Server Data Flow................................................................. 50 PDF Tools AG – Premium PDF Technology 3-Heightsв„ў PDF Desktop Producer, Version 4.3 Page 4 of 50 February 11, 2014 1 Introduction 1.1 Description The 3-Heightsв„ў PDF Producer creates files compliant with PDF and PDF/A from any Windows application via the print function. PDF/A has been acknowledged world-wide as the ISO standard for long-term archiving since 2005. PDF/A documents can also be created at the touch of a button from within Microsoft Office Suite and displayed automatically thanks to a plug-in. The OEM version offers software development partners a multitude of additional options. The product is characterized by its high speed and the outstanding quality of its PDF/A-compliant conversions. 1.2 Functions The PDF Producer converts documents from any Windows application into PDF, PDF/A or TIFF. Page format, compression and other parameters are customizable. Fonts can be embedded, whereby either the entire font set is stored or only the subset of characters actually used in the document. The viewer integrated in the desktop version displays the file immediately after conversion. The OEM version can handle multiple print jobs at the same time. Synchronous generation means that the files are available again immediately after conversion - a huge benefit for integration in applications. PDF Tools AG – Premium PDF Technology 3-Heightsв„ў PDF Desktop Producer, Version 4.3 Page 5 of 50 February 11, 2014 1.2.1 Features Select PDF conformity: 1.4 and later, PDF/A-1, PDF/A-2, PDF/A-3 Automatically detect and adjust portrait and landscape formats Use Unicode and ANSI font sets including Asian font sets (Chinese, Japanese and Korean) Print in color or grayscale Set image compression quality (e.g. JPEG) Select resolution Embed fonts and form subsets Set compression for bi-tonal images (G3, G3-2D, G4, JBIG2, ZIP, Packbits) Set compression for indexed images (LZW) Set compression for color and grayscale images (JPEG, ZIP) Encrypt and password-protect files; set access authorization rights Select from more than 100 standard page formats Down-sample images (optional) Linearize PDF files Embed fonts (optional) Subset fonts (optional) Set standard settings for all users Set customized settings per user Port monitor for automated and configurable post-processing of generated PDF files Port pool for parallel document creation in multi-user environments (Terminal Server, Citrix) Synchronous and asynchronous document creation Predefined settings in TIFF Producer (Fax N, bi-tonal, grayscale, RGB, CMYK) Automatic resolution limitation to prevent memory space problems 1.2.2 Formats Input Formats: The tool accommodates all input formats supported by the print function of the proprietary application (e.g. Microsoft Word). PDF Producer Output Formats: PDF 1.4, 1.5, 1.6, 1.7 PDF/A-1b, PDF/A-2u, PDF/A-3u TIFF Producer Output Formats: PDF Tools AG – Premium PDF Technology 3-Heightsв„ў PDF Desktop Producer, Version 4.3 Page 6 of 50 February 11, 2014 Bi-tonal: o uncompressed o CCITT G3 o CCITT G3-2D o CCITT G4 o LZW o ZIP o Packbits Grayscale (4 or 8 bit), RGB and CMYK: o uncompressed o LZW o JPEG o JPEG (old) o ZIP o Packbits 1.2.3 Compliance ISO 19005-1 (PDF/A-1), ISO 19005-2 (PDF/A-2) , ISO 19005-3 (PDF/A-3) ISO 32000 (PDF 1.7) 1.3 Operating Systems Windows XP SP 2, Windows Server 2003– 32 and 64 bit Windows Vista, 2008, Windows 7, Windows Server 2008-R2, Windows 8, Windows Server 20013 on Intel – 32 and 64 bit 1.4 Applications PDF creation on-the-fly Microsoft Office Add-Ins Server-based document conversion for all types of file formats, such as Internet Explorer HTML, MS Office documents, etc. Integration in enterprise applications, e.g. archiving systems 1.5 Understanding the 3-Heightsв„ў PDF Producer If you are not familiar with this product or not sure about its application area and functionality, please read this chapter first. It describes the concept and idea and is PDF Tools AG – Premium PDF Technology 3-Heightsв„ў PDF Desktop Producer, Version 4.3 Page 7 of 50 February 11, 2014 important to be understood. It covers briefly what this product can and what it cannot. The following section applies to the "3-Heightsв„ў PDF Producer" and "3-Heightsв„ў TIFF Producer", which will be abbreviated as "Producer". 1. From an application’s point of view is the functionality and control of the Producer equivalent to any other printer driver. This means: 2. The Producer must be used in combination with a Windows application that has the ability to print. A PDF or TIFF file is produced by the printer driver which interprets the Windows GDI calls from the printing application. For more details, see also chapter "GDI Specification Coverage". Example: A way to create a PDF from an MS Word document, is open the document with MS Word (see example), use the print functionality of MS Word and select the "3-Heights(TM) PDF Producer" as printer. 3. The Producer does neither have the ability to read the native file, nor does it have the functionality to print it on paper (e.g. the MS Word file). 4. The API, which is only available for the OEM version does not change the above concept. A feature of the API is to add XMP metadata. The samples that are provided do not use the API of the Producer. All sample programs open or create from scratch a document and print it. This is done using libraries which provide these functionalities (and not the Producer). This can be done using any programming language. The VB.NET and the Delphi samples converting MS Word documents to PDF use the COM API of the MS Word Object. The document is opened, read and printed using objects of the MS Word Object. The Producer is provided as printer. This is achieved by passing the name of the printer as sting to a function of the Word API. The C sample uses GDI calls to create a document and print it. The program consists of Windows GDI commands only. The Producer is used as printer. PDF Tools AG – Premium PDF Technology 3-Heightsв„ў PDF Desktop Producer, Version 4.3 Page 8 of 50 February 11, 2014 1.6 Packages 1.6.1 Software Kits The 3-Heightsв„ў PDF Producer comes in three different software kits. Table: Software Kits Product Code Product Name Description CRED PDF Desktop Producer The standard version of the 3-Heightsв„ў PDF Producer. Its installation is performed using Setup.exe. It provides a-ready-to-use MS Word plug-in. CREA, CREC PDF Producer Developer Kit The developer kit of the 3-Heightsв„ў PDF Producer allows for creating custom plug-ins (e.g. a Word plug-in) using the producer-API. Its installation is performed using either pdfprninstaller.exe or the OEM installationAPI. CREB PDF Producer Runtime Kit Runtime kits are used for computers where a product is installed that was created using the PDF Producer Developer Kit. Compatibility Notes: Before the product CRED became available, the product code of the standard version of the PDF Producer was also CREA. In previous versions, the CRED was called “PDF Producer (as Printer Driver)”, it was renamed to “PDF Desktop Producer”. 1.6.2 Documentations There are two manuals. Table: Manual Manual Product Name cred.pdf PDF Desktop Producer Description This documentation contain information mainly used by the end-user, such as: The installation routine using Setup.exe Configurations and document settings How to print from a Windows application Samples for printing applications It is packaged into the CRED software kit or available for PDF Tools AG – Premium PDF Technology 3-Heightsв„ў PDF Desktop Producer, Version 4.3 Page 9 of 50 February 11, 2014 download here: http://www.pdftools.com/public/downloads/manuals/cred.pdf crea.pdf PDF Producer Developer Kit This documentation contains information for developers, such as: The installation routine using pdfprninstaller.exe The Installation interface The Licensing interface It does not contains end-user and configuration information, for that please refer to the manual “cred.pdf”. It is packaged into the CREA software kit or available for download here: http://www.pdftools.com/public/downloads/manuals/crea.pdf Compatibility Note: In versions prior to 1.8.21.1 there was one documentation for all software kits, which was named “crea.pdf” and a separate add-on called “crea_oem.pdf” describing OEM interfaces. Old documentations are obsolete. 1.7 Glossary This chapter should provide a quick overview of the most important key words that are used in this documentation. Printer In terms of the Windows operating system a printer is an object which can be accessed by a printing Windows application to create print jobs. Printers are listed in the window “Printers”. See also chapter “Installation using pdfprninstaller.exe”. Examples for names of Printers: 3-Heights(TM) PDF Producer 3-Heights(TM) TIFF Producer HP Laser Jet 4050 Series PS Names of printers can be defined by the user. Commonly a printer is also referred to a hardware device that is able to print a hard copy of a file. However this type of printer is not mean in this manual. Printer Driver A printer driver is a piece of software that is used by the printer to translate data from the printing application (GDI) to a format that is understandable by the printer device. The most common formats are PostScript and PCL. The 3-Heightsв„ў PDF Producer Driver creates PDF. Printer drivers can be selected in the “Advanced” tab of a printer’s property dialog. Multiple printers can use the same printer driver. PDF Tools AG – Premium PDF Technology 3-Heightsв„ў PDF Desktop Producer, Version 4.3 Page 10 of 50 February 11, 2014 Printer drivers often have the same name as the printer by which they are used. For that reason the terms “printer” and “printer driver” are confused frequently. Example for names of Printer Drivers: 3-Heightsв„ў PDF Producer Driver HP Laser Jet 4050 Series PS Names of printer drivers are given by the manufacturer. Port Every printer has a port. The port defines to where documents are sent, such as a printer port, or a file port. Examples for Ports: 3-Heights(TM) Port LPT1, LPT2, COM1, COM2 An IP address FILE Port Monitor A port monitor is a piece of software that is monitoring a port and processing data sent to that port. The 3-Heights(TM) PDF Port Monitor is monitoring the 3-Heightsв„ў Port and saves the documents at the location that is configured in the port monitor and optionally post-processes them (e.g. opens them in a PDF viewing application). Print Job A print job is a series of pages that are printed as one job. When printing to a physical device, all pages of a print job are printed on paper before the next print job starts. When printing to the 3-Heightsв„ў PDF Producer, all pages of the same print job are printed into the same PDF file. PDF Tools AG – Premium PDF Technology 3-Heightsв„ў PDF Desktop Producer, Version 4.3 Page 11 of 50 February 11, 2014 2 Installation 2.1 Interactive Installation This is the standard installation process for the PDF Desktop Producer (Product code: CRED). 1. When using Windows 7, log in as administrator. If you cannot log in as administrator, you can log in as a user with administrator privileges. In this case there is an additional step to do at the end of the installation. On other platforms, log in as user with administrator privileges. 2. Uninstall any old version of the 3-Heightsв„ў PDF Producer. 3. Download the latest final release version from http://www.pdf-tools.com/pdf/pdf-producer.aspx 4. The 3-Heightsв„ў PDF Producer is delivered as a ZIP archive, with a name similar to CRED200WIN32.zip depending on the version you are using. Unzip this archive to an installation dictionary, e.g. C:\PDF Producer. 5. Inside the ZIP archive you find a file named “3Heights(TM) PDF Producer.msi”. If this is not the case, you are using a different version of the PDF Producer, please see chapter “Packages”. Double-click the MSI file and the dialog below will show up. Press the button “Next” if you wish to proceed. PDF Tools AG – Premium PDF Technology 3-Heightsв„ў PDF Desktop Producer, Version 4.3 February 11, 2014 6. Carefully read the license agreement. You must accept to license agreement in order to proceed to installation. Press the button “Next”. 7. Select the setup type. “Complete” installs the 3Heightsв„ў PDF Producer and all its sub-components. “Custom” allows for individually selecting which sub-components shall be installed. 3-Heightsв„ў TIFF Producer (Optional) Install in addition to a PDF producer a TIFF producer. Add-In for MS Office (Optional) Install and register an Add-In for the MS Office suite. On all platforms the OfficeAddin.DLL is installed. On 64 bit platforms, an additional 64 bit version of the add-in (OfficeAddin64.dll) is installed and registered. Open output file when printing completed (Optional) Install a feature to automatically open the created PDF or TIFF file after creation. PDF Tools AG – Premium PDF Technology Page 12 of 50 3-Heightsв„ў PDF Desktop Producer, Version 4.3 Page 13 of 50 February 11, 2014 8. The 3-Heights PDF (and TIFF) Producers should now be listed in the window “Devices and Printers”. 9. This step is only required on Windows 7 and if you did not install the PDF Producer as administrator. Left-click the PDF Producer and select “Printer Properties”. Under “Security”, remove the user entry under which the PDF Producer was installed. After that, you will have button “Change Properties” under “General”. If you want to change properties, that button needs to be pressed first. 2.2 Automated Installation using MSIEXEC This is a description how the 3-Heights(TM) PDF Producer can be installed using the Microsoft Installer MSIEXEC and its incorporated additional functionalities. This is used for automated installation, e.g. for deployment. Type the following command to retrieve the usage of MSIEXEC: PDF Tools AG – Premium PDF Technology 3-Heightsв„ў PDF Desktop Producer, Version 4.3 Page 14 of 50 February 11, 2014 msiexec /? The following command launches the installer of the 3-Heights(TM) PDF Producer without any additional parameters. It is basically the same as starting (double-clicking) the MSI file directly: msiexec /i "3-Heights(TM) PDF Producer.msi" If you would like to log the installation, use the switch /l. The following command logs all information except verbos and extra debugging messages: msiexec /l* installation.log /i "3-Heights(TM) PDF Producer.msi" You can use 3-Heights(TM) PDF Producer specific configuration settings via MSI properties on the command line. Supported settings (properties) are: PDFPORT_NAME PDFPORT_COMMAND PDFPRINTER_NAME PDFPORT_PROMPTNAME=0 (default 1, prompt enabled) TIFFPORT_PROMPTNAME=0 (default 1) PDFPORT_ADDTIMESTAMP=1 (default 0) TIFFPORT_ADDTIMESTAMP=1 (default 0) PDFPORT_ADDUSER=1 (default 0) TIFFPORT_ADDUSER=1 (default 0) PORTPOOLSIZE=10 (default 1; maximum: 20) PRINTDIRECT=1 (default 0/No, i.e. use spooling) Note: TIFF printer entries will by default use the same port(s) as PDF entries. If you want to configure different port settings for the PDF and TIFF printer entries, you must also configure different port directories. The following command defines the name of the directory to which the port monitor outputs documents. Note that the path must always end with a backslash: msiexec /i "3-Heights(TM) PDF Producer.msi" PDFPORT_NAME="C:\Documents and Settings\All Users\Documents\PDF Outbox\" The following command sets the printer name: msiexec /i "3-Heights(TM) PDF Producer.msi" PDFPRINTER_NAME="My 3Heights(TM) PDF Producer" Here is an example which combines several settings: PDF Tools AG – Premium PDF Technology 3-Heightsв„ў PDF Desktop Producer, Version 4.3 Page 15 of 50 February 11, 2014 msiexec /qb /l* i.log /i "3-Heights(TM) PDF Producer.msi" PDFPORT_NAME="C:\Documents and Settings\All Users\Documents\PDF Outbox\" (Due to a "feature" of Windows, it is not possible to pass the string "%FILE%" as argument. (""%%FILE%%"" is transformed to " %FILE%"). Instead the argument should be passed as Q-FILE-Q, MSIUTIL replaces this by "%FILE%".) For PDFPORT_PROMPTNAME and TIFFPORT_PROMPTNAME use value вЂ�0’ to disable the prompt. By default the file name prompt is enabled. It is also possible to control the feature set to be installed. The package consists of the following MSI feature set and hierarchy: PDFProducer (contains the PDF Producer driver, port monitor, API DLL, printer installer and port explorer executables, the manual and readme file) o TIFFProducer (contains the TIFF printer driver) o OfficeAddin (contains the 32 bit MS Office plugin) o OfficeAddin64 (contains the 64 bit MS Office plugin) o ShellOpen (contains the support for automatically opening the output file) SDK (contains the software development kit) The INSTALLLEVEL for PDFProducer is 1, and 90 for ShellOpen (making this the default features). TIFFProducer has an INSTALLLEVEL of 200, OfficeAddin 110, OfficeAddin64 120, and SDK 300. Furthermore, PortExplore.exe has an installation condition of PE<>”N”. To install just the PDF printer and the automatic file open support, you would specify the following command: msiexec /qb /l* i.log /i "3-Heights(TM) PDF Producer.msi" ADDLOCAL=PDFProducer,ShellOpen PE=N The silent de-installation stops processes that have driver DLLs loaded. There are two silent modes. Option "/qb" allows for popup; "/qn" suppresses popups. 2.3 Uninstall If you have installed and registered the 64 bit version of the Office Add-in, first unload the add-in from the office application (to remove the button from Normal.dot) or unregister it. Then proceed with the un-installation. If you installed the PDF Producer using Setup.exe, go to Start -> Programs -> 3Heights(TM) PDF Producer -> Uninstall 3-Heights(TM) PDF Producer. If the un-installation process fails, restart the print spooler service and retry. Note that restarting the spooler means that all current print jobs are aborted. If it still fails, restart the system and retry. If the restart does not help, consult the chapter troubleshooting. PDF Tools AG – Premium PDF Technology 3-Heightsв„ў PDF Desktop Producer, Version 4.3 Page 16 of 50 February 11, 2014 2.4 Troubleshooting 2.4.1 Un-installation fails If you have trouble uninstalling an expired version of the 3-Heightsв„ў PDF Producer, please follow the first three steps described at the following website: http://www.pdf-tools.com/pdf/Support/FAQ/Article.aspx?name=Uninstall-Expired-Producer 2.4.2 Error 126 Should the installation or un-installation fail with the error 126 (Error message: The specified module could not be found), verify the PATH environment variable is set correctly and does not include any invalid directories. To verify or change the PATH environment variable, open System from the Control Panel. In the tab Advanced, click on Environment Variables… Under System variables, find and select the entry Path, then press the Edit… button underneath it. Remove any invalid directories. 2.4.3 Error 1722 Commonly error 1722 occurs when the 3-Heightsв„ў PDF Producer is trying to being installed or uninstalled whilst the print spooler is stopped. Start to print spooler to resolve this error. 2.4.4 Printing via PDF Producer blocks Applications Printing via a PDF Producer printer entry works like printing through any Windows printer: print jobs are serialized to pass one by one to the configured printer port. This can block the printing application, if other applications are also using the same printer and port, and if printing is configured to not use spooling. There are two parameters that permit performance tuning in these cases: 1) The printer’s advanced setting “direct printing”: if “direct printing” is configured, change this to “Spool print documents…” 2) Port pooling: make use of port pooling for the PDF printer, and increase the number of ports to a sufficiently large count Note: if you anticipate that multiple users and/or application will be using the same printer(s) and port(s), you can specify the necessary parameters via command line during the installation (see PORTPOOLSIZE and PRINTDIRECT parameters). Note 2: when configuring port pooling with multiple ports, make sure to configure all port settings identically to ensure deterministic behavior. PDF Tools AG – Premium PDF Technology 3-Heightsв„ў PDF Desktop Producer, Version 4.3 Page 17 of 50 February 11, 2014 3 Configuration The configuration of either the 3-Heightsв„ў PDF Producer or the 3-Heightsв„ў TIFF Producer is done at two different places: Printer Properties Document Settings Printer properties are set per printer. Document settings are set per user (or all users). This chapter gives a brief overview for both producers. Detailed configuration information is found at the in the corresponding chapters for the PDF and TIFF Producers. Configurations applied in the printer are persistent. In a Windows application that is printing a document, specific settings for each document can be applied. Document settings configured from within an application are volatile and are only valid for a print job, or a series of print jobs. After the application is closed, the document settings are lost. If document settings are not defined at the time of printing from an application, the default values (current user’s document settings) are applied. 3.1 Printer Properties Printer Properties define the properties of the Windows printer. These are: Printer Name Network Sharing Ports Windows Security etc. Once you install either the 3-Heightsв„ў PDF Producer or the 3-Heightsв„ў TIFF Producer, you can use the Properties dialog box to set its properties. You access the Printer Properties dialog box by doing the following: Windows 2000: Double-click on the Printers icon in the Control Panel or select Settings in the Start menu and then choose the Printers option. Windows XP: Double-click on the Printers icon in the Control Panel or select Printers and Faxes in the Start menu. Right-click on the icon of the printer you want to configure and then select Properties from the pop-up menu. Printer properties are set per printer. If multiple sets of printer properties (e.g. different ports or different network sharing) are required, multiple instances of the producer need to be installed. PDF Tools AG – Premium PDF Technology 3-Heightsв„ў PDF Desktop Producer, Version 4.3 Page 18 of 50 February 11, 2014 3.2 Document Settings Document settings define how a PDF or TIFF document is to be produced. The settings are different for the PDF and TIFF Producer. They include for example: Orientation Paper Size Color Resolution Image Compression etc. Document settings can be set for all users or for the current user. To configure the current user’s document settings: In the tab "General" of Printer Properties dialog box, press the button "Printing Preferences…". To configure the default document settings for all users: In the tab "Advanced", press the button "Printing Defaults…". This operation requires administrator rights. Doing either opens the document settings dialog box. 3.3 MS Office Add-In The installation process also installs an MS Office Add-in. The add-in is available in the following applications: MS Word MS PowerPoint MS Excel The add-in allows for creating PDF documents via mouse click directly from MS Office applications. It comes with a button that is labeled "Save to PDF/A" (English) or "PDF/A Speichern" (German). Pressing that button prints the current document to the 3-Heightsв„ў PDF Producer with PDF/A-1b settings. If multiple instances of the 3-Heightsв„ў PDF Producer are installed, and one of them is set as default Windows printer, the Word plug-in picks that one. Otherwise it chooses a random instance. Metadata from the MS Office document’s properties are mapped to XMP metadata of the PDF as described in Table: Mapping of Metadata. The table includes the names of the English and German MS Office. Of course the plug-in also works in other languages. Table: Mapping of Metadata XMP (PDF) MS Office (English) MS Office (German) pdfaid:part 1 1 pdfaid:conformance B B PDF Tools AG – Premium PDF Technology 3-Heightsв„ў PDF Desktop Producer, Version 4.3 Page 19 of 50 February 11, 2014 dc:title <Title> <Titel> dc:creator <Author> <Autor> dc:description <Comments> <Kommentar> dc:subject <Subject> <Thema> dc:source <Name of document (path)> <Name des Dokuments (Dateipfad)> xmp:CreatorTool <Microsoft Word or Microsoft Excel or Microsoft PowerPoint> <Microsoft Word oder Microsoft Excel oder Microsoft PowerPoint> pdf:Keywords <Keywords> <StichwГ¶rter> xmp:CreateDate <Date of creation> <Datum der Erstellung> PDF Tools AG – Premium PDF Technology 3-Heightsв„ў PDF Desktop Producer, Version 4.3 Page 20 of 50 February 11, 2014 4 Configuration of the 3-Heightsв„ў PDF Producer After installing the 3-Heightsв„ў PDF Producer, its default settings are set to factory defaults. The default values can be adjusted and set individually for the current user or for all users. The current user’s document setting are by default applied to any document printed using the 3-Heightsв„ў PDF Producer. 4.1 Printer Properties 4.1.1 General This tab lists the printer name, and optionally the location and a comment of the printer. It also lists the default features of printers, such as color, and available paper sizes. Press the button "Printing Preferences…" to open a dialog box for the current user’s personal default document properties. A description of the available features that can be configured is available in the chapter Document Settings. Press the button "Print Test Page" in order to print a one-page test page to the PDF Producer. PDF Tools AG – Premium PDF Technology 3-Heightsв„ў PDF Desktop Producer, Version 4.3 February 11, 2014 4.1.2 Sharing Specify the name if the printer is shared. Check the "List in the Directory" box to publish the shared printer in the Active Directory and thereby allow users to search for the printer based on its capabilities and location. 4.1.3 Ports The installation process automatically installs a port monitor called "3-Heights(TM) Port Monitor", and creates a new instance of this type. This is the default port after installation. The port has the name that was defined during the installation. The default is .\PDF OutBox\. which means the output is stored in the sub-directory “PDF OutBox” of the user’s “My Documents” directory. This requires that only users who have such a folder on the target system may submit print jobs otherwise the operation will fail. Alternatively an absolute path can be defined, such as: C:\PDF OutBox\. The port monitor handles any document that is sent to a port of the type "3-Heights(TM) Port". PDF Tools AG – Premium PDF Technology Page 21 of 50 3-Heightsв„ў PDF Desktop Producer, Version 4.3 Page 22 of 50 February 11, 2014 The path may contain system variables, such as %TEMP%. If you would like to not use the 3-Heights(TM) Port, but another port, such as FILE, you can reset it by checking another port. Press the button "Configure Port…" to view and edit the settings of the port. By checking "Make File Names Unique" (Alt-U) documents with the same name are automatically renamed, by adding a number in brackets to the file name. If it is not checked, output files with the same name overwrite each other. "Remove file name prefixes": With this box checked file name some predefined prefixes such as "Microsoft Word –" etc. are removed from the resulting file name. This configuration parameter is set by default. Check "Prompt file name" if you wish a dialog box to be prompted and asking for the file name every time a document is created. User’s Tip: Ports can also be set by certain printing application. For example in the print dialog of MS Word, there is a check box "Print to File", if checked, the port "FILE" is used for this particular print job. If the application does not allow for selecting the port, but it is required to print to different ports, one can simply install multiple instances of the PDF Producer, each with different ports and select the port by selecting a different instance of the PDF Producer. This trick can also be applied for other settings of the printer (e.g. one instance produces PDF/A another produces regular, web-optimized PDF). Multiple Ports The 3-Heightsв„ў Port Monitor Version 4.1.26.0 and later supports printer pooling. This allows creating multiple ports for the same PDF Producer. The port monitor delegates the print job to the first free port. As a result, documents can be created in parallel. It is suggested to use 1 to 4 ports, but not more than available CPUs. The ports can be of different port types and/or have different configurations (e.g. different output directories). When printing directly to the FILE port, only one port is required, because this port supports parallel processing implicitly. To enable multiple ports, do the following steps: Create additional instance of the 3-Heightsв„ў PDF Port Monitor In the tab “Ports” tick the box “Enable printer pooling”. Tick all ports that should be part of the pool PDF Tools AG – Premium PDF Technology 3-Heightsв„ў PDF Desktop Producer, Version 4.3 Page 23 of 50 February 11, 2014 Execute Program after Creation of PDF By checking "Execute Command" (Alt-X) a command can be specified, which is executed after the file is created. The placeholder %FILE% can be used as a variable of the file name. This feature can be used for example to launch an application to display the PDF after it is created. Extended path names must be included in "quotation marks" like for shell commands. Depending on the command the placeholder may or may not require quotation marks: "%FILE%". Here are some sample commands: "C:\PDF Tools\bin\ViewerPro.exe" "%FILE%" "C:\Program Files\Adobe\Acrobat 7.0\Acrobat\Acrobat.exe" "%FILE%" The command is executed under the account that submitted the print job. In order to execute different commands for different instance of the 3-Heightsв„ў PDF or TIFF Producer, multiple ports of the type 3-Heightsв„ў Port Monitor must be installed and configured individually. If this option is active then the specified command line executable has access to environment variables of the printing user’s session. In addition to the %FILE% variable the %COPIES% and %COLLATE% variables are replaced by the corresponding values in the device mode (i.e. printer settings). The command line may also contain variables from the system environment in the command. The variable %FILE% is reserved and is automatically replaced by an empty string. The same applies to invalid variables. (System Variables can be listed using the command вЂ�set’ in the command prompt.) Example, assuming %VIEWERPATH% is defined (e.g. as “C:\Program Files\PDF Viewer”): "%VIEWERPATH%\viewer.exe" "%FILE%" Execute a Script The command can only start processes. In order to start a batch script (.bat, .cmd) the executable cmd.exe needs to be started with the batch file as parameter. Example for an Execute Command: C:\Windows\system32\cmd.exe /c start C:\run.bat "%FILE%" And the content of the referred batch file C:\run.bat "C:\Program Files\PDF Tools AG\bin\viewer.exe" %1 exit If the script resides at a location whose path contains blanks, the path can be set using /Dpath, where вЂ�path’ is an existing directory written in quotes. C:\Windows\system32\cmd.exe /c start /D"C:\sp ace\" run.bat "%FILE%" PDF Tools AG – Premium PDF Technology 3-Heightsв„ў PDF Desktop Producer, Version 4.3 Page 24 of 50 February 11, 2014 Time in File Name By ticking the checkbox “Add time to file” name, the resulting file name is automatically given a prefix with the current time. The prefix consists of 17 characters representing the current date (including year, month, day, hour, minutes, seconds, milliseconds) and an underscore. Example: 20110219082359777_ stands for 2011, February 19, 08:23:59 and 777 ms 4.1.4 Advanced Creating PDF Synchronously vs. Asynchronously In order to create PDF documents synchronously check the radio button "Print directly to the printer" in the "Advanced tab" (default). This means the print command returns once the print job is closed and the PDF is complete. In order to create PDF documents asynchronously check the radio button "Spool print documents so program finishes printing faster". This means at the time the print command returns the PDF is potentially not yet completed, but only in queue, and the application can proceed without waiting until it’s finished. Printing Defaults Pressing the button "Printing Defaults…" opens the document settings for all users. If the 3-Heigthsв„ў PDF Producer is shared, these will be the default document settings for all users. In order to modify these settings, the logged-in user must have the proper access-rights. User’s document settings defined in General -> "Printing Preferences…" overrule these document settings. 4.1.5 Color Management Not supported at this time. 4.1.6 Security Set the Windows standard permissions that you can allow and deny for users and groups. PDF Tools AG – Premium PDF Technology 3-Heightsв„ў PDF Desktop Producer, Version 4.3 February 11, 2014 4.1.7 Device Settings The tab Device Settings shows a subset of the document settings. These are the factory defaults for the settings PDF Compliance Level, Character Encoding, Fonts and Image Quality. They are read- only. PDF Tools AG – Premium PDF Technology Page 25 of 50 3-Heightsв„ў PDF Desktop Producer, Version 4.3 Page 26 of 50 February 11, 2014 4.2 Document Settings Document settings define how a PDF document is to be produced. For example it defines what version of PDF shall be created, or what type of image compression shall be applied, shall fonts be embedded or not, etc. Document settings can be set persistently for the current user, or default settings for all users, or individually and volatile when printing from an application, see chapter "How to print from a Windows application". Current user: Under the tab General, press on the button "Printing Preferences…". All users: Under the tab Advanced, press the button "Printing Defaults…". User’s Tip: The initial value of the current user is defined by the All user setting. Once the current user has a setting, changes in the default for all users have no impact on already existing current user settings. 4.2.1 Paper/Output The paper format and output orientation are usually controlled by the printing application. (e.g. Paper size and format of a Word document). Paper Size: All paper sizes installed on the system (including the 118 Windows default paper sizes) are available for selection. Default: A4 Orientation: Choose between Portrait and Landscape orientation. Default: Portrait User’s Tip: To add additional (custom) paper sizes, do the following steps: Open the “Printers” window (Win 2000: Start -> Settings -> Printers, Win XP: Start -> Printers and Faxes) From the menu “File” select “Server Properties” In the tab “Forms” check the box “Create a New Form”, specify the paper size and press the button “Save Form”. (Note that PDF limits paper sizes to 14399x14399 points.) PDF Tools AG – Premium PDF Technology 3-Heightsв„ў PDF Desktop Producer, Version 4.3 Page 27 of 50 February 11, 2014 4.2.2 Graphics Print Quality: Define the resolution of rendering. Available settings are: - High (1200 dpi) - Medium (600 dpi) - Low (300 dpi) - Draft (150 dpi) - Display High (120 dpi) - Display Low (96 dpi) The print quality has different impacts: 1. PDF Producer: The selected resolution is applied by the PDF Producer. It affects down-sampling images as well as the precision for the calculation of coordinate systems, e.g. for text and graphics. 2. Printing application: The set print quality is reflected in the device capabilities. This means the printing application renders (or should render) with the appropriate resolution. Effects of that are: - The application may (or may not) apply up or down-sampling of images. - Due to rounding to full pixels, at low resolution, the coordinate system may be missing one pixel to render the last character of a word, whereas in higher resolution it fits in. As a result line and page breaks (e.g. of MS Word) can vary with different resolutions. (These effects are related to the Windows printing architecture, which does not support wysiwyg). Generally a higher print quality results in a visually better output at the cost of a larger file size. However selecting a too high print quality may result in the printing application up-sampling images, which does not necessarily improve the quality but only increase the file size. Default: Low Color: Gray scale uses one color channel, whereas color requires at least three channels. Therefore gray scale PDF documents will in general have a smaller file size. Default: Color ICM Method: Set the Image Color Management (ICM) to one of the following settings: - "Disabled" - handled by Windows - handled by the PDF Producer Default: Disabled The ICM Intent: - Colormetric: For matching a particular color. - Contrast: Optimized for Photographic images. PDF Tools AG – Premium PDF Technology 3-Heightsв„ў PDF Desktop Producer, Version 4.3 Page 28 of 50 February 11, 2014 - Saturation: Optimized for Presentation graphics. Default: Colormetric 4.2.3 Document Options Pages Per Sheet (вЂ�N-Up’): This setting allows for placing multiple pages (1, 2, 4, 6, 9, 16) on one sheet. Default: 1 Character Encoding: Sets the character encoding of fonts. This is important if the text must be extracted later. - UNICODE: A 16 bit character encoding that can be used for most languages. - Windows ANSI: An extension to ASCII, using 256 defined characters. Default: UNICODE Rotate Landscape Pages: Set whether landscape page should be rotated or not. The available options are: - None - Clockwise - Counter-Clockwise Default: None Use a back buffer: Use a memory buffer to support complex operations such as binary and ternary raster operations. On documents where these operations are not applied, enabling the back buffer comes with an increase of processing time. For unusually-formed documents, using the back buffer may as well come with a better performance. Default: No Down-sample Images: Automatically down-sample images if their resolution exceeds the value defined in the "Print Quality". Requires the back buffer to be enabled. Re-sampling adjusts the image and optimizes it for a defined resolution. It always comes with a loss in information as it alters the original image. The 3-Heightsв„ў PDF Producer only down-samples, it never up-samples. Default: Yes Rasterize Pages: Store each page of the output PDF as one rasterized image that is rendered by the GDI. The benefit of using this option is that any visual content can be rendered, as the conversion to PDF operations is not required. The downside is a usually larger file size and the loss of vector and text objects. Default: No Fast Web View (linearize): Add so called linearization tags to the document. A linearized document has a slightly larger file size than a non-linearized file, and provides the following features (among others): PDF Tools AG – Premium PDF Technology 3-Heightsв„ў PDF Desktop Producer, Version 4.3 Page 29 of 50 February 11, 2014 - When a document is opened through a PDF viewing application plug-in for an Internet browser, the first page can be viewed without downloading the entire PDF file. - When another page is requested by the user, that page is displayed as quickly as possible and incrementally as data arrives, without downloading the entire PDF file. Default: No Compliance Level sets the PDF version. Supported are - PDF 1.4 (Corresponds to Acrobat 5 and higher) - PDF 1.5 (Corresponds to Acrobat 6 and higher) - PDF 1.6 - PDF 1.7 - PDF/A-1b - PDF/A-2u - PDF/A-3u Selecting PDF/A-1b automatically adjusts other settings. Among other requirements, in PDF/A fonts must be embedded, JPEG2000 compression is not allowed, etc. See also note about PDF/A in the chapter Features. Selecting PDF/A-2u creates a document, which is compliant to PDF/A-2 levels B and U. Default: PDF/A-2u Fonts Embedding: A font can be embedded as a resource into a PDF document. This ensures the document is portable and the font displays equally on different systems. Embedding a font file however increases the file size of PDF document. Default: Yes The following fonts are only embedded if embedding is selected: PDF Standard ZapfDingbats) Fonts (Helvetica, Courier, Times Roman, Symbol and Common fonts that are available on basically every operating system, such as "Arial", "Times New Roman" The following fonts will always be embedded: - Fonts for uncommon characters, e.g. Asian characters - Fonts that use uncommon glyphs, e.g. Hello WorldпЂ - Symbolic fonts, e.g. пЃЎпЂўпЂҐ - Barcode fonts Default: Yes Subsetting an embedded font means only the characters that are actually used are embedded in the document. This has the advantage of reducing the file size, in particular for Asian fonts, which can be several Megabytes in size. On PDF Tools AG – Premium PDF Technology 3-Heightsв„ў PDF Desktop Producer, Version 4.3 Page 30 of 50 February 11, 2014 the other hand, if the document is modified at later time, only the characters that are already used are available and not the complete font. Default: Yes True Type Font: Not supported at this time. Image Quality: Set the compression types for bi-level, indexed and continuous tone images. - JPEG Quality: Set the compression quality for JPEG compressed images, allowed values are 1 to 100. A higher value results in an image with a visually higher quality and a larger file size. A lower value uses a higher compression rate that comes with a visually lower quality and a smaller file size. Default: 80% - Bi-level: None No compression CCITT G3 CCITT Fax Group 3 CCITT G3-2D CCITT Fax Group 3-2D CCITT G4 CCITT Fax Group 4 JBIG Joint Bi-level Image Experts Group ZIP Flate compression Default: CCITT G4 - Indexed: None ZIP No compression Flate compression Default: ZIP - Continuous: None No compression JPEG Joint Photographic Expert Group ZIP Flate compression Default: JPEG Encryption: Select between "None" and "High (128-bit RC 4)". A PDF/A document may not be encrypted. 128 bit encryption requires PDF Version 1.4 (Adobe Acrobat 5) or later to read. - User Password: The password to open the document. If a user password is set, the application displaying the document (e.g. Acrobat Reader) will pop up a box asking for a password. At this point, either the user or the owner password must be provided. The user password is optional. - Owner Password: The password to change the security settings (permission flags and passwords) of the document. The owner password is required to be set if any sort of encryption is applied. - Permissions: Annotate: This option sets the permissions of annotations. Annotations are interactive features, such as form fields, check boxes, sticky notes, links, file attachments, etc. 1. None PDF Tools AG – Premium PDF Technology 3-Heightsв„ў PDF Desktop Producer, Version 4.3 Page 31 of 50 February 11, 2014 2. Fill Form Fields (including Signing) 3. Annotate Document, Fill Form Fields (including Signing) Default: None Print: This option sets if and at which quality printing the document is allowed. 1. None 2. Low Resolution (150 dpi) 3. High Resolution Default: None Extract: Allow mark and extraction of text and graphics. 1. None 2. Extract Text and Graphics in Support of Visually Impaired Users 3. Extract Text and Graphics for any Purpose Default: None Author: This option document is allowed. defines whether modifying the actual 1. None 2. Insert, Rotate and Delete Pages 3. Assemble Document and Create or Modify Form Fields (including Signature Fields) Default: None Stamp File: Set the path to an XML stamp file. The stamp file can add content such as text or images to defined pages. See chapter "XML Stamp File". Default: None 4.3 XML Stamp File In the "Printing Preferences" of the PDF Producer optionally a stamp file can be defined. This stamp file is an XML file defining one or multiple stamps that are to be added onto the pages of the created PDF document. The stamps can consist of text or images or both and can be applied to selected pages. There are two separate stamp files: one for the foreground and one for the background. PDF Tools AG – Premium PDF Technology 3-Heightsв„ў PDF Desktop Producer, Version 4.3 Page 32 of 50 February 11, 2014 4.3.1 Syntax Tags, Attributes-Names, Attribute-Values The Namespace of the PDF stamp. The namespace can contain multiple stamps. ps:pdfstamp xmln:ps http://www.pdf-tools.com/pdfstamp/ Stamp ps:stamp page first, even, odd The pages to which the stamp is to be applied. Commaseparated combinations are allowed. first First page last Last page odd Only odd pages including first page and last page in case it is odd even Only even pages including last page in case it is even all All pages not_first First page excluded not_last Last page excluded ps:rotate Rotate Stamp angle n Rotate by n degrees counter-clockwise, e.g: 90 origin x y Set the origin of the rotation in points, e.g. 100 100 ps:transform matrix a b c d x y Coordinate Transformation The transformation matrix, to scale rotate, skew, translate, etc the stamp, e.g: Identiy: 1 0 0 1 0 0 Scale by factor 2: 2 0 0 2 0 0 Translate 50 points left, 200 up: 1 0 0 1 50 200 Rotate by x: cos(x), sin(x), -sin(x), cos(x) 0 0 For 90 (=pi/2) that is: 0 1 –1 0 0 0 ps:translate offset x y filltext color r g b Coordinate Translation The x (horizontal) and y (vertical) offset in points. A translation by x y is equal to a transformation by 1 0 0 1 x y. Add Filled Text The color as RGB value, where all values must be from 0 to 1, e.g: Red: Green: Black: Gray: 1 0 0 1 0 0 0.5 0 0 0 0.5 0.5 PDF Tools AG – Premium PDF Technology 3-Heightsв„ў PDF Desktop Producer, Version 4.3 Page 33 of 50 February 11, 2014 position x y The position in points on the PDF (A4 = 595 x 842 points, letter = 612 x 792 points), e.g. 200 300 Font path The path to the font that is to be used, e.g: C:/Windows/Fonts/Arial.ttf size n The font size in points, e.g. 12 text text The text that is to be written, e.g. Hello World Add Stoked Text (Outlined Text) stroketext For parameters see filltext. linewidth f Set the linewidth in points, e.g. 1.0. color r g b See filltext position x y See filltext Font path See filltext size n See filltext text text See filltext Add an Image ps:image rect x y w h The rectangle where the image is to be placed at. x,y correspond the the location (origin at lower left corner), and w,h to width and height, e.g: 100 200 50 50 filename path The path to the file, e.g: C:\pictures\image1.jpg compression value By default bi-tonal images are compressed with G4, continuous tone images with JPEG and indexed images with flate. To explicitly set the compression use this property. Support values are: Flate Flate encoded DCT DCT encoded CCITTFax CCITT G4 encoded 4.3.2 Example <?xml version="1.0" encoding="UTF-8"?> <ps:pdfstamp xmlns:ps="http://www.pdf-tools.com/pdfstamp/"> <ps:stamp page="first"> <ps:rotate angle="90" origin="100 100"> <ps:image rect="100 100 50 25" filename="c:/images/img1.jpg"/> </ps:rotate> </ps:stamp> <ps:stamp page="even"> PDF Tools AG – Premium PDF Technology 3-Heightsв„ў PDF Desktop Producer, Version 4.3 Page 34 of 50 February 11, 2014 <ps:transform matrix="1 0 0 1 0 0"> <ps:filltext color="1 0 0" position="200 300" font="C:/Windows/Fonts/Arial.ttf" size="12" text="Hello, World"/> </ps:transform> </ps:stamp> <ps:stamp page="all, not_last"> <ps:translate offset="20 20"> <ps:stroketext linewidth="1.0" color="0.3 0.3 1.0" position="200 300" font="C:/Windows/Fonts/Arialbd.ttf" size="11" text="Watermark"/> </ps:translate> </ps:stamp> </ps:pdfstamp> PDF Tools AG – Premium PDF Technology 3-Heightsв„ў PDF Desktop Producer, Version 4.3 Page 35 of 50 February 11, 2014 5 Configuration of the 3-Heightsв„ў TIFF Producer 5.1 Printer Properties In the printer properties dialog box, the tabs General, Sharing, Port, Advanced, Color Management, Security and Device Settings are available. 5.1.1 General Set the name of the printer and optionally a location and comment. Pressing the button Printing Preferences… opens the current user’s document settings. Pressing the button Print Test Page prints a 1-page test page to the TIFF Producer. 5.1.2 Sharing See chapter Sharing for the 3-Heigthsв„ў PDF Producer. PDF Tools AG – Premium PDF Technology 3-Heightsв„ў PDF Desktop Producer, Version 4.3 Page 36 of 50 February 11, 2014 5.1.3 Ports The installation process automatically installs the 3-Heightsв„ў Port Monitor if not already installed and creates a new port of this type. The port has the name that was defined during the installation. For example C:\Documents and Settings\All Users\Documents\OutBox\ The port monitor handles any document that is sent to a port of the type "3-Heights(TM) Port". To change the port, check another port, e.g. FILE: Click "Configure Port…" to view the settings of the port. 3-Heights(TM) Port The port name cannot be changed after the installation. By checking "Make File Names Unique" documents with the same name are automatically renamed, by adding a number in brackets to the file name. If it is not checked, output files with the same name overwrite each other. By checking the box "Execute Command", an command can be provided, which is executed after a TIFF document is created. For further information, see the corresponding chapter "Execute Program after Creation of PDF" in the PDF Producer section. 5.1.4 Advanced See chapter Advanced for the 3-Heigthsв„ў PDF Producer. 5.1.5 Color Management Not supported at this time. PDF Tools AG – Premium PDF Technology 3-Heightsв„ў PDF Desktop Producer, Version 4.3 Page 37 of 50 February 11, 2014 5.1.6 Security Set the Windows standard permissions that you can allow and deny for users and groups. 5.1.7 Device Settings The tab Device Settings shows the factory defaults of the document settings. They are read-only. PDF Tools AG – Premium PDF Technology 3-Heightsв„ў PDF Desktop Producer, Version 4.3 Page 38 of 50 February 11, 2014 5.2 Document Settings Document settings define how a TIFF document is to be produced. For example it defines the resolution, color depth, or what type of image compression is applied, etc. Document settings can be set for all users or for the current user. To configure the current user’s settings: In the tab "General", press the button "Printing Preferences…". To configure the default settings for all users: In the tab "Advanced", press the button "Printing Defaults…". Doing either will show the graphical interface for the 3Heightsв„ў TIFF Producer Printing Preferences. There are default profiles available for the various TIFF Class: Fax Standard, Fax High Red, Bilevel, Grayscale and Color. The default values of these profiles are listed in the table: Default Profiles. Each default profiles has default values for color space, orientation, bits per component, resolution, compression and fill order. Some of the values can be modified, some cannot. e.g. when selecting Fax Standard, the default compression is CCITT G4, but it can be altered to CCITT G3, G3-2D, all other settings cannot be altered. The TIFF class profile Custom allows for individually adjusting any settings. Note, that not all combinations are allowed, e.g. a G4 compression always requires 1 bit per component. The table below shows the default TIFF Class profiles. A value on a gray background indicates it cannot be altered while that specific profile is active, a bold value indicates it can be altered. Table: Default Profiles Parameter Color Space Orientation Bits per Comp Resolution (dpi) Compression Fill Order Fax Standard Gray Portrait 1 204 x 98 CCITT G4 MSB first Fax High Res Gray Portrait 1 204 x 196 CCITT G4 MSB first Bilevel Gray Portrait 1 200 x 200 CCITT G4 MSB first Grayscale Gray Portrait 8 150 x 150 LZW MSB first Color RGB Portrait 8 150 x 150 LZW MSB first PDF Tools AG – Premium PDF Technology 3-Heightsв„ў PDF Desktop Producer, Version 4.3 Page 39 of 50 February 11, 2014 Custom any any 1/4/8 any any MSB first Orientation: Set the orientation of the paper (the TIFF) to either Portrait or Landscape. Paper Size: Select one of more than 100 paper sizes. Color Space: Select from Gray, RGB and CMYK color space. Bits per Component: Select the color depth. Available values listed in the table below: Table: Bits per Component Bits per Component Color Space (Components) Bits per Pixel 1 Gray (1) 1 4 Gray (1) 4 8 Gray (1) 8 8 RGB (3) 24 8 CMYK (4) 32 Resolution X, Y: Set the resolution in dots per inch (dpi). Typical values are 150 dpi for color and 200 or more dpi for bi-tonal images. Fax Tiffs have always a horizontal resolution of 204 dpi and a vertical resolution of either 98 dpi (Fax Standard) or 196 dpi (Fax High Res). Compression: All available types of compression and color space combinations are listed in the table TIFF Formats. Compatibility Note: In versions prior to 2.0.22.0, the JPEG compressions had different names. “JPEG” was named “JPEG (old)” and “JPEG Technote #2” was named “JPEG”. Compression Quality: The value can be set from 1 (lowest) to 100 (highest). The default is 75. Fill Order: Set the fill order of the bits. Available orders are MSB (most significant bit) first and LBS (least significant bit) first. PDF Tools AG – Premium PDF Technology 3-Heightsв„ў PDF Desktop Producer, Version 4.3 Page 40 of 50 February 11, 2014 Table: TIFF Formats Color Space Compression 3-Heigthsв„ў PDF Viewer Pro 1.8 Photoshop 8 Acrobat 7 MS Office 12: Picture Manager Kodak Imaging for Windows (W2000) Windows Picture and Fax Viewer (XP) Paint 6.0 (Vista) Paint 5.1 (XP) Windows Photo Gallery (Vista) Bi-tonal None x x x x x x x x CCITT G3 x x x x x x x x CCITT G3-2D x x x x x x x x CCITT G4 x x x x x x x x LZW x x x x x x x x ZIP x x x Packbits x x x x x x x x x x x x x x x x LZW x x x x x x x x JPEG (Technote #2) x x x JPEG x x x ZIP x x x Packbits x x x x x x x x None x x x x x x x x LZW x x x x x x x x JPEG (Technote #2) x x JPEG x x x ZIP x x x Packbits x x x x x x x x None x x x x x x x x LZW x x x x x x x x JPEG (Technote #2) x x x JPEG x ZIP x x x Packbits x x x x x x x Grayscale None RGB CMYK x x x x x Supported PDF Tools AG – Premium PDF Technology 3-Heightsв„ў PDF Desktop Producer, Version 4.3 Page 41 of 50 February 11, 2014 6 How to print from a Windows Application Once the 3-Heightsв„ў PDF Producer is installed, it can be used as any other printer driver. However instead of printing to a physical printer device, it creates PDF documents. If not defined differently, the default values are applied, see chapter "How to configure the 3-Heightsв„ў PDF Producer default values". It is possible to adjust these default values when printing from an application by configuring the document settings. Document settings can be configured at the time a document is printed. They can be set individually for each print job. (Print job in this case means producing a PDF document.) In order to configure the document settings, do the following steps: 1. From the Windows application select the print function. 2. Select the printer driver with the name "3-Heights(TM) PDF Producer". 3. Press the button "Properties". The window of the printer dialog is provided by the application and is therefore different for each application. As an example a screenshot of the MS Word dialog is shown here: A description of the available features that can be configured is available in the chapter Document Settings. PDF Tools AG – Premium PDF Technology 3-Heightsв„ў PDF Desktop Producer, Version 4.3 Page 42 of 50 February 11, 2014 Here is a description of the work flow when a user prints a document from a Windows application using the 3-Heightsв„ў PDF Producer. 1. A user creates / opens a document using a Windows application, e.g. MS Word. 1. User creates document 2. 3. He uses the print functionality of the application to print the document. The print dialog is provided by the application and therefore looks differently for different applications. In the print dialog the printer driver "3Heights(TM) PDF Producer" is selected. Current document is shown 2. User selects print functionality Print Dialog is shown Optionally the print dialog may allow to modify the document settings. 4. If document settings can be edited, the document settings dialog of the 3Heightsв„ў PDF Producer is shown. The default values are the user document settings. If modifying document settings is not allowed by the application printer dialog, the default values (i.e. the user document settings) are used for the print job. 5. The user confirms and initiates the print job. The application prints the document. The 3-Heightsв„ў PDF Producer creates a PDF document. 3. User selects printer 3-Heightsв„ў PDF Producer driver Print Dialog optionally may allow adjusting the document settings Yes No 4. User presses button for Printer Properties Document settings dialog of the PDF Producer is shown 5. User confirms and starts print job Document is printed 3-Heightsв„ў PDF Producer produces PDF document User Actions Application PDF Tools AG – Premium PDF Technology PDF Producer 3-Heightsв„ў PDF Desktop Producer, Version 4.3 Page 43 of 50 February 11, 2014 7 Document Conversion Accuracy The PDF Producer has been designed to map the printed appearance of the source document’s pages into an accurate representation in the PDF document. This is one of the reasons why the PDF Producer has been implemented without any dependencies to existing drivers such as the PostScript driver with its known limitations. However, there are inherent limitations regarding conversion accuracy which are given by the Windows spooler architecture, in particular the limitations of the GDI and EMF interface specification. Furthermore, some settings influence the conversion accuracy. 7.1 Known Issues of the GDI and EMF Spooler System Direct Printing vs. Spooling Direct printing produces the PDF output file synchronously during the print operation which means that the PDF file creation finishes at the same time as the print operation completes. Spooling produces an intermediate EMF spool file which is converted asynchronously meaning that the print operation terminates earlier than the PDF file creation. Direct printing produces more accurate results than spooling in general. The following operations are not supported by GDI when choosing spooling: Pattern brushes to stroke lines Certain types of bitmap operations 7.2 Conversion Accuracy Settings Back Buffer Usually a printer driver (e.g. the PostScript driver) assumes that the target page is a paper sheet. Thus, complex graphics features such as transparency blending is not supported. In general, all raster operations which require “reading” from the target surface are not supported. Enabling the back buffer performs all complex raster operations in memory before sending the result to the target surface, in this case the PDF page. If simple raster operations are used which do not require a back buffer, it is not used. Enabling the back buffer increases conversion accuracy but makes the resulting PDF file in general bigger. Down-sample Images If the resolution of a raster image is higher than the desired resolution (see print quality), then the number of samples is reduced to match the desired resolution. Down-sampling reduces the quality of the image (usually only visible when zooming) but reduces the size of the resulting PDF file in general. PDF Tools AG – Premium PDF Technology 3-Heightsв„ў PDF Desktop Producer, Version 4.3 Page 44 of 50 February 11, 2014 Print Quality This setting defines the resolution of the target page. Although PDF is a resolution independent format, the print quality influences how coordinates are rounded to integers. This has an impact on the positioning of bitmaps, graphics and text. Furthermore, if downsampling is enabled then the print quality defines the resulting resolution of the image. Finally, the print quality defines the resolution of the back buffer if it is enabled. Increasing the print quality makes Rasterize Page This setting converts the page description in a single raster image which constitutes the page of the resulting PDF file. This setting has a similar effect as using the back buffer but rasterizes all content independent whether the back buffer is required or not. This setting is mainly used to protect the page content from being extracted - the document cannot be searched anymore. Rasterizing the page significantly increases the file size in general. JPEG Quality 7.3 The JPEG compression reduces the size of raster images at the price of inaccurate visual details which are usually not observed in photographic images. This setting defines a trade-off between the loss of visual accuracy and compression ratio. GDI Specification Coverage The creation of PDF files with the 3-Heigthsв„ў PDF Producer is accomplished by printing a document to a special printer driver that produces a PDF data stream instead of a printer hardware specific PostScript or HPPCL data stream. In order to do so, applications must use the Windows GDI (graphics device interface) and the printer spooler functions. The GDI specification has been extended with each new version of the Microsoft Windows operating system. The 3-Heightsв„ў PDF Producer printer driver is based on the GDI specification for Windows 2000 and newer systems (XP, Windows 2003 Server, VISTA). All required printer driver functions including alpha blended, parallelogram shaped, color keyed and masked bitmaps as well as gradient fills have been implemented and will produce high quality PDF renderings. The printer driver capabilities are: 24-Bit device surface Constant alpha, per pixel alpha (transparency is replaced with white if compliance is PDF/A-1b) Gradient rectangles, Gradient triangles Alternate and winding fills of shapes Arbitrary opaque brushes for text background rectangles BГ©zier curves Vector fonts: TrueType, OpenType and Type1 Geometric wide strokes Fonts that have an inherent vertical writing direction PDF Tools AG – Premium PDF Technology 3-Heightsв„ў PDF Desktop Producer, Version 4.3 Page 45 of 50 February 11, 2014 JPEG compressed bitmaps The following capabilities are not yet implemented but planned in future releases: CMYK color space ICM color management 7.4 Conversion Accuracy Testing Tool PDF Tools AG provides tool to test the conversion accuracy of the PDF and TIFF producer. It can freely be downloaded at www.pdf-tools.com/public/downloads/resources/testafw.zip It can used to experiment with various settings and compare the PDF and TIFF producer with products from other vendors (e.g. the PostScript driver). PDF Tools AG – Premium PDF Technology 3-Heightsв„ў PDF Desktop Producer, Version 4.3 Page 46 of 50 February 11, 2014 Samples 8 Convert from Office Document to PDF From the MS Office application select the "Print" command. A printer dialog window will be shown. This window depends on the application. The MS Word printer dialog shown here: As printer driver name select the "3Height(TM) PDF Producer". Click on "Properties" in order to adjust the settings. Make sure "Print to file" is unchecked if such a checkbox is available. Press "OK". The document is now printed to a PDF which is saved in the corresponding output folder. 8.1 Convert MS Excel Tables When sending an MS Excel table to the 3-Heightsв„ў PDF Converter it is important to ensure the print quality of the document is not set to "High". The print quality mainly influences the quality of images, but it also sets the precision of text positioning. When PDF Tools AG – Premium PDF Technology 3-Heightsв„ў PDF Desktop Producer, Version 4.3 Page 47 of 50 February 11, 2014 converting Excel Tables this should be set to "Low" or "Medium". Otherwise the creation of the PDF takes a lot of memory and is time consuming. To apply this setting to an Excel document: Open the document in MS Excel. Click on the print button or select “Print” from the menu. The "Print" dialog opens. Select the 3-Heights(TM) PDF Producer, click on the button "Properties". The "3-Heights(TM) PDF Producer Document Properties" windows opens. In the menu "Graphics", set "Print Quality: Low". Save the document. PDF Tools AG – Premium PDF Technology 3-Heightsв„ў PDF Desktop Producer, Version 4.3 February 11, 2014 8.2 Print from the Internet Explorer Using the Microsoft Internet Explorer 6, it is suggested to use the following steps in order to receive a good result: From the "File" menu, select "Page Setup…". Press the button "Printer…" select the "3-Heights (TM) Producer". and PDF Press the button "Properties…" to set the document settings. When done press "OK" to close the dialog. From the menu "File", select "Print", select the "3-Heights (TM) PDF Producer" and print the document. PDF Tools AG – Premium PDF Technology Page 48 of 50 3-Heightsв„ў PDF Desktop Producer, Version 4.3 Page 49 of 50 February 11, 2014 8.3 Create a Print Job using Windows Calls There is a C example available at samples/sample.c, that shows how to print “Hello World”. The relevant steps are: Open the printer OpenPrinter(). driver "3-Heights(TM) PDF Producer" using the call Get the document settings. Create device context for the printer. Begin a print job, and thereby set the document relevant information such as document name, output path and data type. Begin a page. Create a font, taking into account the resolution. Write the text "Hello World". Cleanup the page. Terminate the page and the print job. Cleanup the document. PDF Tools AG – Premium PDF Technology 3-Heightsв„ў PDF Desktop Producer, Version 4.3 Page 50 of 50 February 11, 2014 9 Client and Server Data Flow On a client system, the 3-Heightsв„ў PDF Producer works like this: The Windows application makes calls to the Graphics Device Interface (GDI) These GDI calls are interpreted by the printer driver, the 3-Heightsв„ў PDF Producer The 3-Heightsв„ў PDF Producer creates a PDF document In a network environment, the structure is very similar. However the output of the GDI is an enhanced metafile (EMF). The EMF is a spool file and sent over the network. It is played back on the server system, interpreted by an EMF Print Processor and changed to non-EMF. The 3-Heightsв„ў PDF Producer is installed on the server where the PDF document is produced. Client Client Application Application GDI GDI Network PDF Producer PDF Spool File Server EMF Print Processor GDI PDF Producer PDF PDF Tools AG – Premium PDF Technology
© Copyright 2026 Paperzz