OMNITRACKER
The OMNINET
Problem and Request Tracking System
OMNITRACKER Web Gateway Manual
Version 10.3 (build 6122)
(C) Copyright 1996-2014 by OMNINET GmbH
OMNITRACKER Web Gateway Manual
В© 2014 OMNINET GmbH
Information in this document is subject to change without notice and does not represent a commitment on the part
of OMNINETВ® GmbH. The software described in this document is furnished under the software license agreement
distributed with the product. The software may be used or copied only in accordance with the terms of the license.
The purchaser may make one copy of the software for a backup, but no part of this user manual may be reproduced,
stored in a retrieval system, or transmitted in any form or by any means electronic or mechanical, including
photocopying and recording for any purpose other than the purchaser?s personal use, without prior written
permission from OMNINETВ® GmbH.
Printed: Juli 2014 in Germany
(C) Copyright 1996-2014 by OMNINET GmbH
All Rights Reserved.
OMNITRACKER and OMNINET are registered trademarks of OMNINETВ® GmbH.
Microsoft, Windows, Win32, Windows NT, Windows 95, Visual BasicВ® , Visual C++ are registered trademarks of
Microsoft Corporation.
Other brand and product names are either trademarks or registered trademarks of their respective holders.
Contents
3
Table of Contents
Foreword
0
Part I Introduction
8
Part II Installation
10
1 Installation
................................................................................................................................... 10
Part III Using the Web Gateway
12
1 Login
................................................................................................................................... 12
URLs
......................................................................................................................................................... 12
Login Page
......................................................................................................................................................... 15
Defining a.........................................................................................................................................................
filter
17
Single Sign-On
......................................................................................................................................................... 20
External Authentication
......................................................................................................................................................... 21
Basic Authentication
......................................................................................................................................................... 24
Basic Authentication
.........................................................................................................................................................
w ithout passw ord
28
2 Main
...................................................................................................................................
Page
34
Introduction
......................................................................................................................................................... 34
Object list.........................................................................................................................................................
usage
40
List Layout
.........................................................................................................................................................
Definition Page
43
Tree Layout
.........................................................................................................................................................
Definition Page
45
View Save.........................................................................................................................................................
Page
48
Notifications
.........................................................................................................................................................
Page
49
Calendar View
.........................................................................................................................................................
Types
51
Introduction
.................................................................................................................................................. 51
Month View
..................................................................................................................................................
Type
53
Week View..................................................................................................................................................
Type
54
Day View ..................................................................................................................................................
Type
56
3 Object
...................................................................................................................................
Page
58
Introduction
......................................................................................................................................................... 58
Drop-Dow n
.........................................................................................................................................................
Lists
61
Quick Search
......................................................................................................................................................... 62
Send Em ail
......................................................................................................................................................... 63
Attachm ents
......................................................................................................................................................... 68
Rich-Edit Toolbar
......................................................................................................................................................... 70
4 Search
...................................................................................................................................
Forms and Filters
71
Default Search
.........................................................................................................................................................
Form
71
Edit Filter Param
.........................................................................................................................................................
eters
72
Perform ing
.........................................................................................................................................................
a Search
74
Search and
.........................................................................................................................................................
execute task
76
Filter Edit Page
......................................................................................................................................................... 78
Filter Save.........................................................................................................................................................
Page
79
Filter Organize
.........................................................................................................................................................
Page
80
5 Date/Time,
...................................................................................................................................
Currency and Number formats
80
Part IV Configuration
В© 2014 OMNINET GmbH
84
4
OMNITRACKER Web Gateway Manual
1 Configuration
...................................................................................................................................
Overview
84
2 Configuration
...................................................................................................................................
File
84
3 WebConfig
...................................................................................................................................
Editor
87
4 Style
...................................................................................................................................
Sheet Files
93
5 Web
...................................................................................................................................
Configurations
95
Web Gatew
.........................................................................................................................................................
ay Settings Window
95
Web Gatew
.........................................................................................................................................................
ay Configuration Window
97
Guest Login
.........................................................................................................................................................
Properties Window
109
Guest Login
.........................................................................................................................................................
Base Filter Window
115
Web Configuration
.........................................................................................................................................................
Option Window
116
Web Configuration
.........................................................................................................................................................
Im port Wizard - Settings Page
118
Web Configuration
.........................................................................................................................................................
Im port Wizard - Results Page
120
6 Web
...................................................................................................................................
Forms
123
Web Form
.........................................................................................................................................................
Editor Window
123
Web Form
..................................................................................................................................................
Editor Window
123
Tab Properties
..................................................................................................................................................
Subpanel
133
Section Properties
..................................................................................................................................................
Subpanel
134
Field Properties
..................................................................................................................................................
- General Subpanel
136
Field Properties
..................................................................................................................................................
- Columns Subpanel
138
Field Properties
..................................................................................................................................................
- Extended Subpanel
139
Field Properties
..................................................................................................................................................
- Attachments Subpanel
139
Field Properties
..................................................................................................................................................
- Reference Subpanel
141
Field Properties
..................................................................................................................................................
- Size Subpanel
145
Field Properties
..................................................................................................................................................
- Values Subpanel
146
Field Properties
..................................................................................................................................................
- HTML Wrapper Subpanel
148
Field/Text..................................................................................................................................................
Properties - Display Subpanel
148
Field/Text..................................................................................................................................................
Properties - Design Subpanel
150
Text Properties
..................................................................................................................................................
- General Subpanel
150
Create Object
..................................................................................................................................................
Button Properties Subpanel
151
Fill Object..................................................................................................................................................
Button Properties Subpanel
152
Task Button
..................................................................................................................................................
Properties Subpanel
153
Command..................................................................................................................................................
Buttons Properties Subpanel
154
Search +..................................................................................................................................................
Execute Task Button Properties
155
Search Form
..................................................................................................................................................
Checkbox Properties
155
Send Email
..................................................................................................................................................
Button Properties Subpanel
156
Search Reference
..................................................................................................................................................
User Field Properties
157
Web Form
.........................................................................................................................................................
Button Configuration Window
159
Web Form
.........................................................................................................................................................
Preview Window
162
7 Web
...................................................................................................................................
Themes
165
Introduction
.........................................................................................................................................................
to Web Them es
165
Organize.........................................................................................................................................................
Web Them es
167
Web Them
.........................................................................................................................................................
e Editor
168
8 Arbitrary
...................................................................................................................................
HTML formatting for lists
171
Web List .........................................................................................................................................................
Layout Editor Window
171
Defining Custom
.........................................................................................................................................................
Layouts
174
9 Scripting
................................................................................................................................... 184
Introduction
......................................................................................................................................................... 184
Global Properties
.........................................................................................................................................................
and Methods
184
Overview.................................................................................................................................................. 184
Properties.................................................................................................................................................. 185
ActiveFilter
........................................................................................................................................... 185
В© 2014 OMNINET GmbH
Contents
5
ActiveFolder
........................................................................................................................................... 186
ActiveObject
........................................................................................................................................... 186
ActiveSearchFilter
........................................................................................................................................... 187
ActiveSession
........................................................................................................................................... 189
ActiveUser
........................................................................................................................................... 189
CombineFilterAndSearch
........................................................................................................................................... 189
RecursiveSearch
........................................................................................................................................... 190
ServerLanguage
........................................................................................................................................... 190
Methods .................................................................................................................................................. 190
CancelAction
........................................................................................................................................... 190
CloseObject
........................................................................................................................................... 191
GetSelectedObjects
........................................................................................................................................... 191
LogMessage
........................................................................................................................................... 192
OpenObject
........................................................................................................................................... 192
OpenNew...........................................................................................................................................
Object
193
ResultMessage
........................................................................................................................................... 193
Save
........................................................................................................................................... 194
Search ........................................................................................................................................... 195
StatusText
........................................................................................................................................... 195
Hints about
.........................................................................................................................................................
scripting
196
10 Invoking
...................................................................................................................................
Combo Scripts from JavaScript
199
Introduction
......................................................................................................................................................... 199
JavaScript
.........................................................................................................................................................
Functions
199
11 Speeding
...................................................................................................................................
up the Web Gateway using HTTP compression
204
Part V Troubleshooting
210
1 Limitations
................................................................................................................................... 210
2 Hints
...................................................................................................................................
for Troubleshooting
211
Index
В© 2014 OMNINET GmbH
225
Part
I
8
1
OMNITRACKER Web Gateway Manual
Introduction
The OMNITRACKER Web Gateway allows OMNITRACKER users or guests to access the
OMNITRACKER database by using an ordinary Web browser.
Features
Browsing through folders and object lists
Searching for objects, using the full-text search engine or search forms
Filtering for objects
Adding, modifying and deleting objects
Downloading and uploading attachments
Providing guest logins for your customers, partners, etc.
Sending emails
The OMNITRACKER Web Gateway can be adapted to your own needs as described in the
Configuration chapter.
В© 2014 OMNINET GmbH
Part
II
10
OMNITRACKER Web Gateway Manual
2
Installation
2.1
Installation
Installing the OMNITRACKER Web Gateway
Please see the OMNITRACKER Installation Guide for the necessary steps to install the
OMNITRACKER Web Gateway.
В© 2014 OMNINET GmbH
Part
III
12
OMNITRACKER Web Gateway Manual
3
Using the Web Gateway
3.1
Login
3.1.1
URLs
This page describes the URLs that you can use to start the Web Gateway. In all URLs, the
placeholder <hostname> means the name of the host on which the Web server and the
OMNITRACKER Web Gateway is running, and <virtualroot> means the name of the virtual directory
under which the Web Gateway has been installed (see Installation).
If optional parameters are used make sure that the first parameter always is prefaced with an "?"
character. All further parameters must be prefaced with the "&" symbol. All white spaces used in the
URLs are for better readability and must be removed. Optional parameters are embraced with square
brackets in the examples below.
Standard Login and optional parameters
http://<hostname>/<virtualroot>/login.aspx [?lang=<language code>] [&readonly=1]
[&autologin=<param>] [&guestlogin=<id>] [&showLoginObject=1] [&locale=<language
code>] [&user=<login name>] [&hidelanguage=1] [&tzo=-60]
Displays the Login Page for an ordinary login or guest logins.
The optional parameters described here can be used with all login modes (standard login, single
sign-on, login with filter)
Hide Language:
The optional hidelanguage parameter allows to hide the language dropdown list in the Login page.
Login Language:
The optional lang parameter lets you set the display language using one of the ISO 639-1
shorthands (e.g. 'en' for English), overwriting any browser settings.
Locale
Number, currency and date/time formats depends on the Language setting in the browser. It is
possible to override the browser settings by using the optional locale parameter. Possible values
are for example: "en-US", "en-GB", "de-DE", "de-AT"...
Login Name
The optional "user=<login name>" parameter can be used to fill the given name into the login field
automatically.
В© 2014 OMNINET GmbH
Using the Web Gateway
13
Readonly Licenses:
If you have purchased "Read only" licenses for your OMNITRACKER system, you can use the
parameter "readonly=1" to log in with a read-only license.
TZO (timezone offset):
The timezone offset of the client machine in minutes. The timezone offset is determined
automatically and the "tco" parameter is added to the url. The timezone offset must be known to
display the correct date/time values in the Web Gateway. If an invalid value is entered here, the web
servers timezone is used instead.
Example for germany (UTC+1): "timezone=-60" [or "timezone=-120" in summer (daylight saving
time)]
If you want to use the Web servers timezone (old behavior before 10.3.0), then an invalid value (not
numeric) must be passed here (e.g. "timezone=false").
Single Sign-On and Basic authentication:
The "autologin=<param>" parameter can be used when in the web configuration the option "Single
Sign-On (allow)" or "Single Sign-On (hide login Window)" is enabled or if you want to use basic
authentication
<param> = 1 : The login window is hidden if the login attempt succeeds. If the current user cannot
log in, the dialog is displayed (the option "Single Sign-On (allow)" must be enabled)
<param> = 2 : The checkbox "Use Windows Login" on the login window is checked (the option
"Single Sign-On (allow)" must be enabled)
<param> = 3 : The login window is displayed (overrides the option "Single Sign-On (hide login
window)")
<param> = 4: The login window is hidden and basic authentication is used.
Guest Logins:
The optional guestlogin=<id> parameter performs a guest login. The number <id> specifies which
guest login setting is used (see Guest Login Properties Window). If authentication is required for the
guest login, the Login Page will be displayed. Otherwise, the login page will be skipped and the Main
View or the Object Page will be displayed.
The optional parameter "showLoginObject=1" can be used with Guest Logins. After login the user
can edit his own object (for example to modify his address data).
Singleton Login:
The Singleton Login displays a single object. Three modes are possible (1,2 or 3).
singleton=1 means that the user will automatically be transferred to the URL for Singleton Logout
(s. Web Configuration options for details) when clicking OK (the button "Save" is not available in this
mode).
singleton=2 means that the user can intermittently save the object (by clicking the Save button)
but will automatically be taken to the logout page when clicking the OK or Logout button.
В© 2014 OMNINET GmbH
14
OMNITRACKER Web Gateway Manual
singleton=3 means that the user opens the object, but can return to the main page by clicking the
"OK" or "Cancel" button.
http://<hostname>/<virtualroot>/Login.aspx ?id=<id> &singleton=<singleton>
The number <id> specifies the unique id of the object to display.
The parameter <singleton> can either be 1, 2 or 3.
Note:
If the object with the specified <id> does not exist in the database, logging in will not be possible if
singleton 1 or 2 is used!
Singleton Login with Filter:
http://<hostname>/<virtualroot>/Login.aspx ?singleton=<singleton> &folder=<folderpath>
&filterfield1=<filterfieldname1> &filterparam1=<filterparamvalue1> [more parameters]
[&includesubfolders=1]
Displays a single object.
This is a variant of the singleton login with a unique ID. Instead, you can enter the full path of a folder
and one or more filter parameters to search for. If the search you defined with this URL returns
exactly one object, this object is opened as if its ID was given. Otherwise, the user is informed that
the filter is ambiguous and logged in as usual. See the page Defining a filter for more information.
Number, currency and date/time formats depends on the Language setting in the browser. It is
possible to override the browser settings by using the optional locale parameter. Possible values
are for example: "en-US", "en-GB", "de-DE", "de-AT"...
Example URL using singleton login with filter:
The following url opens the object with the value "70127" in the field "Number", in the folder
"ServiceDesk\Incidents".
Furthermore the singleton mode 2 and the guestlogin with the id "1" is used.
http://<hostname>/<virtualroot>/Login.aspx ?folder=ServiceDesk%5CIncidents &filterfield1=Number
&filterparam1=70127 &singleton=2 &guestlogin=1
Note:
If the filter does not return any object, logging in will not be possible if singleton 1 or 2 is used!
If the filter returns more than one object you will be informed by a message box. Afterwards the main
page is displayed for all singleton modes.
Login with filter
В© 2014 OMNINET GmbH
Using the Web Gateway
15
The optional parameter openuniquematch=1 allows to specify a filter in the login URL as known
from the singleton login, but with one difference: If the specified filter returns more than one object,
then this filter is used on the main page and the filter result is displayed. If the filter returns only one
object, then this object is opened.
http://<hostname>/<virtualroot>/Login.aspx ?openuniquematch=1 &folder=<folderpath>
[&filter=<filtername>] [&filterfield1=<filterfieldname1> &filterparam1=<filterparamvalue1>]
[more parameters] [&includesubfolders=1]
Either the optional parameter filter or the optional parameters filterfieldN and filterparamN must
be used to define a filter.
With the parameter filter, a named filter (e.g. the filter "Open Incidents" in the folder
"ServiceDesk\Incidents") can be used:
http://<hostname>/<virtualroot>/Login.aspx ?openuniquematch=1 &folder=ServiceDesk%
5CIncidents &filter=Open%20Incidents
See the page Defining a filter for more information.
Note:
The white-spaces between the parameters in the URLs above are for better readability and
must be removed!
3.1.2
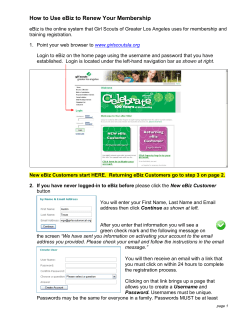
Login Page
Layout
В© 2014 OMNINET GmbH
16
OMNITRACKER Web Gateway Manual
Description
Enter your user name and password into the corresponding fields, and press Login.
The login information will remain valid until you close your Web browser, until you press the "Logout"
button on the main page, or until the session timeout has expired (see "Configuration File" for setting
the session timeout).
Use Windows Login
If the web configuration option "Single Sign-On (allow)" is enabled, this checkbox is displayed.
If this box is checked, the user will log in with his current windows credentials. No login name and
no password is necessary.
Note:
The IIS must be configured that no anonymous login is allowed for the Web Gateway website.
The integrated windows authentication must be enabled.
The line "<identity impersonate="true"/>" must be added to the <system.web> section of the
Web.config file if not present.
For further informations see "Single Sign-On" in the administrator online help.
Read-only login
В© 2014 OMNINET GmbH
Using the Web Gateway
17
If you have purchased "Read only" licenses for your OMNITRACKER system, the checkbox "Readonly login" will be visible in the third line. Check the box to login using a read-only license. You can
also append "?readonly=1" (resp. "&readonly=1" as second parameter) to the URL, in this case the
checkbox will not be visible and you are logged in with a read-only license.
Your read-only license is converted to a write-enabled license if you perform one of the following
actions:
clicking the "New" button to create an object
clicking "Save" or "OK" to modify an object
saving a filter
modifying a column layout
executing a combo script
If there are no free write-enabled licenses at the moment, the current action (create/modify) will fail
and you are informed of this. As administrator, you can configure the message a user receives in
this case. If the conversion succeeds, you can continue using the Web Gateway as if you had
logged in the usual way. You cannot convert a write-enabled license back to a read-only license.
Language
Select your preferred language for the Application.
The preselected language depends on the browsers language settings and can be overwritten by the
optional "lang" parameter in the url.
(When using Internet Explorer 7 you can change the language in the menu by clicking 'Tools' ->
'Internet Options' -> 'Languages'.)
Note: Only languages that are installed on the OMNITRACKER server can be selected.
3.1.3
Defining a filter
If the URL parameters singleton or openuniquematch are used in the login url, then it is possible
to define a filter as described here.
Singleton
The filter must return exactly one object. Then this object is opened if the login succeeds.
If the filter returns more then one object, an error message is shown. The last visited folder is
displayed.
If the filter does not return any object, logging in will not be possible (singleton 1 and 2) or an error
message is displayed.
В© 2014 OMNINET GmbH
18
OMNITRACKER Web Gateway Manual
OpenUniqueMatch
If the filter returns exactly one object, then this object is opened if the login succeeds.
Otherwise the filter result is displayed on the main page.
Singleton URL:
http://<hostname>/<virtualroot>/Login.aspx ?&singleton=<singleton> &folder=<folderpath>
&filterfield1=<filterfieldname1> &filterparam1=<filterparamvalue1> [more parameters]
[&includesubfolders=1]
OpenUniqueMatch URL:
http://<hostname>/<virtualroot>/Login.aspx ?openuniquematch=1 &folder=<folderpath>
&filterfield1=<filterfieldname1> &filterparam1=<filterparamvalue1> [more parameters]
[&includesubfolders=1]
Using an existing filter
Instead of using filterfieldN and filterparamN pairs it's possible to specify a public, named filter:
http://<hostname>/<virtualroot>/Login.aspx ?folder=<folderpath> &filter=<filtername>
[&includesubfolders=1]
Explanation of the parameters:
Name
Description
folder
Enter the folder path (separated by backslashes "\" resp. "%
5C") in which the object is located.
filter
Enter the name of a public named filter which exists in the
given folder
yes, if
filterfield1 is
not used
filterfield1
You may enter any number of user fields to filter for. You
can identify the user fields either by their label or by their
alias name. The following user field types are valid:
Autonumber
Boolean
Byte
Currency
Date/Time
Dropdown list
Float (single/double)
Integer (long/short)
Text
Workflow
yes, if filter
is not used
The number of "filterparam" parameters must be the same
yes, if filter
filterfield2
...
filterfieldN
filterparam1
Required
yes
В© 2014 OMNINET GmbH
Using the Web Gateway
filterparam2
...
filterparamN
19
as the number of "filterfield" parameters. The following format is not used
conventions apply:
Autonumber: Use either the plain number or the
number according to the numbering schema
Boolean: "y" or "n"
Date fields: Use the format YYYY-MM-DDTHH:MM:
SS, the "T" in the middle is the letter "T"
Dropdown and Workflow fields: Use either the label or
the alias of the value/state
Float and currency fields: The decimal separator is a
"."
includesubfolde Use the parameter includesubfolders=1 to search including
rs
subfolders.
no
This can be useful if objects may be moved to subfolders
during their lifetime, but can lead to ambiguous filters if you
identify via (for example) autonumber fields which are not
shared with subfolders
The other parameters are described in the section of the singleton login with a unique ID.
A few notes
If you enter multiple filter fields, the fields are combined with "and".
Every field is compared for equality.
An object is only opened if it is the single object which matches the given filter. So typical user fields
to search for are autonumber fields or the identifying fields of a folder.
Logging in will not be possible if singleton 1 or 2 is used and if the filter as invalid parameters or if the
filter does not return any object.
You have to escape certain characters (in the folder path, userfield names and field values) due to
URL specifications. Below, there is a list of characters which have to be replaced in your URL:
Character
Escape
symbol
Character
Escape
symbol
Character
Escape
symbol
$
%24
~
%7E
#
%23
&
%26
?
%3F
%
%25
+
%2B
@
%40
{
%7B
,
%2C
Space
%20
}
%7D
/
%2F
"
%22
|
%7C
:
%3A
<
%3C
\
%5C
В© 2014 OMNINET GmbH
20
OMNITRACKER Web Gateway Manual
;
%3B
>
%3E
[
%5B
=
%3D
^
%5E
]
%5D
` (Grave
accent)
%60
An important warning: It is strongly recommended that you do not use non-ASCII characters
(characters 128-255, this includes German umlauts) in the folder path or in the search parameters.
Use the folder alias if necessary and select appropriate search fields. Handling of these characters
is not defined in the HTML specification and may vary depending on your browser and the selected
character set.
3.1.4
Single Sign-On
If Single Sign-On is used for authentication, the user uses his Windows credentials for logging in.
On the login page, when single sign-on shall be performed, the user selects the check box "Use
Windows Login".
In order to use single sign-on, the following conditions must be fulfilled:
If Windows user "MYDOMAIN\joe" shall be able to log in, then there must be an OMNITRACKER
user account with login name "joe".
For all single sign-on user accounts in the OMNITRACKER user special folder(s), the
authentication method must be "Windows".
The Web Gateway Configuration Option "Allow Single Sign-On" must be set to true.
In Internet Information Services (IIS), the authentication method of the Web Gateway must be set
to Windows-Authentication. Anonymous Login must be disabled and ASP.NET Impersonation
must be activated.
If the OMNITRACKER server is in a different Windows domain than the user that logs on, the field
"Windows Domain Name" of the corresponding OMNITRACKER user account must contain the
name of the Windows domain to which the user belongs. E.g. if user "MYDOMAIN\joe" logs in,
and the OMNITRACKER server is in domain "OTHERDOMAIN", then the value "MYDOMAIN"
must be stored in the field "Windows Domain Name". For users from the domain
"OTHERDOMAIN", however, the field "Windows Domain Name" can be left empty.
When the Web Gateway is installed on a different machine than the OMNITRACKER server, the
web server computer must be marked in Active Directory as trusted for delegation. Furthermore,
service principal names (SPNs) for the OMNITRACKER server must be defined in the Active
Directory. For example, if the OMNITRACKER server is running on host
"myserver.mydomain.com" under port numbers 5085 (normal) and 443 (SSL), then you should use
setspn to define the following SPNs:
setspn -A
setspn -A
setspn -A
setspn -A
OMNITRACKER/myserver.mydomain.com:5085 domain\username
OMNITRACKER/myserver:5085 domain\username
OMNITRACKER/myserver.mydomain.com:443 domain\username
OMNITRACKER/myserver:443domain\username
В© 2014 OMNINET GmbH
Using the Web Gateway
21
Here, domain\username is the user account under which the OMNITRACKER server is running. If
the OMNITRACKER server is running under LocalSystem, use the computer name of the
OMNITRACKER server instead of domain\username.
Generally, the OMNITRACKER server's SPN has the following format:
OMNITRACKER/hostname:portnumber
You also should define the above mentioned SPNs if you want users to log on using the Kerberos
authentication protocol, instead of the NTLM protocol which is used as a fallback if Kerberos is not
available. In the OMNITRACKER log file, you can see whether a user logged in using Kerberos or
NTLM.#
In order to solve any problems regarding single sign-on, please see Single Sign-On Troubleshooting
in the Administrator Guide
3.1.5
External Authentication
External authentication allows the user to log in the Web Gateway directly, without entering
username and password. To do so, additional credentials must be added to the login URL of the
Web Gateway. These credentials may be username, password, session tokens or other information.
The credentials are passed to an external server, which returns a xml document to the
OMNITRACKER. This document must contain the information whether the login is successful as
well as the login name of the OMNITRACKER user. As an additional information the document can
define the login language and the locale information for the web session.
External Authentication can be used for normal logins as well as for guest logins.
Example for external authentication
Suppose that the “Remote Authentication URL” parameter is:
https://app.mycompany.com/webinterfaces/checklogin_goid?ticketId=[auth1]
Further, suppose that the OMNITRACKER web gateway is invoked with this URL:
http://omnitracker.mycompany.com/OTWG/Login.aspx?guestlogin=1&auth1=CC05703D748E-4c84-9A12-C3DC9A681535
Then the following HTTP(S) GET query is sent to the external authentication server:
https://app.mycompany.com/webinterfaces/checklogin_goid?ticketId=CC05703D-748E4c84-9A12-C3DC9A681535
Configuration of the OMNITRACKER
All required information must be added to the Remote Authentication Options in the Web Gateway
Configuration.
В© 2014 OMNINET GmbH
22
OMNITRACKER Web Gateway Manual
For the example above, the following URL has to be specified as Remote Authentication URL:
https://app.mycompany.com/webinterfaces/checklogin_goid?ticketId=[auth1]
("auth1" will be replaced by the information which is passed as "auth1"parameter to the Web
Gateway in the login URL)
If the Remote Authentication Server requires a certificate for authenticating the OMNITRACKER
server, the certificate name can be specified using the configuration option "Client Certificate for
Remote Authentication". Necessary certificates are determined automatically if this option is left
empty.
If the returned xml document has not exact the format which is supported by the OMNITRACKER,
the document can be converted into the supported format by performing a XSLT transformation.
Therefore a XSL Style Sheet can be specified.
XML format required by OMNITRACKER
The following format is required by the OMNITRACKER. If the document format of the external
authentication server differs, a XSLT transformation must be performed. Please find an example for a
XSLT transformation at the end of this page.
<?XML version="1.0" encoding="…" ?>
В© 2014 OMNINET GmbH
Using the Web Gateway
23
<reply>
<success>true</success>
<user>JohnDoe</user>
<locale>en-us</locale>
<errormessage></errormessage>
</reply>
Explanation of the nodes:
success: can be "true" or "false". If "true", the OMNITRACKER user which is specified as "user"
will be logged in.
user: contains the login name of the OMNITRACKER user or the name of the Web Guest which
will be logged in.
locale (optional): Specifies the language and the regional settings for displaying texts and numeric
values in the Web Gateway. It contains the two-letter language code according to ISO-639-1,
followed by “-“, followed by the two-letter country code according to ISO 3166-1 alpha-2. Upper and
lower case are ignored in <locale>. If the specified language is not supported by OMNITRACKER,
the standard server language is used (In this case an error message like "External Authentication
warning: The locale 'XX-YY' is not valid and will be ignored." is written to the OMNITRACKER
Server log file).
errormessage (optional): This message will be displayed to the Web Gateway user if the login fails
(success = "false")
URL
One or more parameters called “authN” can be added to the URL. For each parameter, N must be
different, and the parameters must be numbered starting with 1, e.g. auth1, auth2, and so on.
According to the example above, the following login URL must be used:
Login.aspx?auth1=CC05703D-748E-4c84-9A12-C3DC9A681535
or for using a guest login with ID = 1:
Login.aspx?guestlogin=1&auth1=CC05703D-748E-4c84-9A12-C3DC9A681535
If the login language is not forced by the external server (locale specified in the xml document), it
can be set in the URL using the parameters "lang" and "locale":
Login.aspx?lang=en&auth1=CC05703D-748E-4c84-9A12-C3DC9A681535&locale=enUS
Example for a XSLT tranformation
Imagine the xml document returned by the external authentication server has the following format:
В© 2014 OMNINET GmbH
24
OMNITRACKER Web Gateway Manual
<?xml version=“1.0“ encoding=“UTF-8“?>
<Login>
<error>false</error>
<user>JohnDoe</user>
<language>de_AT</language>
</Login>
The following XSL style sheet must be added to Web Gateway Configuration to convert the given
document into the correct format:
<?xml version="1.0" encoding="UTF-8"?>
<xsl:stylesheet version="1.0" xmlns:xsl="http://www.w3.org/1999/XSL/Transform">
<xsl:template match="Login">
<result>
<success><xsl:if test="error='false'">true</xsl:if><xsl:if test="error='true'">false</xsl:
if></success>
<user><xsl:value-of select="user"/></user>
<locale><xsl:value-of select="translate(language, '_', '-')"/></locale>
</result>
</xsl:template>
</xsl:stylesheet>
Note: only XSLT 1.0 is supported.
Security hint
If external authentication is used, all authentication relevant information is contained within the URL.
This URL can be visible in the browsers address bar. In addition, the information is transferred as
cleartext through the network if SSL (https) is not configured for the Web Gateway. To minimize the
risk that a third person can misapply a valid login, https should be used. In addition, the session
tokens which are transferred as URL parameter to the Web Gateway should only be valid for a small
period of time (ideally they should become invalid directly after the OMNITRACKER server has
checked if the session tokens are valid).
3.1.6
Basic Authentication
The Web Gateway supports basic authentication. This means the authentication data are passed to
the Web Gateway within the header of the HTTP request.
WARNING:
The login credentials are passed as plaintext from the client browser to the Web Gateway server and
can be intercepted. It's strongly recommended that this authentication mode only is used, if the
HTTP connection is encrypted (https):
В© 2014 OMNINET GmbH
Using the Web Gateway
25
Using basic authentication
Anonymous Login must be enabled in IIS.
Basic authentication must be disabled in IIS.
Windows authentication must be disabled in IIS.
The login URL parameter "autologin=4" must be added (e.g. "https://servername/OTWG/
Login.aspx?autologin=4")
Depending on the defined security level (see below) the Browser will ask for the user name and
password and pass them to the Web Gateway.
Configuration of the OMNITRACKER
Basic Authentication can be configured in the category "Basic Authentication" in the Web Gateway
Configuration.
В© 2014 OMNINET GmbH
26
OMNITRACKER Web Gateway Manual
Authentication without password
This option must be set to false. Fore more information read the chapter Basic Authentication
without password.
Allowed IPs (Access Manager)
This option is without any meaning here.
Allowed IPs (Web Servers)
This option is without any meaning here.
Allowed User Names
This option can contain a regular expression that specifies the raw names of users that are allowed
to log in.
Forbidden User Names
This option can contain a regular expression that specifies the raw names of users that are not
allowed to log in. E.g. the string "admin" indicates that users with "admin" in their name are not
allowed to log on using basic authentication. Only regular expressions with "^" and "$" are applied to
the whole user name.
Security Level
There are three security levels available. It defines under what circumstances the Web Gateway
asks for the authorization data using basic authentication.
Security Level
0
Description
The highest security level.
The Web Gateway will never ask for the login credentials.
This means that the first request which is sent to the Web Gateway already
must contain the authorization header. If this header is not present, the error
message "Missing authorization header" is displayed.
Its recommended if for example a web portal is used which supplies the login
credentials to the Web Gateway. After successful login the web portal must act
as a proxy. The user can directly access the Web Gateway without entering his
user name or password.
В© 2014 OMNINET GmbH
Using the Web Gateway
1
27
The Web Gateway will ask for the login credentials only if an encrypted HTTP
connection is used (https)
This means that if the login page is opened and if the authorization header is not
present, the browser shows an dialog and asks for user name and password.
2
The lowest security level.
The Web Gateway will ask for the login credentials even if the HTTP connection
is not encrypted. (Not recommended)
User Name Header
If a user name header is specified here, the http request which is sent to the Web Gateway Login
page must contain a header with the same name. This header must contain the login name of the
OMNITRACKER user. If for example the User Name Header "OT_USER" is specified here, and if the
OMNITRACKER User "JohnDoe" wants to log in the Web Gateway using basic authentication, then
the HTTP request must contain this header: "OT_USER: JohnDoe"
Note:
The login name within the User Name Header must be in plaintext and not base64 encoded.
Even if a user name header was specified, the HTTP request also must contain an "Authorization"
header like this: "Authorization:Basic dXNlcm5hbWU6cHdk". It contains the user name and the
password as a base64 encoded string, separated by a column. (Example: "username:pwd" is
"dXNlcm5hbWU6cHdk" as an base64 encoded string). The authorization header is added by
browsers if the browser asks for the login credentials (depends on the security level) or must be
added manually.
Troubleshooting
Problem
The error
message
"Missing
authorization
header" is
displayed
Solution
The HTTP request does not contain the required Authorization header. This
header is not added automatically if the security level is "0" or if the security
level is "1" and the connection is not encrypted (https).
Solution:
If you were redirected from a web portal which manages the login, this portal
must add the Authorization header to the request.
If you want to access the Web Gateway directly using basic authentication, the
security level must be reduced, or an encrypted HTTP connection must be used
В© 2014 OMNINET GmbH
28
OMNITRACKER Web Gateway Manual
if the security level is "1".
The error
message
"Missing user
name header"
is displayed
The HTTP request does not contain the user name header which was specified
in the Web Configuration Options. This header must be added by a web portal.
If you want to access the Web Gateway directly using basic authentication, you
must not specify a user name header.
The error
message
"Wrong user
name or
password" is
displayed
This can have several reasons:
The user does not exist in OMNITRACKER server
The password is not correct
The user name matches the rule which is specified in the option "Forbidden
User Names"
The user name does not match the rule which is specified in the option
"Allowed User Names"
The browser
asks several
times for user
name and
password
Basic authentication is enabled in IIS and the user is not listed in the active
directory.
Solution: disable "Basic/Standard Authentication" and enable "Anonymous
Authentication" in IIS
or
The error "401
Unauthorized"
is displayed
3.1.7
Basic Authentication without password
WARNING: Never use this feature on a public web server! Read the security hints!
This authentication method was introduced to support the usage of external access managers and
works as shown in the picture below.
В© 2014 OMNINET GmbH
Using the Web Gateway
29
An access manager is located on a machine between the client machines (User Browser) and the
web server (Microsoft IIS). The clients cannot connect directly to the IIS. The machine where the
access manager is installed on works as a proxy.
Function:
1. The user opens the Web Gateway login url.
2. The request is cached by the access manager.
If the user is not yet authenticated, this is done by the access manager automatically (e.g. a login
in mask which is provided by the access manager is displayed to the user)
3. The original request which was cached in step (2) now is sent to the Web Gateway (on the IIS
machine). In addition the access manager has added a custom user name header to the request,
which contains the login name of an OMNITRACKER user. A password is not required.
4. + 5. The login is performed automatically and the Web Gateways main page is displayed in the
user browser.
WARNING:
The OMNITRACKER server does not perform a separate authentication. Therefore it must be
assured that only the access manager has access to the Web Gateway server.
Using basic authentication without password
Anonymous login must be enabled in IIS.
Basic authentication must be disabled in IIS.
В© 2014 OMNINET GmbH
30
OMNITRACKER Web Gateway Manual
Windows authentication must be disabled in IIS.
The login URL parameter "autologin=4" must be added (e.g. "https://servername/OTWG/
Login.aspx?autologin=4")
Configuration of the OMNITRACKER
Basic Authentication can be configured in the category "Basic Authentication" in the Web Gateway
Configuration.
Authentication without password
Set this option to true if you want to enable the feature described on this page. An external
authentication manager must be used. Make sure that only the access manager can connect to the
Web Gateway server.
Please read the security hints below.
Allowed IPs (Access Manager)
В© 2014 OMNINET GmbH
Using the Web Gateway
31
Enter the IP address of the machine where the access manager is installed on here. This restricts
the number of proxies which can connect to the Web Gateway using Basic Authentication without
Password.
Note: At least one IP address must be specified here, otherwise Basic Authentication without
Password cannot be used. Several IP addresses must be comma separated.
Allowed IPs (Web Servers)
Enter the IP address of the machine where the Web Gateway is installed on here. This restricts the
number of web servers which can connect the the OMNITRACKER server using Basic Authentication
without Password.
Note: At least one IP address must be specified here, otherwise Basic Authentication without
Password cannot be used. Several IP addresses must be comma separated.
Allowed User Names
This option can contain a regular expression that specifies the raw names of users that are allowed
to log in.
Forbidden User Names
This option can contain a regular expression that specifies the raw names of users that are not
allowed to log in. E.g. the string "admin" indicates that users with "admin" in their name are not
allowed to log on using basic authentication. Only regular expressions with "^" and "$" are applied to
the whole user name.
Security Level
This option does not has any meaning if the option "Authentication without password" is used.
User Name Header
The user name header which is added by the access manager to the login request must be entered
here. This header must contain the login name of the OMNITRACKER user. If for example the User
Name Header "OT_USER" is specified here, and if the OMNITRACKER user "JohnDoe" wants to log
in the Web Gateway, then the HTTP request must contain this header: "OT_USER: JohnDoe"
Note: The login name within the user name header must be in plaintext (not base64 encoded).
В© 2014 OMNINET GmbH
32
OMNITRACKER Web Gateway Manual
Security Hints
WARNING: Enabling this feature is a security risk. The OMNITRACKER does not perform any
authentication and allows to login without any password. An aggressor only must know existing
login names to gain access to the system. Therefore the access to the web server and to the
OMNITRACKER server must be restricted.
Separate Web Server
If this feature is used, a separate web server should be used which supplies exclusively this login
method. Only the access manager (which must be installed on a separate machine) may have
access to this web server.
NEVER user this feature on a public web server!
Use Firewalls and separate network cards
The connection between access manager and web server should be established using a separate
network card. A firewall on the web server must block incoming requests from other machines
except the access manager.
Use client certificates
Setup a secure connection to the web server (https) and force the usage of a client certificate
which must be installed on the access manager.
Authenticate the user account which is used by the access manager.
The access manager should be authenticated by the IIS using windows authentication or basic
authentication.
Restrict the access by defining allowed and forbidden user names
If possible restrict the access as far as possible, e.g. lock out superusers and persons with
administration privilege.
Troubleshooting
Problem
Solution
The error
message
"Missing
authorization
header" is
displayed
If this message is displayed then probably no IP address is defined for the
Access Manager or the Web Servers. If this is the case, the feature "Basic
Authentication without Password" is disabled.
The error
message
"Missing user
name header"
is displayed
The HTTP request does not contain the user name header which was specified
in the Web Configuration Options. This header must be added by the access
manager.
The error
This can have several reasons:
If an IP is defined, the address of the access manager may be wrong. To find out
the correct IP please enable the "OT_LogLoadTimes"-log in the web.config file.
Set the value to an existing file path. In the created log file an error should be
displayed with the IP address of the access manager. LogLoadTimes should be
disabled afterwards.
В© 2014 OMNINET GmbH
Using the Web Gateway
message
"Wrong user
name or
password" is
displayed
33
The user does not exist in the OMNITRACKER database
A user name header was not defined.
The allowed IP (Web Servers) is not correct.
The user name matches the rule which is specified in the option "Forbidden
User Names"
The user name does not match the rule which is specified in the option
"Allowed User Names"
Some of the problems can be identified by checking the OtServer log file (Logins
and Logouts must be logged) or by enabling the "OT_LogLoadTimes"-log in the
web.config.
To enable OT_LogLoadTimes, the value of the key must be set to an existing
folder.
В© 2014 OMNINET GmbH
34
OMNITRACKER Web Gateway Manual
3.2
Main Page
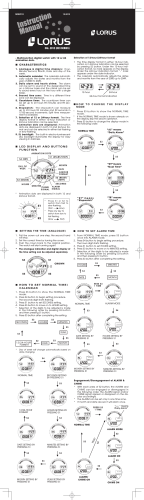
3.2.1
Introduction
After logging in, the main page will be displayed.
Layout
Description
The header contains buttons for general features (e.g. Logout)
The column on the left contains the shortcut bar.
The second column from the left side displays all available folders for the current user. Whenever
the user selects a folder, the object list on the right pane will be updated.
The right pane on displays the search form on the top, if there is one defined in the displayed
folder.
Below the search form is the main button bar, which allows to create/open/delete objects, perform
tasks and change layouts and views. The folder specific Shortcut bar is attached here.
Below the button bar is main list which shows the objects in the current folder which matches the
current filter selected in the search form.
В© 2014 OMNINET GmbH
Using the Web Gateway
35
The main list supports three view types:
List View
Tree View (also editing objects is supported if Tree View is used)
Calendar View
The view type can be changed by clicking the button "View":
List and Tree View
If the number of objects in the list exceeds a predefined threshold (see the configuration option
"Displayed Objects" in the Web Gateway Configuration Window), the list will be spread across
multiple pages.
The buttons on the bottom of the list allow to navigate between the pages.
By clicking on an entry in the list, objects can be selected. The in combination with the buttons
CTRL or SHIFT, several objects can be selected.
Selected objects can be opened or deleted by clicking the appropriate button.
An object also can be opened with a double click or by selecting it and pressing ENTER
(STRG+ENTER if the objects in the list are editable).
Columns can be re-sized with the mouse: click and hold the right border of a column in the lists
header, drag it to the desired width and release.
Use the checkbox on the left side of the header to select/unselect all objects displayed in the list.
More details about the view types "List View" and "Tree View" can be found in the User Guide
(chapter "Concepts / View Types").
В© 2014 OMNINET GmbH
36
OMNITRACKER Web Gateway Manual
Calendar View
The Calendar View itself supports three different subtypes:
Calendar View Description
subtype
Month View
The objects are displayed in a month calendar. (See the topic Month View Type
for a screenshot and more detailes)
Week View
The objects are displayed as appointments in a multi-day view, i.e. the
weekdays Monday to Sunday are displayed in a row. (See the topic Week View
Type for a screen shot and more details)
Day View
The objects are displayed as appointments in a day view. The entries of this
date can be optional grouped according to the content of an object attribute.
(See the topic Day View Type for a screenshot and more details)
More details about the Calendar View type can be found in the topic Calendar View Types Introduction.
Panes Control
It's possible to keep multiple objects open simultaneously. All open objects are displayed in the
header as link buttons. The objects which cannot be accessed directly (due to insufficient space)
can be reached by clicking the "overflow" button.
Multiple objects can be opened with one click by selecting them and clicking the "Open" button. But
there is a limit of max. ten objects which can be opened at once.
For a better clearness the size of unselected pane tab buttons is limited and the label is shortened.
If the mouse cursor is moved over a pane button the width is enlarged to a certain degree.
В© 2014 OMNINET GmbH
Using the Web Gateway
37
The dynamically enlarged pane tab button is supported by Internet Explorer 10 or newer and most
other browsers. It can be disabled by adding the following attribute to the <appSettings> section in
the web.config file:
<add key="OT_DynPaneButtonWidth" value="false"/>
Main button bar
The main button bar contains buttons to perform actions or tasks on the selected objects.
If a free space on the button bar is clicked, a context menu is opened which allows to change the
appearance of the buttons.
If a folder specific shortcut bar is defined (see Admin Guide for more information), the additional
buttons are displayed right to the views drop-down list.
If there is not enough space to display all additional buttons, the "overflow" button (small button on
the right side) allows to access the controls which are currently not displayed.
Note:
The images are displayed either in 16x16 or 24x24 pixels.
The shortcut bar uses 32x32 pixel images. For best appearance icons should be used which contain
all three sizes (16x16px, 24x24px and 32x32px).
Control
Description
Use this button to navigate to the first page in the object
list.
В© 2014 OMNINET GmbH
38
OMNITRACKER Web Gateway Manual
Use this button to navigate 5 pages back in the object list.
Use this button to navigate to the previous page of the
object list.
Use this button to navigate to the next page of the object
list.
Use this button to navigate 5 pages ahead in the object
list.
Use this button to navigate to the last page in the object
list.
Use these buttons from the main button bar to delete
objects or to restore objects from the "deleted objects"
folder.
Note: Deleting objects must be explicitly allowed in the
Web Gateway Configuration Window.
Only objects that aren't referenced by other objects can
be deleted. Deleted objects are always moved into the
trash bin. To remove objects permanently from the
database, they must be deleted from the trash bin folder.
This button opens a menu, which allows to change the
users password or performs a logout.
The URL defined in the configuration option "URL for End
of Session" (see Web Gateway Configuration Window) will
be loaded after logging out.
The currently logged in user is the "superuser".
Click this button if you want to display or hide one of the
following panels or pages:
Shortcut Bar
Folder Tree
Notifications page
Search Form
In addition the height of the search form can be limited. If
this option is enabled, the max-height of the search form
can be resized like the shortcut bar and the folder tree.
(Not available if IE 6/7 is used)
Use this button to create a new object in the current
folder.
В© 2014 OMNINET GmbH
Using the Web Gateway
39
Use this button to
Change the current view type (list, tree, calendar)
Edit the list or tree layout
Save the current view
By clicking "Edit layout...", the Tree Layout Definition
Dialog or the List Layout Definition Dialog (depending on
the current layout) will open.
The layout of the Calendar View can only be configured
using the WPF client (see chapter "Calendar View
Settings - "General" Subpanel" and "Calendar View
Settings - "Appearance" Subpanel" of the User Guide).
The second listbox contains all predefined public and
private views. Select one to apply it to the list.
The "Tasks" button opens a popup menu, where all
available print and export tasks are listed. There is also a
drop-down list for selecting the desired output format (e.g.
pdf). If you have to select requests for your task, you can
do so by selecting the entries in the list.
Note: The following task types are not supported:
Word mail merge
Show results as table
Export to database / interface bus
Depending on the task type you selected in the "Tasks"
combo box, different elements will be listed in this combo
box.
For print/report tasks, the possible output formats are:
HTML (with preview)
PDF (with preview)
DOC
PDF
XLS
For export tasks, you have the following choices:
CSV
MDB
TXT
XLS
If the format you chose contains a preview, a new window
will pop up and display the report. You can then choose to
save the output to a file. Otherwise, you are immediately
prompted to save the output file. If and how you can
preview the report in PDF format depends on the plugins
В© 2014 OMNINET GmbH
40
OMNITRACKER Web Gateway Manual
installed in your browser.
It might happen that the XLS option does not appear for
export tasks. The reason is that the IIS network service
does not have the necessary rights to launch the Excel
application. See the troubleshooting page for help.
The "More actions" button opens a popup menu, with
additional options.
Modify objects: Opens the "Modify Object" dialog which
allows to edit multiple (all selected) objects at the same
time. This button is not visible if the permission "Object
- Modify via Context Menu" was not granted.
The Search box offers flexible means for finding
OMNITRACKER objects quickly and easily.
See Search Box (User Guide) for more information
If a filter that contains "ask user" parameters is selected, a dialog to access these parameters will
open. The new parameters will be applied by clicking "Ok", while "Cancel" continues to use the
original parameters.
3.2.2
Object list usage
Introduction
The object list in the Web Gateway is very powerful and has many features that are available in the
OMNITRACKER client too.
Paging
If the current folder contains a lot of objects, more than the object list display per page, then the
navigation buttons in the toolbar will get available (they turn black).
These buttons allow you to
move to the first page
move 5 pages backward
move to the previous page
move to the next page
move 5 pages forward
move to the last page
В© 2014 OMNINET GmbH
Using the Web Gateway
41
If a sublevel contains too many objects, the navigation buttons will be displayed in the headline
obove the objects:
If the option "show object name only" is selected in the "layout definition dialog", then you must
click on the button "more" to display all available items. Paging is not possible.
Select Objects
To select an object, simply click the corresponding row. The row now is highlighted
If you want to select different rows, hold down the "shift" or the "ctrl" key and select the rows in the
list. To select all displayed objects you can click the checkbox in the header of the list. Analogous
you can select an object and press the keys "ctrl"+"a".
В© 2014 OMNINET GmbH
42
OMNITRACKER Web Gateway Manual
You can use the paging buttons and select objects on other pages too. (Press the "ctrl" key to
select objects on different pages.)
The following keys are used by the object list:
cursor up
Selects the row above the current row.
cursor down
Selects the row below the current row.
page up / cursor
right
Move to the next page if more objects are available.
page down /
cursor lef
Move to the previous page.
ctrl + mouse
click
Selects the row and the previous selection remains.
shift + mouse
click
Selects all rows between the current and the previous selection
enter
Opens the current selected object.
double click
Opens the object.
keypad +
Expands the current row (treeview only)
keypad -
Collapse the current row.
del
Delete the selected object(s)
В© 2014 OMNINET GmbH
Using the Web Gateway
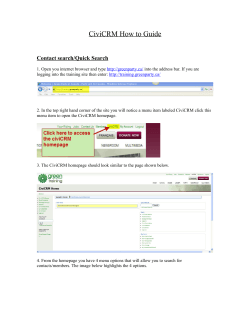
3.2.3
List Layout Definition Page
Introduction
On the list layout definition page, you can change the column layout for each folder.
Layout
To open this dialog, switch to "List view" and click "Edit layout..." on the Main Page.
В© 2014 OMNINET GmbH
43
44
OMNITRACKER Web Gateway Manual
Columns
These columns currently are visible in the list layout. It's possible to override the name of the column
by entering a new text in the column "Header". On the right the width of the columns can be
adapted. Its possible to add further columns or to remove existent.
Sort Columns
The sort columns are listed here. The list is sorted by the columns listed here. The sort order can be
changed here.
Window Description
Title
Add...
Description
Opens the "Add Column" window which allows to add further columns to the list
layout.
В© 2014 OMNINET GmbH
Using the Web Gateway
As sort
column
Up
3.2.4
Adds the current selected column to the sort column
Moves the current selected column up
Down
Moves the current selected column down
Delete
Removes the current selected column from the visible/sort columns
Toggle
direction
45
Switches between ascending and descending order
Tree Layout Definition Page
Introduction
On the Tree Layout Definition Page, you can edit the reference fields which are shown in each folder
for the current view. You can also access the List Layout Editor to edit the column layout of every
referenced folder.
В© 2014 OMNINET GmbH
46
OMNITRACKER Web Gateway Manual
Layout
Control
Description
Check the name of a referenced field to have it displayed in the tree, if you
uncheck it, it will not be visible in the main view, including its subelements.
Up
Down
Select an element in the tree and click "up", so that the selected element will
be moved one step up. Click "down" to move it down. You cannot move the
topmost element upward or the lowest element downward.
Note: The order of unchecked elements is undefined. Checked items are saved
in their defined order.
Select All
Unselect All
Edit Layout...
Click "Select all" to have all the elements on the currently selected item's level
checked. Click "Unselect all" to remove the checkmark from all these
elements.
Select an element and click "Edit Layout..." to open the List Layout Definition
Page.
Note: If more than one userfield refers to the same folder, these userfields all
have the same list layout.
Reset Layout...
Select an element and click "Reset Layout..." to remove the element's layout
definition. The element will then be displayed in the folder's default list layout.
You cannot reset the root element's list layout.
Check or uncheck these boxes to define general display options:
Draw Line between "Draw line between items": Draws lines indicating the connections between the
Items
items (see pictures below, left = unchecked, right = checked)
В© 2014 OMNINET GmbH
Using the Web Gateway
47
Draw Grid
Show column
headers
Show object name
only
"Draw grid": Draws a grid between the items (see pictures below, left =
unchecked, right = checked)
"Show column headers": Whether or not to display the subelements' column
headers (see pictures below, left = unchecked, right = checked)
"Show object name only": Displays only the object name and the names of its
referenced objects. Ignores the "Show column headers" flag (see example
below)
В© 2014 OMNINET GmbH
48
OMNITRACKER Web Gateway Manual
OK
Cancel
3.2.5
Click OK to confirm your changes and to apply the changes to the main view.
Click Cancel to exit the editor and to discard all changes.
View Save Page
Layout
The Save View Window allows you to Save user defined Views. (See the User Guide for details).
Pick the name from the list or enter an new one.
Administrators are allowed to define public Views.
В© 2014 OMNINET GmbH
Using the Web Gateway
3.2.6
49
Notifications Page
Introduction
"Notifications" are email-like messages, which can be read using the Web Gateway. When a user
logs in, and there are new Notification messages, then the following page is displayed.
New messages are highlighted in boldface. By expanding a list item or double-clicking an entry of
the list, the whole notification text can be read.
Notification messages normally are sent automatically by OMNITRACKER-internal actions.
Currently it's not possible to send notifications directly from the Web Gateway.
Layout
Description
Title
Description
Open
Opens the selected Notification(s).
Delete
Deletes the selected Notification(s).
Refresh
Checks if new notifications are available and updates the list.
Open
associated
object...
Opens the attached object.
Mark as read
Marks the selected Notification(s) as read.
Mark as unread Marks the selected Notification(s) as not read.
В© 2014 OMNINET GmbH
50
OMNITRACKER Web Gateway Manual
Searching
The search box can be used to search in the list of notifications. It is checked if the search string is
found in the columns "Subject", "Date", "From" or "Object".
The search starts after pressing the ENTER key in the search box.
Delete the text in the search box and press enter or click on the "Close search result" button to
display all notifications again.
New Notifications
If a user logs in and if there are new (unread) Notification messages, then the notification page is
displayed. The notification page cannot be displayed if the Singleton Logins 1 or 2 are used.
The Web Gateway periodically checks if new Notifications arrived. By default this happens once
every 15 minutes. If a user gets new Notifications, then the Notification tab becomes highlighted after
the next page refresh which is caused by the user (e.g. if the user clicks on a shortcut bar link).
"Immediate" delivery
If the Web configuration option "Always close session" is enabled, then a polling mechanism
becomes active, which also is used to check if new Notifications are available (the notification time
interval is respected anyway).
If new Notifications arrive, then the Notifications tab becomes highlighted immediately, without page
В© 2014 OMNINET GmbH
Using the Web Gateway
51
reload, even if the user currently is absent.
The default polling interval is 60 seconds, the notification interval is 15 minutes by default, so the
user is informed about new notifications at most 16 minutes after the notification was sent.
The time intervals can be adapted using the WebConfig Editor tool.
Note:
Too small intervals can have a negative impact on the performance.
The notifications page can be hidden for all users. See the Web Gateway Configuration dialog (Main
view options | Hide Notifications).
3.2.7
Calendar View Types
3.2.7.1
Introduction
In the OMNITRACKER Web Gateway the objects of a folder can optionally be displayed in a
calendar view. Currently the following calendar view type are supported:
Calendar View
subtype
Description
Month View
The objects are displayed in a month calendar. (See the topic Month View
Type for a screenshot and more detailes)
Week View
The objects are displayed as appointments in a multi-day view, i.e. the
weekdays Monday to Sunday are displayed in a row. (See the topic Week
View Type for a screen shot and more details)
Day View
The objects are displayed as appointments in a day view. The entries of this
date can be optional grouped according to the content of an object attribute.
(See the topic Day View Type for a screenshot and more details)
In order to display the objects in one of the calendar view subtypes a so called calendar view setting
is required. This calendar view setting specifies - among other things - which of the attributes shall
be used as the start or end date when displaying the object in the calendar. The calendar view
setting can only be configured using the WPF client (see also "Calendar View Settings - "General"
Subpanel" of the WPF Client UserGuide).
The subject of an appointment can not be set inside the calendar view setting. Instead it will be
В© 2014 OMNINET GmbH
52
OMNITRACKER Web Gateway Manual
generated using the naming scheme of the OMNITRACKER folder.
Important:
If the active calendar view settings does not contain an attribute as the start date and/or does not
contain an attribute for the end date, no appointments will be displayed in the Calendar View of the
OMNITRACKER Web Gateway.
Calendar Views and Working Times Calendars
Apart from displaying the objects of a folder, the calendar views can additionally be attached to a
working times calendar (see "Working Times Calendar" of the UserGuide) either by directly selection
a distinct calendar in the Calendar View Settings or by specifying that the calendar assigned to the
current use shall be used.
If a calendar view is attached to a working times calendar it additionally displays the holidays defined
for this working times calendar as well as the working times for individual dates. If a user calendar is
used the calendar also displayes the "Personal Calendar Entries" of the current user (i.e. off-days or
different working hours). Appointments from the working times calendar (e.g. a holiday) or from an
user calendar can neither be edited nor deleted.
General Aspects
For all three calendar view subtypes the calendar control contains a header. The header itself
contains controls for navigation and for switching between the calendar view subtypes.
Window Description
Title
Description
1. Go back one day/week/month (depending on selected subtype)
2. Go forward one day/week/month (depending on selected subtype)
Day view
Display the appointments of today
Week view
Display the week which contains today
Month view
Display the month which contains today
Opens a date picker control to select a specific day. Depending on the selected
subtype, the appointments of the selected date, the week which contains the
selected date or the month which contains the selected day will be displayed.
1. Switch to day view
2. Switch to week view
3. Switch to month view
В© 2014 OMNINET GmbH
Using the Web Gateway
53
Keyboard Behaviour
No keyboard behaviour is supported (except the ones mentioned in Mouse Behaviour)
Mouse Behaviour
When the mouse hovers over an appointment, a tool tip is displayed that shows the start and the
end time and the complete subject of the appointment. The tool tip will be removed as soon as
any key is pressed or when the mouse is moved outside the appointment.
When the mouse hovers over an appointment, the delete icon
will be displayed in the top right
corner. If the user clicks this icon, the appointment will be deleted. This icon will only appear if the
user has writing permissions and the appointment is not from a working time calendar or from a
personal calendar.
When the user double-clicks at an appointment with the left mouse button, the appointment is
opened in the object form.
When the user left-clicks at any free area in the background (at the same height of the 00:0024:00 vertical ruler in day or week view), the half hour in which the user clicked is selected in day
view. In week view the complete day (i.e. the day column) is marked as selected. In month view
the day which is clicked is marked as selected. If next the view subtype is changed to day view,
the new selected day will be displayed.Any previously selected area is unselected; any previously
selected appointments also are unselected.
If the user held down the SHIFT key while pressing the mouse button, the time area between the
currently selected half hour and the previously selected half hour is selected.If the user moves the
mouse while keeping the left mouse button depressed, the time area between the currently
selected half hour and the half hour over which the mouse is hovering is selected.
If the mouse hovers over the bottom border of an appointment, the mouse cursor changes to
(This indicates that the user can change the end time of the appointment.)
.
If the user presses the left mouse button while the cursor is over the bottom border of an
appointment and moves the cursor up or down while keeping the left mouse button pressed, the
end of the appointment is changed to the half hour on which the cursor currently is positioned.
If the user presses the left mouse button while the cursor is over the appointment and moves the
cursor, the appointment is moved to the nearest corresponding half hour, and to the corresponding
column. The total height of the appointment is not changed (this is only possible for the day and
week view).
3.2.7.2
Month View Type
In the month view the objects of the current folder are displayed in a calendar that displays all days
of the current month using a 7x5 day matrix.
The weekday in the first column and in the last column of this matrix depends on the current locale
settings (Sunday and Saturday are the start and end weekday in the us-english locale settings,
respectively). The matrix will be filled up with the last days of the previous month and the first days of
the next month.
В© 2014 OMNINET GmbH
54
OMNITRACKER Web Gateway Manual
The selected day (or today if the calendar view is visible for the first time) will be marked (in this
example the 14. of March 2012). Up to two entries per date can be displayed at once in the month
view. If the mouse hovers over an appointment a tool tip will appear. This tool tip contains the start
and end date of the appointment (date and time) and a subject. If an appointment is double-clicked
the object form with all object data will be opened (analogue to double-clicking of an object in list or
tree view, see ). If a day is single-clicked, this day wil be selected and marked. If a day is doubleclicked the calendar control will switch to day view and the new selected date will be displayed.
If a calendar entry is displayed without a time value preceeding its title (e.g. like the entry
"SpecialHoliday") then it lasts the whole day (i.e. from 0:00 to 24:00). Otherwise the time value
indicates the time the calendar entry starts or ends. If a calendar entry covers more than one day
(does not have to be more than 24 hours), the entry will cover more than one day in the calendar
view (e.g. like the entry "Room 1: test - allday one" which starts at March, 21 at 1:00 AM and ends
at March 25, at 1:00 AM.
Navigating to a distinct date in the month view
In order to navigate to a special date in the month view either use the back/forward navigation
buttons to move backward/forward one month or use the today button to move to today (if today is in
the displayed month, this date will be selected) or use the
(s. Introduction).
3.2.7.3
button to open a date picker control
Week View Type
In the week view the objects of the current folder are displayed in a multiple column view with a time
bar at the left (from 0:00 to 23:00). Every column contains the appointments of one weekday. The
weekday which starts depends on the current locale settings (Sunday is the start of the week for usen).
В© 2014 OMNINET GmbH
Using the Web Gateway
55
The Parts of the Week View
The week view consists of three parts:
Week Calendar (left Displays the seven days of a week as columns with allday/multiday entries
side)
in the first row and the hours of the day as rows (one row covers 30 minutes)
and a time bar on the left.
Date Selection
Control (right side,
top)
Can be used to directly select the date that shall be displayed in the week
calendar (or rather the week which contains this date). Every day in the date
selection control that contains at least one appointment (an object from the
folder or an element of the working time calendar or the personal calendar)
will be displayed with a bold font.
Calendar Entries List Contains all elements of the selected day (which is marked in the week
(right side, bottom) calendar, Wednesday the 13th in the example above). Entries in this list
which do not contain at start and/or end time are multi-day appointments
(e.g. the first entry in the list).
Additionally to the week calendar the calendar entries list can be used to
open appointments (with a double-click of a list entry) or to delete an entry
(with a single-click of a list entry and afterwards a single-click of the
button).
Navigation to a Distinct Date in the Week View
In order to navigate to a special date in the week view either use the back/forward navigation buttons
to move backward/forward one week or use the today button to move to today (if today is in the
displayed week, this date will be selected) or use the
button to open a date picker control (s.
Introduction). Furthermore a day in the current displayed week can be selected with a single-click in
one of the hour rows (the calendar entries list will then display all entries of this day). Alternatively
the date selection control on the right side can be used to navigate to a special date.
В© 2014 OMNINET GmbH
56
OMNITRACKER Web Gateway Manual
The Parts of the Week Calendar
In the following the most important features of the week calendar are described:
The top row contains all appointments which are all-day or multi-day appointments. All-day means
the appointment starts at 0:00 and ends at 24:00. Multi-Day means an appointment covers more
than one day (i.e. it starts at a date and ends at least on the next day, e.g. the first entry in the
multi-day row). All appointments in this row are displayed without the start and end time.
The time bar on the left side displays the hours 0:00 to 24:00 in half hour steps.
Every column contains the appointments for this day (appointments which start and ends on this
day and multi-day entries)
Every appointment is displayed with the start and end time (if not a all-day or multi-day
appointment) and a subject (generated using the naming scheme of the folder).
If a personal calendar is attached all entries from this will be displayed also
Moving and Sizing a Calendar Entry with the Mouse
In order to modify the end time of a selected calendar entry , move the mouse cursor over the bottom
of the entry and press the left mouse button. If the mouse is now moved downwards the end time will
be changed. With this the end time of a selected calendar entry can only be modified on the same
day column. If you want to change the start time of the calendar entry, move the mouse cursor over
the entry and press the left mouse button. The complete entry can now be moved with the mouse.
With this the start time and the end time will be changed, i.e. the duration of the entry will be kept.
To move a calendar entry to another day, again move the mouse cursor over the entry and press the
left mouse button. Now move the mouse to another day in the week calendar, i.e. to another column,
and release the left mouse button. The complete entry is now at a different day, if another time row
was choosen, the start time and end time are different, too. Again, the duration of the moved entry
will be kept.
3.2.7.4
Day View Type
In the day view the objects of the current folder are displayed in a single column view with a time bar
at the left (from 0:00 to 23:00).
В© 2014 OMNINET GmbH
Using the Web Gateway
57
The Parts of the Day View
The day view consists of three parts:
Day Calendar (left
side)
Displays a single date or a single date in a group view (the appointments
are grouped by a field of the OMNITRACKER folder) columns with allday/
multiday entries in the first row and the hours of the day as rows (one row
covers 30 minutes) and a time bar on the left.
Date Selection Control Can be used to directly select the date that shall be displayed in the day
(right side, top)
calendar. Every day in the date selection control that contains at least one
appointment (an object from the folder or an element of the working time
calendar or the personal calendar) will be displayed with a bold font.
Calendar Entries List
(right side, bottom)
Contains all elements of the selected day. Entries in this list which do not
contain at start and/or end time are multi-day appointments (e.g. the first
entry in the list).
Additionally to the week calendar the calendar entries list can be used to
open appointments (with a double-click of a list entry) or to delete an entry
(with a single-click of a list entry and afterwards a single-click of the
button).
Navigation to a Distinct Date in the Day View
In order to navigate to a special date in the day view either use the back/forward navigation buttons
to move backward/forward one day or use the today button to move to today or use the
button
to open a date picker control (s. Introduction). Alternatively the date selection control on the right
side can be used to navigate to a special date.
В© 2014 OMNINET GmbH
58
OMNITRACKER Web Gateway Manual
The Parts of the Day Calendar
In the following the most important features of the day calendar are described:
The top row contains all appointments which are all-day or multi-day appointments. All-day means
the appointment starts at 0:00 and ends at 24:00. Multi-Day means an appointment covers more
than one day (i.e. it starts at a date and ends at least on the next day, e.g. the first entry in the
multi-day row). All appointments in this row are displayed without the start and end time. For
Multi-Day appointments a left and/or right arrow is also displayed in the appointment (e.g. the first
entry in the multi-day row).
The time bar on the left side displays the hours 0:00 to 24:00 in half hour steps.
Every column contains the appointments for this day (appointments which start and ends on this
day and multi-day entries)
Every appointment is displayed with the start and end time (if not a all-day or multi-day
appointment) and a subject (generated using the naming scheme of the folder).
If a personal calendar is attached all entries from this will be displayed also
Moving and Sizing a Calendar Entry with the Mouse
In order to modify the end time of a selected calendar entry, move the mouse cursor over the bottom
of the entry and press the left mouse button. If the mouse is now moved downwards the end time will
be changed. With this the end time of a selected calendar entry can only be modified on the same
day column. If you want to change the start time of the calendar entry, move the mouse cursor over
the entry and press the left mouse button. The complete entry can now be moved with the mouse.
With this the start time and the end time will be changed, i.e. the duration of the entry will be kept.
Using Grouping
If grouping is enabled the entries of this date are grouped into different categories. Every category
will be displayed in a own column. In order to use the grouping option you can specify a drop-down
or reference object user field in the Calendar View Setting that defines the column for grouping.
Important:
All objects of an OMNITRACKER folder for which the grouping field is empty will/can not be
displayed using grouping.
3.3
Object Page
3.3.1
Introduction
Introduction
The object page displays the fields of a single object, its attachments, and its history.
В© 2014 OMNINET GmbH
Using the Web Gateway
59
Layout
Description
By default, all fields of the current object are displayed. The administrator of the OMNITRACKER
Web Gateway can, however, hide one or more fields from some or all users, change the order they
appear on the page, arrange them on a Tab Strip and in Sections, specify one- or two-column layout
for every row and customize the field labels (see Web Form Editor).
Modifying reference fields:
The user can open, add/modify or delete references to other objects by clicking one of the buttons
right to the field:
"Add existing" offers a list of existing requests to choose from, possibly including subfolders.
"Add new" offers a creation form, possibly after determining the subfolder to create the new object in.
The newly created object is then set as the references object or added to the reference list.
"Delete object" removes the reference and moves the object into the "Deleted Objects" folder.
Saving modifications:
The user can save the modifications of the current object by clicking the Save or the Apply button.
If the user has been referred here by URL (see URLs), clicking this button will redirect the user to a
configurable Logout Page (see the configuration option "URL for End of Session" in the Web
Gateway Configuration Window).
В© 2014 OMNINET GmbH
60
OMNITRACKER Web Gateway Manual
Closing object / returning to main view:
The user can save the modifications and close the object by clicking the OK Button.
The user can close the object without saving by clicking the Cancel button. This button will be
labeled "Close" on popup forms. It will be disabled if the user has been referred here by URL (see
URLs) or if the Object Page opened in a popup window (see the configuration option "Popup Forms"
in the Web Gateway Configuration Window).
The user can close the object without saving by clicking the "Close Tab" button:
The user can return to the main view by clicking the folder name:
Expanding / minimizing of sections:
It is possible to configure sections as "expandable", i.e. they can be expanded/minimized with a
single click (see Section Properties Subpanel in chapter Web Form Editor Window). If a section is
configured as "expandable" an additional button to expand/minimize the section is added to the title
(if the title is empty, only the button will be displayed as title). If the section is in the expanded state,
a click of this button will minimize the section. If the section is in the minimized state, the button will
expand the section.
Alternatively if the focus lies within one of the controls of a section, the keyboard shortcut
Ctrl+Shift+S can be used to expand/minimize this section. The tool tip of this button depends on
the actual state of the section.
Minimized section with title "Details":
Maximized section with title "Details":
В© 2014 OMNINET GmbH
Using the Web Gateway
3.3.2
61
Drop-Down Lists
Introduction
Drop-Down lists in the Web Gateway offer a comfortable way to find a specific item if the list of items
is very long:
If the Drop-Down list was opened, it's possible to enter text to search for a specific item in the list.
1. Open the list
Click into the drop-down control or click the cursor down key if the drop-down list has the focus
2. Type in text
В© 2014 OMNINET GmbH
62
OMNITRACKER Web Gateway Manual
3. Only matching items are displayed
Note:
The search is performed on client side. There occurs no communication with the Web Server.
By default the search feature only is available if the number of items in a Drop-Down list reaches a
limit and does not exceed a maximum. This range can be configured in the Web Gateway
Configuration dialog.
This search also is available on quick search fields, if the result of the quick search is displayed.
The speed of the search can vary and depends on the following factors:
Number of items in the list (The search can be slow if there are hundreds of items in the list)
Used Browser (some Browsers are very slow (e.g. IE6 and IE7)
Clients machine speed
3.3.3
Quick Search
Introduction
Fields of the types "Reference to object", "List of references" and "Reference to user" can be
configured to allow Quick Searches.
This feature must be enabled in the Web Form Editor for the according fields.
how to enable Quick Search for reference to object fields
how to enable Quick Search for reference lists
how to enable Quick Search for reference to user fields
Quick Search fields are identifiable on their magnifier symbol on the left.
To perform a Quick Search, simply enter the Text you are searching for and press enter.
В© 2014 OMNINET GmbH
Using the Web Gateway
63
If the Quick Search returns exactly one result, the object name is filled in the text field immediately:
If the Quick Search returns more than one result, a drop-down list with the search results is
displayed.
The User can select the desired object with the mouse or by using the cursor keys and pressing the
ENTER key.
A quick search can be canceled by pressing the ESC key.
If a quick search is used for fields of type "Reference list of objects", then it is possible to select
multiple items in the search result list. In this case a check box is displayed on the left side of each
list item.
A checkbox can be checked with a mouse click or by pressing the SPACE key. The selection will
be applied after ENTER was pressed.
If the number of items of a quick search result exceeds the Drop-Down filter range minimum, it's
possible to enter text to search a specific item within the search result.
If the Quick Search returns more results than defined as Quick Search Limit in the Web
Configuration, the Select Object dialog will be opened to display the quick search result.
3.3.4
Send Email
Introduction
On web forms, buttons for sending emails can be placed. These buttons can be configured to use a
specific message template, or the user can select the desired message template himself.
В© 2014 OMNINET GmbH
64
OMNITRACKER Web Gateway Manual
Select Message Template Dialog
Window Description
This dialog is opened when the Web Gateway user has to select the message template himself.
В© 2014 OMNINET GmbH
Using the Web Gateway
65
Send Email Dialog
Window Description
Title
Description
To...
Opens the "Select Recipients" dialog to add or
remove direct addresses.
Cc...
Opens the "Select Recipients" dialog to add/
remove recipients to/from the list of persons that
shall receive a copy of the message. The name
and address of the Cc recipients are visible for
the other addressees.
Bcc...
Opens the "Select Recipients" dialog to add/
remove recipients to/from the list of persons that
shall receive a copy of the message. In contrast
to the "Cc" recipients the name and address of
the "Bcc" recipients will not be visible for the
other addressees.
HTML
Displays the HTML content of the mail if
available.
Plain Text
В© 2014 OMNINET GmbH
Displays the plain text of the mail for edit or
review.
66
OMNITRACKER Web Gateway Manual
Add...
Add further attachments to this email.
Remove
Removes the selected Attachment from the list
Send HTML and Text
Sends both, HTML and plain text content of this
email.
Send text only
Send
Sends only the plain text, even when HTML
content is available.
Sends the email and closes this window
В© 2014 OMNINET GmbH
Using the Web Gateway
67
Select Recipients Dialog
Window Description
Title
Description
Recipients
The list contains the current recipients. You can
delete recipients by selecting them and clicking
the red "x" button on the right.
User
You can select users and add them to the
recipients list by clicking the "+" button on the
right.
Group
You can select groups and add them to the
recipients list by clicking the "+" button on the
right.
Name and Address
В© 2014 OMNINET GmbH
You can add a new email contact to the
68
OMNITRACKER Web Gateway Manual
recipients list by clicking the "+" button on the
right.
Open Addressbook...
3.3.5
Opens the selection dialog which let you
choose objects from the Addressbooks. This
button only is enabled when at least one folder
was defined as an Addressbook special folder.
Attachments
Introduction
Attachments can be uploaded and downloaded in the Web Gateway.
Note: The maximum file size that can be sent to the web server is restricted by the
"maxRequestLength" setting in the web.config file. This value can be changed by using the
WebConfig Editor.
Attachment field
The Attachments of a field are listed in a table. To open a file or a link, simply click on the name.
Then the browser will ask your if you want to open or save the file. If you try to open a file type that is
by default opened with your browser you should click the attachment with the right mouse key and
open the attachment in a new window. Otherwise it's not possible to navigate back to the object form
that is currently open.
Add Attachments
Click on the "Add..." button to upload a file or to add a new web link.
В© 2014 OMNINET GmbH
Using the Web Gateway
69
A link can be added by entering the url in the field "Link".
A file can be added by entering the location in the field "File". You can click the browse button
instead to select a file on your local computer.
If you want to specify a description for a file or a link, it can be entered in the field "Description".
After clicking "Add" you can add further links/files. Click "OK" if you don't want to add further
attachments.
Delete Attachments
If you want to delete an attachment, the checkbox on the left must be selected. Click "Delete" to
remove the selected attachments.
Modify description
If you want to modify the description of an attachment, the checkbox on the left must be selected.
Click "Modify description..." to change the text.
В© 2014 OMNINET GmbH
70
OMNITRACKER Web Gateway Manual
Move Attachments
Attachments can be moved to other attachment fields on your web form. Click the checkbox on the
left to mark the attachments you want to move.
Note: The user must have the permission to move attachments. Furthermore this feature must be
enabled for the attachment field in the web form editor.
3.3.6
Rich-Edit Toolbar
Introduction
The Rich-Edit toolbar gets visible, if an object was opened which has at least one formatted text
field.
The toolbar gets enabled if the formatted text field has the focus. Some of the controls only get
enabled, if text was selected with the mouse cursor.
Layout
Window Description
Title
Description
1. Font family
2. Font size
1. Increase font size
2. decrease font size
1. Format selected text bold
2. Format selected text italic
3. Underline selected text
1. Change the background color
2. Change the text color
1. Align paragraph to left
2. Align paragraph to center
3. Align paragraph to right
В© 2014 OMNINET GmbH
Using the Web Gateway
71
1. Decrease indentation
2. Increase indentation
Start or end a list:
1. Bullet list
2. Numbered list
Insert a picture (the upload is restricted to max 1MB per image)
Insert a hyperlink
3.4
Search Forms and Filters
3.4.1
Default Search Form
If no specific search form was defined for a folder and if the option "Hide Search Form" in the Web
Gateway Configuration Window is set to false, the following default search form is displayed:
If the Web Gateway Configuration option "Hide Filter" is set to true, the first two rows will not be
displayed.
If the Web Gateway Configuration option "Hide Full-Text Search" is set to true, the full-text search
will not be displayed.
If both options are set to true, the default search form will not be visible in the Web Gateway.
This form contains the "filter menu button" for managing the filters in the current folder. By clicking
the dropdown box you can edit, save and organize your filters.
In the dropdown box on the right you can select an specific filter. After a filter is selected, the object
list will update it's content and shows only the objects matching the filter.
If a filter with parameters is selected, the button "Edit filter parameters" will be editable. In the box
right to this button the selected filter parameters will be displayed.
The third row in the search form contains the full-text search field.
The small Button in the upper right corner is the "minimize" button. If clicked, the search form will be
hidden.
В© 2014 OMNINET GmbH
72
OMNITRACKER Web Gateway Manual
.
3.4.2
Edit Filter Parameters
The Edit Filter Parameters dialog allows the user to select the values for the comparison.
Filters with parameters must be created in the windows client. The Web Gateway does not support
creating or modifying filters with parameters.
В© 2014 OMNINET GmbH
Using the Web Gateway
73
Note:
Fields of the type "Reference to object" and "List of references" are usually displayed as dropdownlists. If the amount of selectable objects is greater than specified in the Web Gateway Configuration,
a textbox with a select button is displayed instead to avoid performance issues (see the first row
"Incidents" in the image above...).
Quick Search
It's possible to use the Quick Search feature for the following field types:
Reference to object
List of references
To enable this feature the option "Filter Parameter use Quick Search" must be enabled in the Web
Gateway Configuration dialog. Furthermore in the "Field Properties" dialog a default quick-search
field must be specified (see the image below).
В© 2014 OMNINET GmbH
74
3.4.3
OMNITRACKER Web Gateway Manual
Performing a Search
Full-text search
To perform a full-text search, simply type in the text in the desired full-text search field and press the
associated "search" button.
В© 2014 OMNINET GmbH
Using the Web Gateway
75
Afterwards the page will reload and the object list will only display the objects that matching the
search. To reset the search, simply press the "Reset" button right to the "Search" button.
Search
To perform a search, simply fill all fields you want to include in your search and click the "Search"
button.
All not empty search fields in the search form are included in the search. As well the fields, that are
placed on another tabs.
Search Elements
Button
"Search"
If this button is clicked, the search will be performed.
Button
"Reset"
This button resets the search. All fields will be emptied.
Full-text search / search options
On a search form can checkboxes be placed, that allows to manage the following options:
Combine filter and search (If the filter selection changes or a search is performed, the search
result is addicted to the selected filter and to the filled in search fields.)
AND combination (If checked, all search fields will be AND combined)
Include subfolders in search
Include subfolders in full-text search
Include subfolders in filter
В© 2014 OMNINET GmbH
76
OMNITRACKER Web Gateway Manual
Close search result
To close a search result, click on the white cross on the right side of the navigation toolbar.
Full-text searches can alternatively be closed by clicking the respective "Reset" button.
3.4.4
Search and execute task
If you click on a "Search and execute task" Button, a search will be performed and afterwards a task
will be executed.
The search result is not displayed in the object list.
Three kinds of "Search and execute task" buttons can be placed on a search form.
Execute Task with a determined Output
The task and the output format was determined by an administrator and can't be changed.
Execute Task and select the Output
The task was determined by an administrator. If the button is clicked, a dialog opens, where the user
can select the output format.
Select Task
The task and the output format can be selected by the user himself:
В© 2014 OMNINET GmbH
Using the Web Gateway
В© 2014 OMNINET GmbH
77
78
3.4.5
OMNITRACKER Web Gateway Manual
Filter Edit Page
Description
The top porting shows all the conditions the filter rule consists of.
The lower section allows you to edit a single condition. Clicking on a condition from the rule lets you
edit the selected condition.
A condition consists of for components:
A boolean operator, AND or OR. This is requires only if you're combining more than one
condition.
A property.
A comparison. Which comparisons are available depends on the type of property. (See the
User Guide for details)
Possibly a value the property is compared to. This, too, depends on the type of property you're
comparing. (See the User Guide for details)
Once you've edited the condition, you can use the buttons in the bottom to
Add the condition to the rule or
Change the currently selected condition - this requires that you select a condition in the rule.
You can also remove the currently selected condition from the rule by clicking the "Delete"
button.
В© 2014 OMNINET GmbH
Using the Web Gateway
79
In order to change the operator precedence, you can select a range of conditions from the rule and
use the "Add (...)" and "Remove (...)" buttons on the right to add and remove brackets, respectively.
3.4.6
Filter Save Page
Description
The Filter Save Page allows you to Save user defined Filters.
Pick the name from the list or enter an new one.
В© 2014 OMNINET GmbH
80
3.4.7
OMNITRACKER Web Gateway Manual
Filter Organize Page
Description
This Page allows you to change and delete existing named filters.
3.5
Date/Time, Currency and Number formats
The format of date/time data, currency and numerical values depends on the local browser settings
and is independent of the login language.
Users of the Internet Explorer can modify the language settings by opening the "Internet Options"
window. On the "General" tab the button "Languages" must be clicked to specify the default
language.
Users of the Firefox browser have to open the "Options" in the "Tools" menu. After selecting the tab
"General", the languages can be defined by clicking the button "Languages".
What is affected?
Date/Time values
Currency values (e.g. the decimal separator or the currency symbol)
Numeric values (e.g. the thousands separator if displayed)
Overwrite browser's settings
The browser's default language setting can be overwritten by specifying the desired language in the
Login URL. The optional parameter "locale" can be used to define the preferred language.
Example for using the English (UK) format:
В© 2014 OMNINET GmbH
Using the Web Gateway
81
http://localhost/OTWG/Login.aspx?locale=en-GB
Restrict Date/Time/Currency formats
Administrators can restrict the possible number formats to the languages installed on the
OMNITRACKER server. Therefore the Web Gateway configuration option "Limit date/time/number
formats" must be set to true.
В© 2014 OMNINET GmbH
Part
IV
84
OMNITRACKER Web Gateway Manual
4
Configuration
4.1
Configuration Overview
The Web Gateway can be configured using the following means.
The Configuration File contains basic information needed to connect to the OMNITRACKER
Server, information about email notifications and redirection URLs (if the OMNITRACKER
server is unavailable), and some general web application settings.
The WebConfig Editor tool can be used to edit the configuration file.
The Style Sheet File contains formatting information, such as fonts and colors, that defines
the look of the Web Gateway's pages.
Most configuration settings that apply to the Web Gateway in general (not folder-specific) are
stored in "Web Configurations" in the OMNITRACKER database. These configurations can be
edited in the OMNITRACKER Client, using the Web Gateway Settings Window.
The layout of the Object Page can be defined in a folder-specific way by creating web forms.
These web forms are stored in the OMNITRACKER database as part of the folder definition.
They can be edited in the OMNITRACKER Client, using the Web Form Editor.
Note:
Do not change any *.aspx or *.js files. Doing that might cause the Web Gateway to malfunction;
furthermore, any changes in these files will be overwritten during a version upgrade.
4.2
Configuration File
The Web Gateway's configuration file is named web.config and is located in the Web Gateway's
installation directory (usually C:\inetpub\wwwroot\OTWG). It contains general web application
settings and information that can be adapted by the administrator.
Here are some of the settings that are defined in the configuration file:
Session timeout
Maximum request length (limits the maximum attachment size that can be uploaded)
Connection to the OMNITRACKER server (hostname and port)
Used Web Configuration
Email notification settings (if OMNITRACKER server is not reachable)
Redirection of users if OMNITRACKER server is not reachable
Used Crystal Reports version
All important settings can be easily adapted by using the WebConfig Editor tool.
NOTE:
The Web Gateway will be restarted after saving changes. All existing web-session will be terminated!
В© 2014 OMNINET GmbH
Configuration
85
Accessing the OMNITRACKER Server
Location
Attribute
Description
web.config
OT_Hostname
Defines the name or alternatively
the IP address of the host
computer system on which the
OMNITRACKER server process
resides.
<configuration>
<appSettings>
<add>
If the OMNITRACKER server
process resides on the same
computer as the OMNITRACKER
client process, then "localhost"
should be used as host name.
Exception: If the Web-Gateway
runs on a node in a loadbalancing cluster, then the DNS
name of the cluster must be
instead of "localhost".
OT_Port
Defines the port number of the
OMNITRACKER server.
OT_configuration
Defines the name of the Web
Configuration to be used.
OT_CrystalReportsAssemblyVer Defines the Crystal Reports
sion
assembly version that is used to
create reports. The default value
is 12.0.2000.0.
WARNING: The web.config file
contains two more entries with
the Crystal Reports assembly
version. All entries must contain
the same version number.
Please use the WebConfig Editor
tool exclusively to adapt this
setting!
В© 2014 OMNINET GmbH
OT_emailSender
The email address that is used
to send notification emails if the
OMNITRACKER server is not
reachable.
OT_emailRecipients
The email addresses to which
notifications are sent, separated
by semicolons.
OT_smtpServer
The SMTP server which is used
to send the notification emails.
OT_redirectionUrl
The URL to which users are
86
OMNITRACKER Web Gateway Manual
redirected if the OMNITRACKER
server is not reachable.
NOTE: if no URL is defined, the
users will receive the connection
error message (e.g. "Cannot
connect to server 'xy', Port
123...") if the OMNITRACKER
server is not reachable.
OT_LogLoadTimes
If you set this value to a valid
path (on which the IIS process
has write access), the Web
Gateway creates a log file for
every day in which it logs the
time that is spent in the Web
Gateway code for each
requested page. If an exception
occurs, this is also logged in the
file.
If the value is not set or set to an
empty or invalid path, no logging
is performed.
OT_ErrorLogDirectory
If you set this value to a valid
path (on which the IIS process
has write access), the Web
Gateway creates a log file for
every day in which it logs error
messages and debug
information.
OT_showStackTrace
If you set this value to "true" then
a detailed error is displayed if an
unexpected error occurs.
The following Attributes can be used for virtual Web Gateways separately by appending
"_<NameOfTheVirtualWebGateway>" to the attribute:
OT_Hostname
OT_Port
OT_configuration
OT_redirectionUrl
For example you can use "OT_Hostname_OTWG2" to configure this setting for a virtual Web
Gateway with the name "OTWG2"
Web Application Settings
В© 2014 OMNINET GmbH
Configuration
87
Location
Attribute
Description
web.config
timeout
Session timeout in minutes
cookieless
Defines whether browsers must
enable cookies to access the
OMNITRACKER Web Gateway.
<configuration>
<sessionState>
"true": Browsers do not need to
enable cookies
otherwise: Browser must enable
cookies
web.config
<configuration>
<system.web>
<httpRuntime>
4.3
maxRequestLength
Defines the maximum file upload
size (in kBytes) supported by the
Web Gateway. This limit can be
used to prevent denial of service
attacks caused by users posting
large files to the server
WebConfig Editor
In the "Tools" subdirectory of your Web Gateway installation directory, there is a file named
"ConfigEditor.exe". You can use this application to simply change settings in the web.config file.
This Tool furthermore checks your web.config file after the Web Gateway installation has finished
and can add missing entries that are important for the Web Gateway to work correctly.
The main features are:
Change general application settings
Create new virtual Web Gateways
Change settings for specific Web Gateways (e.g. the used Web Configuration)
Define the Crystal Reports version that shall be used
Configure the email notification (the Web Gateway can send emails to administrators if the
OMNITRACKER server cannot be reached)
Define a logging directory for errors
Check/Update web.config files after an version update
Set time intervals necessary for some features
NOTE:
The Web Gateway will be restarted after saving changes by clicking "Apply". All existing websession will be terminated!
To use this tool on IIS 7 machines, the windows feature "IIS Metabase and IIS 6 configuration
В© 2014 OMNINET GmbH
88
OMNITRACKER Web Gateway Manual
compatibility" must be installed.
Layout - General Settings
Window Description
Title
Timeout after
inactivity
Description
Here you can specify how long a Web Gateway user can be inactive, before
the OMNITRACKER session is closed automatically.
Note: There is another timeout setting in the Internet Information Service (IIS).
This option should be set to the same value. Otherwise the smallest timeout
В© 2014 OMNINET GmbH
Configuration
89
setting is used.
Warning: This timeout will not work on the main page, if an auto refresh
interval is defined for the object list. (see Web Gateway Configurtion Window)
Max. request
Length
This is the maximum size in KB, that a user can upload to the web server. If
you want to allow the users to upload attachments that are larger than 4 MB,
than you must enlarge the max possible file size here.
Warning: Only change this setting if necessary to prevent denial of service
attacks caused by users posting large files to the server.
Use Cookies
This feature should be enabled avoid that the session id is displayed in the
url. This increases the security.
Furthermore some Web Gateway features need this option to be checked.
For example the size of the email dialog will be stored in cookies.
Enable Single
Sign-On
This option must be checked if you want to use the OMNITRACKER Single
Sign-On feature.
Load defaults
Loads the recommended application settings.
Crystal Reports
Version
Please specify here which Crystal Reports Runtime Components you have
installed on the web server.
You can click the button "Test" to check if the specified version of the Crystal
Reports Runtime components is installed.
Sender
Recipients
SMTP server
Send test email
Log Directory
The email address that is used to send a notification email.
The email address(es) that will receive the notification emails. Please use the
semicolon ( ; ) to separate several addresses.
The SMTP server that is used to send notification emails.
Click this button to check if your settings are correct and if email notifications
can be sent.
If a directory is specified here, errors will be written to a log file. The logging
directory is the same for all (virtual) Web Gateways.
Layout - Virtual Web Gateways
В© 2014 OMNINET GmbH
90
OMNITRACKER Web Gateway Manual
Window description
Title
Name
Description
The name of the virtual Web Gateway that shall be configured.
(All Web Gateways that have an item with the key "OT_Hostname_xxx" in
the "appSettings"-section of the web.config file are listed in the dropdown
list.)
Create new
New virtual Web Gateways can be created by clicking this button.
В© 2014 OMNINET GmbH
Configuration
91
1. Select the source website containing your current Web Gateway
installation of which you want to create a copy.
2. Select your current Web Gateway
3. Select the target website in which you want to create the copy.
4. Enter the name of the new Web Gateway copy.
After clicking OK the new Web Gateway will be added to the IIS and to the
web.config file.
Select the option "Only add to web.config" if you don't want the application to
be added to the IIS.
Delete
Hostname
If this button is clicked, the currently displayed virtual Web Gateway is
removed from the IIS and from the web.config file.
Defines the name or alternatively the IP address of the host computer system
on which the OMNITRACKER server process resides.
If the OMNITRACKER server process resides on the same computer as the
OMNITRACKER client process, then "localhost" should be used as host
name.
Exception: If the Web-Gateway runs on a node in a load-balancing cluster,
then the DNS name of the cluster must be instead of "localhost".
Port number
Defines the number of the TCP port of the OMNITRACKER server process to
which the Web Gateway shall connect. This port number must be identical to
the number as defined in the "Server Port Subpanel" window.
Test connection
Click this button to check if the specified OMNITRACKER server is
reachable.
Redirection URL
If an URL is specified here, users that try to log in the Web Gateway will be
redirected to this URL if the OMNITRACKER server is not reachable.
If no URL is defined, users will get an error message like: "Cannot connect to
В© 2014 OMNINET GmbH
92
OMNITRACKER Web Gateway Manual
server 'Server1', Port 8085..."
Configuration name The name of the Web Gateway Configuration that shall be used.
If the OMNITRACKER server is reachable, the dropdown list is pre-filled with
all defined Configurations.
Layout - Timings
В© 2014 OMNINET GmbH
Configuration
93
Window Description
Title
Description
Polling interval
The client browser can send a small data package to the Web Gateway
Server every N seconds. N is the time interval which is specified here (default
is 60 seconds).
This polling mechanism ONLY becomes active, if the feature "Always close
session" was enabled in the Web Configuration Options dialog.
Browser closed
logout
On some browsers it is possible to detect if a browser tab/window was closed
or if a redirect occurs. To find out if a redirect occurred we have to wait for the
specified time, to check if another Web Gateway page is requested. If no
request occurs, a logout is performed.
Note: If there are network problems it may be meaningful to use a larger time
interval.
Missing polling
logout
If no polling data package was received from the client for the specified time,
a logout is performed. This interval should be at least 10 seconds larger than
the specified polling interval. This is the fallback mechanism for browsers
which do not support the "Browser closed logout".
Auto-Notification
interval
The Web Server contacts the OMNITRACKER server to find out if new
Notifications are available at most every N seconds. The time interval N can
be specified here. A small time interval can cause performance problems if
many users are connected to the Web Gateway. The default value is every 15
Minutes.
The OMNITRACKER Server is contacted during postbacks (if the clients
browser page is updated) or by the polling mechanism, but only if the AutoNotification interval has expired since the last check.
The polling mechanism only can be used if "Always close session" was
enabled (see description of "Polling interval").
Restore default
timings
4.4
Restores the default settings which are recommended for most applications.
Style Sheet Files
The Web Gateway has different style sheet files for different purposes and different browsers . They
are located in the Web Gateway's installation directory (usually C:\inetpub\wwwroot\OTWG). These
files containing formatting information, such as fonts and colors, that defines the look of the Web
Gateway's pages.
В© 2014 OMNINET GmbH
94
OMNITRACKER Web Gateway Manual
System_StyleSheet files
Files which contain default formatting information. Please do not change the contents of these files.
When updating the Web Gateway, these files will be overwritten.
OTWG_StyleSheet.css
This file can be used to overwrite the formatting of the System_StyleSheet files. The file can be
modified by an administrator an is not overwritten when the Web Gateway will be updated. To
overwrite a style, simply copy the according class from the System_StyleSheet file into the
OTWG_StyleSheet file and adapt the property.
It's recommend that only modified properties are stored in the OTWG_StyleSheet.css file, so please
remove all unchanged properties from the class.
PLEASE NOTE that the elements a Web Gateway page consists of, their styleable attributes and
their structure may change in future versions of OMNITRACKER. In particular, future versions might
replace existing or add additional visual elements that your custom stylesheets do not address.
Example
Let's assume you want to change the background color of the shortcut bar into red and the color
gradient shall be removed. Please open the System_StyleSheet.css file with a simple text editor and
search for "shortcutbar".
You will find the following class:
body.shortcutbar
{
back ground-color: #009EE0;
back ground-image:url(images/bg_shortcutbar.gif);
back ground-position:bottom;
back ground-repeat:repeat-x;
color: White;
}
Now please copy the complete class and paste it into the file OTWG_StyleSheet.css file. Remove
all properties that do not want to change.
body.shortcutbar
{
back ground-color: #009EE0;
В© 2014 OMNINET GmbH
Configuration
95
back ground-image:url(images/bg_shortcutbar.gif);
}
Now you can adapt the color. Replace the value #009EE0 with the new color (e.g. Red or #FF0000
for a red color). To remove the background-image change the value to "none".
body.shortcutbar
{
back ground-color: Red;
back ground-image: none;
}
Now save the OTWG_StyleSheet.css file and login the Web Gateway. The changes should take
effect immediately. If not please press the F5 key for a refresh of the page.
4.5
Web Configurations
4.5.1
Web Gateway Settings Window
Introduction
This window can be accessed through the File / Administration menu. It is used to edit settings for
the Web Gateway. You can maintain multiple configurations, for example if you are using multiple
Web Gateways with one OMNITRACKER Server, or if you want to switch configurations easily.
Each configuration is identified by a unique name. The Web Gateway uses the configuration with the
name specified in the parameter "OT_configuration" in the Configuration file.
В© 2014 OMNINET GmbH
96
OMNITRACKER Web Gateway Manual
Layout
Window Description
Title
Description
Required
Configurations
List of existing Web Gateway configurations.
Add
Configuration...
Opens the Web Gateway Configuration Window to add a new
configuration.
Edit
Configuration...
Opens the Web Gateway Configuration Window to edit the
selected configuration.
Delete
Configuration
Deletes the selected configuration(s).
Export
Exports the selected configuration(s) to a file or to the clipboard.
Import
Imports configurations from a file or from the clipboard.
Import Config
Files...
Description
Opens the Web Configuration Import Wizard to import
configuration files (Web.config and/or OTWebGW.config) from
previous versions of the Web Gateway into the OMNITRACKER
database.
Shows a description for the selected configuration.
В© 2014 OMNINET GmbH
Configuration
4.5.2
97
Web Gateway Configuration Window
Introduction
This window is used to edit a named configuration for the Web Gateway. A configuration consists of
the following information:
Guest logins define a way for external users to log into the Web Gateway without having
individual OMNITRACKER user accounts.
Configuration options control the general behavior of the Web Gateway. Most options can be
assigned multiple values, with rules defining which value should be used, depending on the
current user.
Layout
Window Description
Title
Name
Description
Guest Logins
В© 2014 OMNINET GmbH
Description
Unique name to identify this web configuration. The Web Gateway
uses the configuration with the name specified in the parameter
"OT_configuration" in the Configuration file.
Optional description for this web configuration.
List of guest logins belonging to this configuration. For the meaning
of the displayed columns, please refer to the Guest Login Properties
Required
YES
98
OMNITRACKER Web Gateway Manual
Window.
Add Guest
Login...
Opens the Guest Login Properties Window to add a new guest login.
Edit Guest
Login...
Opens the Guest Login Properties Window to edit the selected guest
login.
Delete Guest
Login
Options
Deletes the selected guest login(s).
List of configuration options with the following columns:
Option: The option's name
Value: The option's value. If the option is not set to a specific
value, the option's default value is used (indicated by the prefix
<default>). If the option has different values depending on the
user, it is displayed as <multiple values>. In this case, you can
press "Edit Value" to see the individual values and their rules.
The options are grouped into several categories. Please refer to the
following sections for a description of each category and its options.
Edit Value...
Opens the Web Configuration Option Window to edit the value(s) of
the selected option.
General Options
These options apply to the Web Gateway in general and are not specific to the main view or object
forms. Some of these options also apply when no user is currently logged into the Web Gateway,
therefore their values cannot depend on the current user. This is indicated by the word "NO" in the
column "Multiple Values", meaning that this option can only be set to one fixed value. "YES" means
that multiple values are allowed for this option.
Option Name
Description
Multiple
Values
Allow deletion of
objects
Set this option to true to enable the deletion of objects in
the Web Gateway.
YES
Always Close
Session
If this option is true, a logout is performed, if a user
accidentally and unintentionally closes the browser
window instead of pressing the Web Gateways logout
button.
Due to technical limitations this logout is performed
delayed.
YES
There are two mechanisms:
On some browsers the closing event can be detected. The
logout is performed about 20 seconds after the browser
(tab) was closed.
If the closing event cannot be detected, the session is
closed about 1-2 minutes after the browser (tab) was
closed (a polling mechanism is used).
В© 2014 OMNINET GmbH
Configuration
99
Note:
This option also affects the update mechanism of
Notifications.
Drop-Down filter range Allows to filter the list of drop-down items if the number of
items is within the specified range. By default the range is
15-1500.
Click here for more information.
Error Message if no
Write-Enabled
License is available
If a user with a read-only license will change to a writelicense it can be, that for the moment no write-license is
available. In this case an error message can be shown that
is defined here
Limit date/time/
number formats
Set this value to 'true' if you want to restrict the possible
date/time and number formats in the Web Gateway to the
languages installed on the OMNITRACKER server.
The number format in the Web Gateway depends on the
settings of the web browser. So if the user has specified
languages that are not installed on the OMNITRACKER
server, these languages are ignored.
Limit number of pane
tabs
This option can be used to limit the number tabs which are
used to switch between the main list and all open objects.
Value
Behaviour
0
There is no limit.
1
The behavior shall be the same as in previous
versions (Web Gateway 10.0.x and older). Either
the main list, or an object is displayed. If an object
is displayed, it must be closed to return to the main
list. If an object is displayed and if action is
triggered which causes that a folder or another
object shall be displayed, then the current object is
canceled and closed, even if the object was
modified by the user! All unsaved changes are
refused.
Such actions (change to folder, open object, create
new object) can be triggered by buttons on the
shortcut bar or by combo scripts.
Note:
This only works if Popup Forms is false.
The Notifications page is not counted (The folder
tab and the Notifications tab can be visible
concurrently).
>1 The maximum displayable tabs is limited to this
number. If the limit is reached, it's not possible to
create or open further objects. An error message is
displayed that it is necessary to close at least one
В© 2014 OMNINET GmbH
YES
100
OMNITRACKER Web Gateway Manual
of the objects first.
Note:
If Popup Forms is enabled, this option can be used to limit
the number of browser tabs or windows, however this may
be problematic if objects are closed by using the browsers
"x"-button instead of the Web Gateways "Cancel" button.
(The Web Gateway cannot recognize if an object was
closed by the browsers "x"-button, so it's assumed that
the object still is displayed.)
Login as readonly by
default
When a user logs in, he only has a readonly license. If the
user wants to save changes on an object, he gets a write
license if one is available. This write license remains, until
the user logs out.
NO
Quick Search Limit
Specifies the maximum of objects that are displayed in the
quick search result window on the object form or in the
filter parameter dialog. If the quick search result contains
more objects than specified here, the user will be
redirected to the main page to select the object(s) from the
main list.
YES
Show bookmarking
link on login page
(normal users)
Set this option to true to have a "Bookmark this page" link
displayed on the login page. This link is only visible if the
user uses Internet Explorer and if it is not a singleton
login.
NO
Show bookmarking
link on login page
(guests)
Same as the previous option, only for guest logins.
NO
Show username in
object is locked
message
If this option is set to true and a locked object is opened,
the information message will contain the name of the user
who locked the object. If this option is set to false, the
name of the user will not be displayed.
NO
Note: This option can only be set to one fixed value with
an <always> rule.
Show User Portraits
Display user icons on reference-to-user fields.
YES
Deactivate this option if you experience performance
problems with long user lists.
Note: At the moment, only Firefox browsers support this
option.
Single Sign-On
(allow)
Allows single sign-on in the Web Gateway
NO
Single Sign-On (hide
login Window)
Allows single sign-on in the Web Gateway
NO
Text for Guest Login
The string to be displayed above the login screen when a
The login window is not displayed and the user is logged in
with his current windows credentials.
NO
В© 2014 OMNINET GmbH
Configuration
101
Label
guest login is used. Instead of a static text a system
parameter can be used here.
Text for Singleton
Logout
The string to be displayed on the logout page after a single
object login. This option is only used if the option "URL for
Singleton Logout" is set to its default value
(OTWGSingletonLogout.aspx).
NO
URL for End of
Session
URL to which the browser will be redirected when the user
presses the "Logout" button
YES
URL for Login Limit
Exceeded
URL to which the browser will be redirected when the
maximum number of concurrent sessions for a web guest
has been reached.
NO
URL for Session
Timeout
URL to which the browser will be redirected when the
session timeout expires.
NO
URL for Singleton
Logout
URL to which the browser will be redirected when the
"singleton" option has been used to show a single object,
e.g. from an Email link (see URLs for details) and the user
presses the "Logout" button.
YES
Main View Options
These options control the display and behavior of the Web Gateway's main page.
Option Name
Description
Auto Refresh Interval
Specifies the time interval in minutes, after
which the object list on the main page is
refreshed. The default value is "0" which means
the auto refresh is disabled.
Note: the calender view is not refreshed. This
option only affects the list and the tree view.
Warning: Using this option can have a
negative performance impact on the server! In
addition the session timeout cannot occur if
the list is periodically refreshed. Sessions will
not be closed if the main window is displayed!
Dialog Title: 'Add
Attachments'
Specifies the dialog title for the 'Add
Attachments' Window.
Dialog Title: 'Add Column'
Specifies the dialog title for the 'Add Column'
Window.
Dialog Title: 'DateTime
Picker'
Specifies the dialog title for the 'DateTime
Picker' Window.
Dialog Title: 'Define List
Layout'
Specifies the dialog title for the 'Define List
Layout' Window.
Dialog Title: 'Define Filter'
Specifies the dialog title for the 'Define Filter'
Window.
В© 2014 OMNINET GmbH
Multiple Values
102
OMNITRACKER Web Gateway Manual
Dialog Title: 'Define Tree
Layout'
Specifies the dialog title for the 'Define Tree
Layout' Window.
Dialog Title: 'Filter
Parameters'
Specifies the dialog title for the 'Filter
Parameters' Window.
Dialog Title: 'Load Filter'
Specifies the dialog title for the 'Load Filter'
Window.
Dialog Title: 'Message Of
The Day'
Specifies the dialog title for the 'Message Of
The Day' Window.
Dialog Title: 'Modify
Attachment Description'
Specifies the dialog title for the 'Modify
Attachment Description' Window.
Dialog Title: 'Move
Attachment'
Specifies the dialog title for the 'Move
Attachment' Window.
Dialog Title: 'Organize
Filters'
Specifies the dialog title for the 'Organize
Filters' Window.
Dialog Title: 'Save Filter'
Specifies the dialog title for the 'Save Filter'
Window.
Dialog Title: 'Save View'
Specifies the dialog title for the 'Save View'
Window.
Dialog Title: 'Select Output
Format'
Specifies the dialog title for the 'Select Output
Format' Window.
Dialog Title: 'Select Task'
Specifies the dialog title for the 'Select Task'
Window.
Dialog Title: 'Set Password
Specifies the dialog title for the 'Set Password'
Window.
Disable Appearance
Settings
Specifies whether appearance settings will
affect the objects in the main list.
YES
Display custom Icons in
Folder Tree
Specifies whether custom icons are displayed
in the folder tree
YES
Filter Parameter select
Reference Limit
Specifies the maximum allowed count of
referenced objects that are displayed in drop
down lists. Otherwise a text field with a select
button is displayed.
YES
Filter Parameter use Quick
Search
Specifies whether Quick Search can be used
on reference fields in the filter parameter dialog.
YES
Hide 'Change Password'
Button
Specifies whether the change password button
is hidden.
YES
Hide 'Change Password'
Button for Web Guests
Specifies whether the change password button
is hidden for web guests.
YES
Note: The change password button will not be
В© 2014 OMNINET GmbH
Configuration
displayed if the guest login uses the option
'Use Windows Login' or does not use a
password field.
Hide Filter
Specifies whether the filter selection box is
hidden.
YES
Hide Folder Tree
Specifies whether the folder tree is hidden.
YES
Hide Full-Text Search
Specifies whether the full-text search is hidden.
YES
Hide Notifications
Specifies whether the notifications page is
hidden.
YES
Hide Search Box
Specifies whether the search box is hidden.
YES
Hide Search Form
Specifies whether the Search Form is hidden.
YES
Hide Shortcut Bar
Specifies whether the Shortcut Bar is hidden.
YES
Hide Views
Specifies whether the views dropdown list is
hidden. If empty, the default text is used. The
placeholder {0} can be used to show the name
of the current user. Multilingual strings from
System Parameters can be displayed if the
following format is used: $?
(<Table>.<Parameter>)
YES
Label for 'Logout' Button
The string to be displayed on the 'Logout'
button. If empty, the default text is displayed.
The placeholder {0} can be used to display the
singular term of the current folder. Multilingual
strings from System Parameters can be
displayed if the following format is used: $?
(<Table>.<Parameter>)
Label for 'New' Button
The string to be displayed on the 'New' button
Show Task
Specifies whether tasks (e.g. reports) can be
displayed.
YES
Page Size Top Level
Maximum number of top level objects
displayed at a time in the object list.
YES
Page Size Sub Level
Maximum number of sub level objects (tree
view only) displayed at a time in the object list.
YES
Show Message of the Day
to Guests
Specifies whether the Message of the Day is
displayed to guests.
YES
Show Message of the Day
to Users
Specifies whether the Message of the Day is
displayed to users.
YES
Show Tasks
Specifies whether the Tasks dropdown list is
hidden.
Show total Numbers of
Specifies whether the total number of objects
В© 2014 OMNINET GmbH
YES
103
104
OMNITRACKER Web Gateway Manual
Objects in the Object list
is displayed.
You may want to remove this flag for
performance reasons. (see "Hints for
Performance Optimization" in the
administration online help for details.
Object Form Options
These options control the display and behavior of the Web Gateway's object page.
Option Name
Description
Multiple Values
Confirm closing Form
Specifies whether there should be a message
box asking the user to confirm the close action
if the object has been changed.
YES
Default position of button
array for attachments
Specifies the default position of the button
array for attachments. Possible values are Left,
Right, Top and Bottom.
YES
Default position of button
array for reference lists
Specifies the default position of the button
array for reference lists. Possible values are
Left, Right, Top and Bottom.
YES
Default style of button array
for attachments
Specifies the default style of button array for
attachments. Possible values are "Icon only",
"Text only" and "Icon + Text".
YES
Default style of button array
for reference lists
Specifies the default style of button array for
reference lists. Possible values are "Icon only",
"Text only" and "Icon + Text".
YES
Display Terminology
Specifies whether the terminology is displayed
in the form title row.
YES
Displayed References
Maximum number of objects displayed at a
time in a reference list. If a reference list is is
displayed using the tree view, this option
defines the number of objects in top and sub
levels.
YES
Hide Toolbar (OK/Apply/
Cancel buttons)
Specifies whether the main button bar on
object forms is hidden. The main button bar
contains the following buttons:
YES
OK
Save
Cancel
Lock (depends on the locking mode of
the OMNITRACKER Server)
Submit and/or Submit&Copy (if added to
the web form)
В© 2014 OMNINET GmbH
Configuration
To supply the default actions like "Save" or
"Cancel" on your form, you can use the OK/
Apply/Cancel/Lock Buttons item in the Web
Form Editor.
If no OK/Apply/Cancel/Lock Buttons item was
added to the form, these buttons will by added
automatically by the Web Gateway to the end
of the object form footer.
Note: Also in the button configuration window
the OK, Save and/or Canel button can be
hidden.
Note: Submit or Submit&Copy buttons cannot
be used, if the Toolbar is hidden!
Highlight required Fields for
Workflow
Specifies whether the fields that are required
for a state transition are highlighted when the
transition is selected.
YES
Lock open Objects
Specifies whether objects are locked when
they are opened.
YES
Open all Objects in the
same popup Form
Specifies whether only one popup window is
used to display objects. Popup Forms must be
activated
YES
Popup Forms
Specifies whether a new window is displayed
when an object is opened.
YES
Modern browsers often open popup windows in
a new tab. This behaviour can be changed in
the browser settings.
Internet Explorer:
Tools/Internet Options/General/Tabs/Settings/
Always open pop-ups in a new window
Firefox:
Tools/Settings/Tabs/Open in new window
instead of new tab
Show Attachment
Description
Specifies whether the description of the
respective attachments is in Web Forms
displayed instead of the filename/link-url.
YES
Show Logout Button
Specifies whether the Logout Button is
displayed in Web Forms.
YES
Show Tooltip on Control
Defines whether tooltips should be displayed
on controls.
YES
Show Tooltip on Label
Defines whether tooltips should be displayed
on labels.
YES
В© 2014 OMNINET GmbH
105
106
OMNITRACKER Web Gateway Manual
Image URLs
These options specify URLs of images used for icons and buttons.
Option Name
Description
Multiple Values
Image for "Add Attachment"
Buttons
URL of the image used for
"Add Attachment" buttons.
YES
Image for "Add Reference"
Button
URL of the image used for a
button in the object form for
adding references to existing
objects.
YES
Image for Attachments
URL of the image used for the
attachments column in the
main view.
YES
Image for "Change Description"
Buttons of attachments
URL of the image used for
"Change Description" buttons
of attachment lists.
YES
Image for Logo
URL of the logo to display in
the upper left corner of the
main view.
YES
Image for "Logout" Button
URL of the image used for the
"Logout" button.
YES
Image for "Move" Buttons of
attachments
URL of the image used for
"Move" buttons of attachment
lists.
YES
Image for "New" Button
URL of the image used for the
"New" button in the main view.
YES
Image for "Next" Button
URL of the image used for a
button to go to the next page in
the object list.
YES
Image for "Next" Button
(Disabled)
URL of the image used for the
"Next" button, if it is disabled.
YES
Image for Object
URL of the image used for
each object in the object list.
YES
Image for "Fast Forward"
Button
URL of the image used for a
button to go 5 pages forward in
the object list.
YES
Image for "Fast Forward"
Button (Disabled)
URL of the image used for the
"Fast Forward" button, if it is
disabled.
YES
Image for "First" Button
URL of the image used for a
button to go to the first page in
YES
В© 2014 OMNINET GmbH
Configuration
the object list.
Image for "First" Button
(Disabled)
URL of the image used for the
"First" button, if it is disabled.
YES
Image for "Last" Button
URL of the image used for a
button to go to the last page in
the object list.
YES
Image for "Last" Button
(Disabled)
URL of the image used for the
"Last" button, if it is disabled.
YES
Image for "Main View" Button
URL of the image used for the
"Main View" button in the
object form.
YES
Image for "Move" Buttons of
attachments
URL of the image used for
"Move" buttons of attachment
lists.
YES
Image for "Open Reference"
Button
URL of the image used for a
button in the object form for
opening a referenced object.
YES
Image for "Previous" Button
URL of the image used for a
button to go to the previous
page in the object list.
YES
Image for "Previous" Button
(Disabled)
URL of the image used for the
"Previous" button, if it is
disabled.
YES
Image for "Remove
Attachment" Buttons
URL of the image used for
"Remove Attachment" buttons.
YES
Image for "Remove Reference"
Button
URL of the image used for a
button in the object form for
removing references.
YES
Image for "Rewind" Button
URL of the image used for a
button to go 5 pages back in
the object list.
YES
Image for "Rewind" Button
(Disabled)
URL of the image used for the
"Rewind" button, if it is
disabled.
YES
Image for "Save" Button
URL of the image used for the
"Save" button in the object
form.
YES
Image for "Select all matching
current filter" Button
URL of the image used for the
button in the navigation toolbar
to select all objects matching
filter.
YES
В© 2014 OMNINET GmbH
107
108
OMNITRACKER Web Gateway Manual
Image for the Search Form
"Search" Button
URL of the image used for the
"Search" buttons in the search
form.
YES
Image for the Search Form
"Reset" Button
URL of the image used for the
"Reset Search" buttons in the
search form.
YES
Image for the Search Form
"Add Reference" Button
URL of the image used for the
"Add Reference" buttons in the
search form.
YES
Image for the Search Form
"Add Reference" Button
(Disabled)
URL of the image used for the
disabled "Add Reference"
buttons in the search form.
YES
Image for the Search Form
"Maximize" Button
URL of the image used for the
"Maximize" button in the
search form.
YES
Image for the Search Form
"Minimize" Button
URL of the image used for the
"Minimize" button in the search
form.
YES
Image for the Search Form
"Remove Reference" Button
URL of the image used for the
"Remove Reference" buttons in
the search form.
YES
Image for the Search Form
"Remove Reference" Button
(Disabled)
URL of the image used for the
disabled "Remove Reference"
buttons in the search form.
YES
Image for "Unselect all" Button
URL of the image used for the
button in the navigation toolbar
to unselect all objects.
YES
Remote Authentication Options
These options define the settings if external authentication is used
Option Name
Description
Multiple Values
Remote Authentication URL Specifies the URL of an external authentication
server
NO
Client Certificate for Remote Specifies which client certificate shall be used
Authentication
for authenticating the OMNITRACKER server.
NO
XSL Transformation for
Remote Authentication
NO
Contains an optional XSLT transformation
which converts the answer of the authentication
server into the XML document format expected
by OMNITRACKER..
Basic Authentication Options
These options define the settings if basic authentication is used
В© 2014 OMNINET GmbH
Configuration
Option Name
4.5.3
Description
109
Multiple Values
User Name Header
Specifies the name of the request header
which contains the login name (optional).
NO
Forbidden User Names
A regular expression which defines which
users cannot use basic authentication
NO
Allowed User Names
A regular expression which defines which
users are allowed to use basic authentication
NO
Security Level
A number from 0 to 2. (0 = highest security
level, 2 = lowest)
Specifies under which conditions the Browser
requests the login data from the user using
basic authentication
NO
Guest Login Properties Window
Introduction
This window is used to edit a guest login setting for the Web Gateway. Guest logins provide access
to the OMNITRACKER for external persons ("guests"). For example, you may want to provide the
possibility for your customers to read a FAQ list, or to create new incidents.
В© 2014 OMNINET GmbH
110
OMNITRACKER Web Gateway Manual
Layout
Window Description
Title
Description
Required
ID
Unique numeric ID to identify this guest login setting. This number must
be used in the Web Gateways Login URL to access the
OMNITRACKER through this guest login.
YES
Name
Name for this guest login setting
YES
Root
Folder
Restricts access through this guest login to the specified folder and its
subfolders. Pressing "..." opens a window to select a root folder.
Pressing "x" removes the root folder setting, meaning that all folders can
В© 2014 OMNINET GmbH
Configuration
111
be accessed through this guest login (depending on the user's
permissions).
Default
Folder
The folder that is selected after login to the Web Gateway.
User
The OMNITRACKER user associated with this guest login. This user will
be the current user in all sessions established through this guest login,
meaning that this user's privileges and permissions define what
information can be accessed and/or modified through this guest login.
Login
Mode
Specifies whether authentication is requried or not. The following modes
are possible:
Anonymous (any user will be able to use this guest login and
assume the associated user's privileges without having to enter any
login name or password.)
Password (the users have to enter name and password into the
login dialog)
Windows Login (the authentication is handled automatically using
the Windows user name as login name and the domain name as
password. The login page will not be displayed to the user. In this
case, the login field and password field in the login folder (see
below) must contain the Windows user names and domain names
of all users that will use this guest login.)
LDAP Profile (the users have to enter their LDAP user name and
password into the login dialog. The login field in the login folder must
contain the LDAP user name of all users that will use this guest
login.
The user name must be unique for all objects in the login
folder!)
Windows Login:
If you want to use this option, make sure that the following options are
set correctly:
The option "Automatic login using current user name and password"
(open "Tools | Internet options | Security", select the respective
zone and click "Adjust settings") is set in the Internet Explorer.
The client computers from which users try to log on is in the same
domain as the OMNITRACKER server
The IIS does not allow anonymous logins. Deactivate this in the IIS
Manager (inetmgr.exe), in the properties dialog of your Web
Gateway directory, open the tab "Directory security" and deactivate
the option "Anonymous login", activate "Integrated Windows
authentication" instead.
Login
Folder
The folder containing authentication information. The login folder must be
specified if "Login required" is checked. Pressing "..." opens a window
to select a login folder.
Login Limit This field is optional and specifies how many concurrent sessions a
Field
guest may use.
В© 2014 OMNINET GmbH
YES
112
OMNITRACKER Web Gateway Manual
Leave this setting empty if you don't want to limit the sessions. Press
the "..." button to select a field that contains a limit for this guest. Only
fields of the types byte, integer and long are supported.
When the fields value is 0, the guest never can login the Web
Gateway
When the fields value is greater than 0, the guest can login as many
times the value is.
When the fields value is empty, the guest may always login.
When a guest wants to login and the login limit is reached, the user is
redirected to a page that tells him that the maximum number of
sessions has been reached. The url of this page can be modified in the
Web Gateway Configuration Window under "General Options".
Login Field The field in the login folder (or a referenced folder) containing the login
names for the guest login. The login field must be specified if "Login
required" is checked. Pressing "..." opens a window to select a login
field.
Login
Label
Optional label for the login edit box on the login page. If no label is
specified, the login box is labeled "Login" (or the equivalent in the
current language).
Password
Field
Optional field in the login folder (or a referenced folder) containing the
passwords for the guest login. If no password field is specified, users will
be able to log in using only the login name and no password. Pressing
"..." opens a window to select a password field. Pressing "x" removes
the password field setting.
Password
Label
Optional label for the password edit box on the login page. If no label is
specified, the password box is labeled "Password" (or the equivalent in
the current language).
Recursive
If this box is checked, authentication information also will be searched in
all subfolders of the configured login folder.
Show
Name of
Guest in
History
and in
Memo
Sections
If this box is checked, the name of the guest login object (naming
scheme of login folder) will be displayed in the history and the header of
memo section entries.
If this box is not checked, the name of the OMNITRACKER user which
is associated to this guest login will be displayed.
Important Notes:
After changing this setting, the existing history and memo sections
will not altered. Additionally id a guest login object is deleted, existing
history/memo entries will not be adapted.
To create the name of the guest login object, the naming scheme of
the login folder will be used. Therefore it should be checked, that the
naming scheme of the login folder does not contain the same fields
which are used as guest login and/or guest password (if so, this
information will be displayed in the history entries).
Create
If this box is checked, the object page for creating a new object will be
В© 2014 OMNINET GmbH
Configuration
new object
in folder...
displayed to the user right after logging in. The folder in which the object
will be created must be selected below. If a root folder is defined, you
can only select folders below the root folder as the folder for object
creation.
Note: If an anonymous login is used, then the login is treated as a
singleton login. This means the user only has the possibility to create
one new object in the specified folder, afterwards a logout is performed.
In versions before 8.1, this folder was the last selected folder for the
OMNITRACKER user defined for this guest login. During migration, the
last selected folder of the user is copied to the web guest login
definition.
If this box is not checked, the main page will be displayed after logging
in.
Restriction Set the radio button to "Use folder base filter" if you want the active web
of active
guests to be restricted by the base filter which is active for the user
guest
selected above.
users
This might be unwanted, so you have the possibility to define a separate
filter to determine the active guests. In this case, select "Ignore base
filter and use this rule".
Important Note:
We recommend you strongly to use a separate filter for the active
guests. In future versions, the flag "use folder base filter", will be
removed, so you should set the flag to "Ignore base filter and use this
rule" as soon as possible.
Edit rule...
Click this button to define a rule by which the objects in the "Login
folder" are filtered. The default filter is an empty filter. The text
representation of the filter is displayed below the button.
Apply web
guest
base filters
also in
server side
actions
In versions before 8.1, server-side actions (this means here Tasks,
Combo scripts and Actions which are triggered by object modifications)
did not consider web guest base filters. Therefore, after migration to 8.1
or later, these actions still do not apply web guest base filters, because
this might be important for existing configurations to work.
Important Note:
We recommend you strongly to have web base filters applied in server
side actions after you have checked if your actions still work with web
base filters enabled. This flag will be removed in a future version, so you
should set the flag as soon as possible to "true".
Base
Filters
List of base filters, which restrict the objects that the user can access
through the guest login. These base filters are applied in addition to the
base filters in the folder definition. The following columns are shown:
Folder: Name of the folder to which the base filter applies. If the
folder contains subfolders, the base filter also applies to them.
Rule: The rule which is used to restrict the objects in the given
folder. You can use any property of the web guest login object and
В© 2014 OMNINET GmbH
113
114
OMNITRACKER Web Gateway Manual
any property of the filtered objects for your rule. Note: If you change
the login folder, all base filters will be deleted.
Field mapping: The field mapping used to create a new object in the
given folder. The web guest login object will be used as the source
object for this field mapping. If there is another mapping for the
creation of new objects (for example, if the guest creates a new
object from the shortcut bar), the field mapping on the base filter is
applied afterwards, overwriting existing field entries.
If Anonymous login mode is selected, it's not possible to define base
filters, because the rule editor offers some special comparisons which
require an authenticated person (guest object). Rules for anonymous
guests must be defined in the folder definitions base filters. To make a
base filter valid for a specific guest login, it must be combined with the
Ot-User account which is used in the guest login definition.
Notes: If you migrate from a version before 8.1, existing web base filters
will be transformed to the new form. If these base filters used a reference
field for matching, this reference field was filled with the web guest login
in earlier versions. In this case, a field mapping will be generated and
used for the new base filter.
Unfortunately, earlier versions allowed the user to define inconsistent
web base filters:
It was possible to define multiple base filters for one folder. The
order in which they were evaluated was undefined. Therefore, if such
a case is detected during migration, all the base filters are
combined (with "AND") and there is a message in the server control
panel. You have to resolve this ambiguity later.
It was possible to define a base filter which compares uncomparable
fields, for example "Reporting Person (which is a reference) = Last
Name (which is a text field)". These filters always returned 0
matches, therefore such base filters are converted to a rule "Unique
ID = 0". There is also a message in the server control panel which
informs you that you have to resolve this manually.
If the base filter tries to match a reference field of the filtered folder
with the web guest login object, a new object cannot be filled with
the web guest login object if the folders don't fit. In this case, no
field mapping is created.
Add Base
Filter...
Opens the Guest Login Base Filter Window to add a new base filter.
Edit Base
Filter...
Opens the Guest Login Base Filter Window to edit the selected base
filter.
Delete
Deletes the selected base filter(s).
Base Filter
В© 2014 OMNINET GmbH
Configuration
4.5.4
115
Guest Login Base Filter Window
Introduction
This window is used to edit a base filter for a guest login. Please refer to the Guest Login Properties
Window for a detailed description of base filters.
Layout
Window Description
Title
Description
Required
Display an object in
the folder ...
The folder to which this base filter applies. If the folder contains
subfolders, the base filter also applies to them. Pressing "..."
opens a window to select a folder.
YES
...if the following rule
applies:
Displays the rule used for matching.
YES
Edit rule...
Opens the rule editor to define the rule
Field mapping for
creation of new
objects
This combobox contains the list of field mappings in the folder
defined above. Only those field mappings whose source folder
is the login folder or one of its parents are shown in the list. In
addition only field mappings without restriction filters are listed
and can be used here. The last item of the dropdown list is
"(Add new...)". If you select this item, the Field Mapping
Definition Dialog pops up which allows you to define a new field
mapping in the target folder with the login folder as the source
folder.
Edit...
Opens the Field Mapping Definition Dialog for the currently
selected field mapping.
В© 2014 OMNINET GmbH
116
4.5.5
OMNITRACKER Web Gateway Manual
Web Configuration Option Window
Introduction
This window is used to edit the values of a configuration option for the Web Gateway. Please refer to
the Web Gateway Configuration Window for a list of available options.
Layout
There are two slightly different versions of this window, depending on the configuration option that
you are editing. For options that allow multiple values (see the tables in Web Gateway Configuration
Window), the window looks as follows:
For options that do not allow multiple values, the window is somewhat simplified:
В© 2014 OMNINET GmbH
Configuration
117
Window Description
Title
Option
Description
Values
Description
Shows the name of the option you are currently editing.
Shows a description for the option you are currently editing.
List of values with the following columns:
Rule: Specifies the condition under which this value applies,
or <default> for the default value.
Value: The value associated with the rule.
If this list contains more than one value, the value that applies at
a given time is determined by evaluating the rules in the order
specified by this list (from top to bottom). The first rule that
matches determines the value to be used. If no rule matches, the
default value is used. To illustrate this, the default value is always
displayed at the bottom of this list, but it is actually not part of
the web configuration and is not stored in the database. The
default value cannot be changed or moved in the list.
If you are editing an option that does not allow multiple values,
then this list cannot contain more than two entries (one for the
actual value and one for the default value).
Edit Rule...
Opens the "Edit rule" window, which is essentially identical to
the Filter Properties Window, to edit the rule for the selected
value.
This button is only available for configuration options that allow
multiple values.
Delete Value
В© 2014 OMNINET GmbH
Deletes the selected value(s) from the list.
Required
118
OMNITRACKER Web Gateway Manual
This button is only available for configuration options that allow
multiple values.
Up/Down
arrows
New Value
Moves the selected value up or down in the list.
This button is only available for configuration options that allow
multiple values.
Specifies a new value that will be inserted into the list of values
when you press "Add Value", "Change Value" or "Set Value".
Depending on the configuration option you are editing, this may
be either a drop-down list of possible values, or a text box in
which you can enter a value.
Add Value
Adds a new entry to the list of values, with the rule <always> and
the value specified in "New Value".
This button is only available for configuration options that allow
multiple values.
Change Value
Changes the selected entry in the list of values to the value
specified in "New Value".
This button is only available for configuration options that allow
multiple values.
Set Value
Sets the configuration option to the value specified in "New
Value".
This button is only available for configuration options that do not
allow multiple values.
Reset Value
Resets the configuration option to its default value.
This button is only available for configuration options that do not
allow multiple values.
4.5.6
Web Configuration Import Wizard - Settings Page
Introduction
The Web Configuration Import Wizard allows you to import configuration information from Web.config
and OTWebGW.config files used by previous versions of the OMNITRACKER Web Gateway. The
following information can be imported:
Configuration options
Guest logins
Hidden fields
Web forms
The wizard can be accessed from the Web Gateway Settings Window. The wizard's first page is
used to specify some settings for the import process.
В© 2014 OMNINET GmbH
Configuration
119
Layout
Window Description
Title
Web.config
Description
Required
Location of the Web.config file to import. Pressing "Browse"
opens a file selection dialog to browse for the file.
You can leave this field blank if you only want to import an
OTWebGW.config file.
OTWebGW.co
nfig
Location of the OTWebGW.config file to import. Pressing
"Browse" opens a file selection dialog to browse for the file.
You can leave this field blank if you only want to import a
Web.config file.
Name
Name of the Web Gateway configuration into which you want to
import the configuration information. If you specify the name of an
existing configuration, this configuration will be modified with the
imported information (you will be prompted to confirm this).
Description
Optional description for the imported web configuration. If you
leave this field blank, the configuration's description will remain
unchanged if it already exists.
Modify
Web.config ...
If this box is checked, then the specified Web.config file will be
modified as follows at the end of the import procedure:
All recognized and imported elements in the section
В© 2014 OMNINET GmbH
YES
120
OMNITRACKER Web Gateway Manual
<configuration> / <appSettings> will be deleted.
The following element will be added to the section
<configuration> / <appSettings>:
<add key="OT_configuration" value="name"/>
where name is the name of the imported web configuration,
as specified in the "Name" box above.
These modifications will instruct the Web Gateway to retrieve its
configuration information from the web configuration that was just
imported into the OMNITRACKER database.
If you check this box, it is advisable to make a backup copy of
the Web.config file before proceeding.
Next
4.5.7
Starts the analysis of the selected configuration files. No
changes will be made to the database at this time. You will get a
chance to review the analysis results on the wizard's Results
Page before you decide to import the information into the
database.
Web Configuration Import Wizard - Results Page
Introduction
This wizard page displays the results of analyzing the configuration files selected on the Settings
Page. It allows you to
review any errors that were found during analysis
select which items you want to import
specify names for the imported web forms
No changes will be made to the OMNITRACKER database until you press the "Finish" button.
В© 2014 OMNINET GmbH
Configuration
121
Layout
Window Description
Title
The following
items ...
Description
List of importable items that were found during analysis of the
configuration files.
If any errors were found during analysis, they are displayed
together with the corresponding item and marked with this icon:
Each importable item has a checkbox, which allows you to
control which items will be imported. You can also use the
checkbox of a section heading (e.g. "Guest Logins") to check or
uncheck all the items in that section at once.
The item list is structured as follows (depending on the
configuration files you are importing, not all of these items may
be available):
Options from Web.config: Represents all importable
elements from the <configuration> / <appSettings> section
of the Web.config file. They will be imported as configuration
options into the web configuration that you specified on the
Settings Page.
If you are importing into an existing web configuration, the
existing configuration options will remain unchanged if you
uncheck this item.
В© 2014 OMNINET GmbH
Required
122
OMNITRACKER Web Gateway Manual
Guest Logins: Contains the guest login settings defined in
the <guestlogins> section of the OTWebGW.config file. They
will be imported into the web configuration that you specified
on the Settings Page.
If you are importing into an existing web configuration, any
existing guest login settings will be replaced only if they
have the same ID value.
Hidden fields: Represents the information from the
<hiddenfields> section of the OTWebGW.config file. This
information is split into two different types of importable
items:
Options: The elements <hiddenfilter>, <hiddenfoldertree>
and <hiddenfulltextsearch> from the OTWebGW.config file
will be imported as the corresponding configuration options
("Hide Filter", "Hide Folder Tree" and "Hide Full-Text
Search") into the web configuration that you specified on
the Settings Page.
If you are importing into an existing web
configuration, the three options mentioned above will
remain unchanged if you uncheck this item.
Visible Permissions: The <hiddenfield> elements from
the OTWebGW.config file will be imported as "visible"
permissions into the corresponding folders (see the
Permissions Subpanel in the folder definition).
Permissions are not part of the web configuration,
but the permission rules will contain a condition
referring to the configuration that you specified on
the Settings Page. This ensures that the
permissions remain unchanged for users using the
Windows client or any other web configuration.
Forms: Represents the information from the <fields> section
of the OTWebGW.config file. Each <folder> element of that
section will be imported as a web form into the
corresponding folder (see the Forms Subpanel in the folder
definition).
Web forms are not part of the web configuration, but they
will be associated with form conditions referring to the
configuration that you specified on the Settings Page. This
ensures that the newly imported web forms will not
interfere with any other web configurations.
Since web forms need to have unique names, the wizard
automatically generates names like
"ImportedWebFormNNN" (where NNN is a number). You
can change these names using the "Form Name" box and
the "Change Name" button (see below). Existing web
forms are never overwritten. If you enter a name that
already exists, you will get an error when you press the
"Finish" button, and you will get a chance to enter a
different name and try again.
Error Details...
Opens a window to display detailed information about the
В© 2014 OMNINET GmbH
Configuration
123
selected error. This button is only enabled when you select an
error (marked with the icon
) from the list.
Form Name
Allows you to enter a new name for the selected web form. This
field is only enabled if a web form is selected in the list.
Change Name
Changes the name of the selected web form to the name you
entered in the "Form Name" box. This button is only enabled if a
web form is selected in the list.
Back
Goes back to the wizard's Settings Page.
Finish
Imports the checked items into the database.
If an error occurs during import (e.g. if a web form with the same
name already exists), an error message is displayed and the list
of items is updated. All items that were imported successfully
are marked with the icon
instead of a checkbox, which
means that you cannot uncheck them anymore (because they
are already in the database). You can still check or uncheck the
remaining items. For example, you can uncheck the item that
caused the error, in order to skip importing that item. You can
also change the names of the web forms that have not been
imported yet. Press the "Finish" button to try importing the
remaining items again.
4.6
Web Forms
4.6.1
Web Form Editor Window
4.6.1.1
Web Form Editor Window
Introduction
This window can be accessed from the Forms Subpanel in the folder definition. It is used to edit a
web form, which defines how objects in this folder are displayed by the Web Gateway. You can also
define search forms using a similar dialog.
В© 2014 OMNINET GmbH
124
OMNITRACKER Web Gateway Manual
Layout
Window Description
Title
Description
Current Language
Allows you to select the language in which the form is currently displayed
and edited. The available choices depend on which languages are defined
in the form. Press the "Select Languages..." button to add or remove
languages.
Translations
Opens the 'Translations button' context menu with further multilingual
features.
Current Web Theme
Allows you to select the theme which defines the design of the form.
Add Theme...
Allows you to add a new theme.
Edit Theme...
Allows you to edit the current selected theme.
Allow HTML tags in
texts
If this box is not checked, all text in the form (including labels, text
elements etc.) will be displayed just like you enter it, no matter what
characters it contains. Any HTML tags you enter will also be displayed
literally and not have the intended effect.
If this box is checked, any HTML tags you enter will have the intended
effect. Please make sure to check the box before entering any HTML
tags. This allows you to specify special formatting in your texts. However,
you will have to take special care not to use the characters "<" and ">"
outside of HTML tags, and not to use the "&" character by itself. You
have to replace these characters by the following codes:
В© 2014 OMNINET GmbH
Configuration
Character
Replaceme
nt
<
<
>
>
&
&
125
If you change this checkbox from unchecked to checked, these
replacements will be done automatically in all existing text. However, it is
your responsibility to use the replacement codes in any text you enter
after checking this box.
If you change this checkbox from checked to unchecked, and the form
already contains HTML tags, they will lose their special meaning and be
displayed literally. You cannot undo this by simply checking the
checkbox again (because then the replacements described above would
be applied to all "<" and ">" characters, including the ones belonging to
the former HTML tags). Therefore, you will be asked to confirm this step.
Whether this checkbox is set on opening the web form editor does not
only depend on the value you set during the last session of the form editor
but also if the form contains HTML labels. If there is no HTML text in the
form, the box is unchecked on reload.
Suppress Form Title
Fullscreen mode
If this box is checked, the form title will not be displayed in the Web
Gateway object form if "Popup Forms" is enabled.
(The title always is displayed on the corresponding panes tab button)
If checked, the Form will be opened in "fullscreen mode" (comparable with
a modal dialog). This means that other elements like the shortcut bar or
the pane tabs are hidden. The user cannot switch to another page (except
child forms if a referenced object is opened) until the object is closed.
If multiple objects are displayed in the breadcrumb bar, and if at least one
of the displayed objects uses the "fullscreen mode", then all objects are
shown in "fullscreen mode".
If a comboscript is invoked on a form which uses "fullscreen mode" and if
the script causes a redirect to another page, then the current object is
cancelled and closed. (The following PerformAction methods are causing
redirects: change_to_folder, open_object and open_new_object)
Use enabled flags
from field definitions
If checked, the "enabled if" flag from the field definition is respected in
web forms. Then it will not be possible to define "Enabled if" rules on the
tab "Display". Whether controls are enabled or not depends on the
"Enabled if" rule or script which was defined on the field definition page.
Add/Modify "OnOpen"
script
Allows to add or modify a script which is executed if the form is opened.
Add/Modify "OnSave"
script
Allows to add or modify a script which is executed if an object is saved
(only available on object forms)
Add/Modify
В© 2014 OMNINET GmbH
Allows to add or modify a script which is executed if a search is
126
OMNITRACKER Web Gateway Manual
"OnSearch" script
performed (only available on search forms)
Edit visibility mode/
Edit form mode
Click this button to switch from "Edit form mode" (this is the default) to
"Edit visibility mode" (see below for details) and back.
Clear Form
Deletes the contents of the form in all languages. You will be asked to
confirm this step.
(Header) ...
This part of the Web Form Editor represents the web form itself. The form
always has a header (shown as "(Header)"). Optionally, it may contain
one or more tabs. The Web Gateway will display the form header near the
top of the page, and any tabs will be displayed below the header (see the
Object Page for an example).
The contents of the header or the currently selected tab are shown in a
hierarchical grid. The tabs contain sections, which may in turn contain
fields, text elements, task buttons, command buttons, attachments and
history. The header may contain the same types of items. The different
types of items are represented by the following icons:
Ico
n
Meaning
Tab
Section
Text element
Button
Boolean Field
Currency Field
Date/Time Field
Dropdown List Field (when displayed
as dropdown list)
Reference to object Field (when
displayed as dropdown list)
Reference to user Field (when
displayed as dropdown list)
Workflow Field (when displayed as
dropdown list)
Dropdown List Field (when displayed
as radio buttons)
Reference to user Field (when
displayed as dropdown list)
Workflow Field (when displayed as
dropdown list)
В© 2014 OMNINET GmbH
Configuration
127
Memo Field
Reference to user Field
Timestamped Memo Field
Other Field
History
When an item is selected, its properties are shown in the properties box
near the bottom of the window.
Double-clicking a tab, section, field or task button opens the Edit
Multilingual Text Window to edit the item's label.
(Footer) ...
Available Items
This part of the Web Form Editor is placed below the header. It can
contain the same types of items as the header, but no tabs.
Shows all items that you can insert into the form. You can insert an item
by double-clicking it, or by selecting it and then clicking "Add". The
following items are available:
New Tab: Creates a new tab.
New Section: Inserts a new section at the end of the current tab.
This item is not available in the form header and also not in search
forms.
New Text: Inserts a new text element after the currently selected
item.
New Task Button: Inserts a new task button after the currently
selected item. This item is only available in object forms.
New Object Create Button: Inserts a new object create button after
the currently selected item. This item is only available in object
forms.
New Object Fill Button: Inserts a new object fill button after the
currently selected item. This item is only available in object forms.
OK/Apply/Cancel Buttons: Inserts the command buttons to save or
cancel the modifications. These buttons can be used instead of the
Toolbar in the Web Gateway. This item is only available in object
forms.
Send Email Button: Inserts a send email button after the currently
selected item. This item is only available in object forms.
History: Inserts an item representing the object's history after the
currently selected item. This item is not available if it was already
added to the form. This item is only available in object forms.
For object forms, fields can be placed multiple times on the form. If a
field is added to the form, the number of occurrences on the form is
displayed behind the field name (number in brackets).
Note:
Only the local fields from the current folder can be placed multiple
times on web forms. Referenced fields, and quick search fields for
reference lists can only be added once to the form.
There are different icons for different field types:
В© 2014 OMNINET GmbH
128
OMNITRACKER Web Gateway Manual
Ico
n
Meaning
Attachments Field
Currency Field
Date/Time Field
Dropdown List Field
Workflow Field
Memo Field
Reference to user Field
Timestamped Memo Field
Other Field
Quick Search Field
(only available for fields of type
"list of references")
If a field is a reference list on the topmost level, its subelements
are only available for adding if the field is on the form.
Quick Search Fields are listed as subelements of the reference
list. Quick Search is only possible on text- and dropdown fields. If
the referenced folder does no contain text- or dropdown fields, no
Quick Search fields are listed. These Quick Search Fields can
only be added once to the form.
If a field is a reference list on a lower level (this means, it is
accessed via a reference chain), the subelements of the reference
list are not available.
On the object form, the subelements of reference lists will show
data if exactly one object is selected in the parent reference list.
Example:
In any folder you have a reference list control to the folder
"Customers". In folder Customers is a Text field named "Title".
You added the Field "Customers" and the subelement
"Customers.Title" to a web form.
If the web form is opened, the field "Customers.Title" shows the
title of the object which currently is selected in the reference list
"Customers". If no object is selected, "Customers.Title" is
displayed as empty field.
Subelements of "reference to single object" fields are always
listed, until they are added to the form.
В© 2014 OMNINET GmbH
Configuration
129
For search forms, there are three top-level nodes, "Full-text search",
"Filter" and "Search". Its subelements are described below.
Full-text search\Search string: Adds an edit field and Search/
Reset buttons to the search form.
Full-text search\Recursive full-text search: Adds a checkbox to
the form indicating whether to perform the search recursive or not. If
the checkbox is not present, the search is performed recursive.
Full-text search\<Fieldname>: Adds an edit field and a button to
perform a full-text search on the selected field. All field types are
supported here, only fields of the current folder are allowed.
Filter\Filter Menu: Adds a drop-down list to the search form to edit
and manage filters.
Filter\Filter List: Adds a drop-down list to the search form in which
all visible filters of the current folder are displayed, including <no
filter> and - if present - <user defined>. If this item is on the form,
"Search\Filter list" cannot be added to the form.
Filter\Edit Filter Parameters: Adds a button to the search form to
open a dialog in which the user can edit filter parameters.
Filter\Display Filter Parameters: Adds a text label to the search
form which displays filter parameters and their values if present.
Filter\Recursive Filter: Adds a checkbox to the search form
indicating whether the filter is to be applied recursively. If the
checkbox is not present the filter is applied non-recursive.
Search\Search: Adds a button to the search form to initiate a
search.
Search\Reset: Adds a button to the search form to reset the search
form's content.
Search\AND Combination: Adds a checkbox to the search form to
indicate whether the search fields are combined with a logical AND (if
checked) or with a logical OR (if not checked). If the checkbox is not
present, the fields are combined with AND.
Search\Filter List: Adds a drop-down list to the search form in which
all visible named filters of the current folder are displayed. If this item
is on the form, "Filter\Filter list" cannot be added to the form.
Search\Recursive: Adds a checkbox to the search form to indicate
whether the search is performed recursively. If the checkbox is not
present, the search is performed non-recursive.
Search\Search + Execute Task\(Select Task): Adds a button to
the search form to open a dialog in which the user can select a task
to perform on the objects the search returns.
Search\Search + Execute Task\<Taskname>: Adds a button to
the search form to perform the selected task on the objects the
search returns.
Search\<Field path>: Adds a control (the control's type depends on
the field type) to the form to enter a value to search for.
Search\<Field path>\(Min value): This is available in Autonumber,
Currency, Date, Dropdown, Floating-Point and Integer fields. It adds a
control (dropdown or edit) to the form in which you can enter a
В© 2014 OMNINET GmbH
130
OMNITRACKER Web Gateway Manual
minimum field value.
Search\<Field path>\(Max value): This is available in Autonumber,
Currency, Date, Dropdown, Floating-Point and Integer fields. It adds a
control (dropdown or edit) to the form in which you can enter a
maximum field value.
Combine Filter and Search: Adds a checkbox to the form
indicating whether the currently defined search should be ANDcombined with the selected filter. If the box is not present, filter and
search are not combined.
Add
Remove
Adds the selected item from the "Available Items" list to the form. Local
fields from the current folder can be added multiple times. The number of
occurrences of a field on the form is displayed behind the field name in
the "Available Items" list.
Removes the selected item from the form.
Toggle Width
Toggles the selected item's width between single column width and whole
page width. Only fields and task buttons can have single column width, all
other items always cover the whole page width.
Arrow buttons
These buttons move the selected item in the direction of the arrow.
The left and right arrow buttons can only be used for tabs and for fields or
buttons with single column width. To move a tab left or right (changing the
order of the tabs), click on the tab and select the line with the tab icon
, then click the left or right arrow button.
... Properties
This box is used to display and edit the properties of the currently
selected item in the form. Depending on the type of the selected item, the
following subpanels are displayed:
Ic Item Type
on
Subpanel(s)
Tab
Tab Properties
Section
Section Properties
Field
Field Properties - General
Field Properties - Visibility
Field Properties - Values
Field Properties Reference
Field Properties - Columns
Field Properties - Size
Field Properties - Extended
Text
Text Properties - General
Text Properties - Visibility
(object form only)
В© 2014 OMNINET GmbH
Configuration
Button
131
Create Object Button
Properties
Fill Object Button
Properties
Task Button Properties
Command Button
Properties
Search + Execute Button
Properties
History
Field Properties - Extended
Recursive full-text
search
Search Form Checkbox
Properties
Recursive Filter
AND Combination
Combine Filter
and Search
Recursive search
For field items, not all the subpanels listed above are shown. Which of
them are shown depends on the field type.
Button Configuration...
Opens the Web Form Button Configuration Window to configure the
buttons for this web form (only available for object forms)
Preview...
Opens the Web Form Preview Window to show how the form will be
displayed by the Web Gateway (only available for object forms)
Manage Themes...
Opens the Web Themes Window to add/modify/delete/rename/export/
import themes.
Keyboard Navigation
The Web Form Editor can also be controlled using the keyboard. In addition to the standard keys for
window navigation, the following keys are supported. Some of them have different meanings
depending on the current focus location within the window.
Key
Focus Location
Ctrl + Tab
Outside of the properties
box
Switches between the header and each tab of
the form
Inside the properties box
Switches between the subpanels in the
properties box, if there is more than one.
Ctrl + Shift +
Tab
Ctrl + Tab
Ctrl + Shift +
Tab
В© 2014 OMNINET GmbH
Description
132
OMNITRACKER Web Gateway Manual
Arrow keys
Form contents
Moves the selection mark through the form
contents in the direction specified by the arrow.
Ctrl + arrow
keys
Form contents
Moves the currently selected form item into the
direction specified by the arrow, if possible. This
is equivalent to clicking the corresponding arrow
button described above.
Return
Form contents
Sets the input focus to the properties box for the
currently selected item.
Return
"Available Items"
Esc
Inside the properties box
Del
Form contents
Adds the selected item from the "Available
Items" list to the form. This is equivalent to
clicking the "Add" button.
Leaves the properties box and sets the input
focus back to the selected item in the form
contents.
Removes the currently selected item from the
form. This is equivalent to clicking the "Remove"
button.
Edit visibility mode
By clicking on the "Edit visibility mode", you can have the web form displayed in a hierarchical form.
This is very useful if you want to set the visibility or enabling rule for many items as a batch,
especially if the rule is complex.
If you select multiple items in the tree view, the visibility section below automatically displays only
В© 2014 OMNINET GmbH
Configuration
133
the rules that can actually be applied to all selected items. If all selected items use the same rule,
the common rule is displayed in the text field. Otherwise, "<multiple rules>" is displayed.
By clicking "Edit rule...", you can edit the enabling or visibility rule for all selected items.
4.6.1.2
Tab Properties Subpanel
Introduction
This subpanel is used to display and edit the properties of a tab in the Web Form Editor.
All tabs on a web form will be surrounded by an own expandable section.
Important Note: If tabs are hidden with this functionality, their content's data is still contained in the
HTML page which is transferred to the user. Therefore, this feature is not suitable for hiding sensitive
data from underprivileged users, as the user can read the data from the page source. The intent for
this feature is convenience, not security. Use permissions to hide data from underprivileged users.
Layout
Window Description
Title
Label
Tooltip
Description
The tab's label in the current language. Pressing "..." opens the
Translation Dialog to edit the different language versions of the
tab's label.
The tab's tooltip in the current language.
Break row
Check this box to have the following tabs displayed in the next
after this tab row.
Display this
tab if the
following
rule applies
This text box contains the rule which must evaluate to true for the
current object in order for this tab to be visible.
Enable this
tab if the
following
rule applies
This text box contains the rule which must evaluate to true for the
current object in order for this tab to be enabled.
Edit rule...
Click these buttons to edit the respective rule.
В© 2014 OMNINET GmbH
Required
134
OMNITRACKER Web Gateway Manual
The left side of the rules can contain the following properties:
Current user (or proxy)
Web configuration
Unique ID of current object
User fields of the current object with the type Boolean,
Dropdown, Workflow, Reference to user or Reference to
request. Referenced fields are also allowed.
Section
4.6.1.3
This subpanel contains the rule definitions for expanded by
default, visible and enabled of the surrounding section. This
subpanel will contain the same configuration for all used tabs
(s.a. Section Properties Subpanel to configure the rules).
Section Properties Subpanel
Introduction
This subpanel is used to display and edit the properties of a section in the Web Form Editor.
Layout
Window Description
Title
Description
Required
Label
The section's label (i.e. the text for the section header) in the current
language. Pressing "..." opens the Edit Multilingual Text Window to edit
the different language versions of the section's label.
Left
column
width
By default the left and the right column have the same size. The size of
the left column can be overwritten here. Absolute (pixel) and relative
(percentage) statements are possible.
Example:
If the value "80%" is entered here, the right column will only use 20% of
the whole object form width.
Expandabl This checkbox indicates whether this section can be expanded or
e
collapsed by the user. By default, this checkbox is not selected. If this
checkbox is not selected a section will always be displayed as expanded
but can not be collapsed by the user. If this checkbox is not selected, the
"Expanded by default if" rule and the checkbox left of the rule are not
editable.
В© 2014 OMNINET GmbH
Configuration
135
Checkbox This checkbox indicates whether the "Expanded by default" rule has be
Expanded evaluated. If this checkbox is not selected, the section will be displayed
by default as expanded by default, regardless of the "Expanded by default" rule.
Expanded This text box contains the rule which must evaluate to true for the current
by default if object in order for this section to be expanded by default. This rule will
only be evaluated if the "Expandable" checkbox and the checkbox left of
this rule are selected.By default, this rule is empty, which is equivalent to
“<always>”, i.e. the section is always expanded by default.
Visible if
This text box contains the rule which must evaluate to true for the current
object in order for this section to be visible.
By default, this rule is empty, which is equivalent to "<always>", i.e. the
section is always visible.
Enabled if
This text box contains the rule which must evaluate to true for the current
object in order for this section to be enabled.
By default, this rule is empty, which is equivalent to "<always>", i.e. the
section is always editable.
Edit
rule...
Click these buttons to edit the respective rule. Depending on the form
type and on the rule type, different properties are available:
Search Forms
o Expanded by Default / Visible / Enabled rules:
Current user (or proxy)
Web Configuration
Object Forms
o Expanded by Default rules:
Current user (or proxy)
Web Configuration
All condition types except “Context …” and “<Local Object>”
o Visible / Enabled rules:
Current user (or proxy)
Web configuration
Unique ID of the current object
User fields of the current object of the type Boolean, DropDown,
Workflow, Reference to user or Reference to object. Referenced
fields are also allowed.
For object forms the rules can contain “old” and “new” field values. “Old” means the field values
stored in the database; “New” means the field values that the user has entered in the form. There is
one exception: When the rule is evaluated when loading the form initially or when reloading the form
В© 2014 OMNINET GmbH
136
OMNITRACKER Web Gateway Manual
after a “Save” operation, the “New” and “Old” field values are identical and both refer to the values
from the database.
For example, suppose that
the object is in state “New”
the “Visible if” rule for the section is “State (new) <> New”
the “Expanded by default” rule is “State (new) = In Progress”
the "Expandable" checkbox is selected and
the checkbox left of the "Expanded by default" rule is selected:
Then the section is invisible when the object is opened; when the user changes the state to “In
Progress”, the section becomes visible and it is expanded because the new state is “In Progress”
and therefore “State (new) = In Progress” evaluates to “true”. (If the rule were “State (old) = In
Progress”, the section would be collapsed after it became visible.)
4.6.1.4
Field Properties - General Subpanel
Introduction
This subpanel is used to display and edit the general properties of a field in the Web Form Editor.
This subpanel is available for all field types.
Layout
Window Description
Title
Label
Tooltip
Description
Required
The field's label in the current language. Pressing "..." opens the Edit
Multilingual Text Window to edit the different language versions of the
field's label.
The field's tooltip in the current language. Pressing "..." opens the Edit
Multilingual Text Window to edit the different language versions of the
field's tooltip.
Note: Multiline text can be entered here. In this case the label is
displayed as a link in the Web Gateway. By clicking on the label, the
tooltip text is displayed in a message box.
In addition, a link to an external web site can be opened by clicking the
В© 2014 OMNINET GmbH
Configuration
label in the Web Gateway. In this case the prefix "link:" followed by the
url can be entered as tooltip.
Example:
The tooltip text "link:http://myserver/help/default.aspx" opens the site
"http://myserver/help/default.aspx" in a new browser tab/window, if the
web form label is clicked.
A combination of both (show text and open link) is not possible! Either a
text can be displayed, or a link can be opened.
Label
position
Add/Modify
"OnChange
" script
Specifies the position of the field's label. Possible values are "Left",
"Top" or "Hidden".
Allows to add or modify a script which is executed if the field was
modified by the user.
Before using "OnChange" scripts, please read the scripting hints.
Read-only
If checked, this field will be displayed as read-only, i.e. the user will not
be able to modify it.
Password
field:
This checkbox appears only for text fields. If set, the field will appear as
a password field. The box is checked by default for encrypted text fields.
Important note: Although the field's value is not directly visible to the
user, the field's content is transferred in plain text to the client.
Therefore, the user can see the field's content in the page source code.
You should only use this option for fields where users might enter
hidden information, never for fields which should not be seen by the
user.
Enable
Quick
Search
Button
This row only appears for "reference to object" fields.
Show
'Move'
Button
This row only appears for attachments fields.
If set, the users can perform Quick Searches for this field in the Web
Gateway. In the dropdown list on the right of this button, the
administrator must select on which field of the referenced objects the
search will be performed. Only text- and dropdown fields are listed.
If set, a button will appear on the web form allowing you to move an
attachment from one attachments field to another attachments field
inside the same object.
The row is only enabled if there are at least two attachments fields on
the current web form.
In the dropdown list, you can define the target field for the "move"
operation. The dropdown list contains all attachments fields except for
the current one which are present on the web form. In addition to this, a
"(select field)" option is offered. In this case, a dialog is displayed to the
user asking him to select a target field.
If the current user doesn't see the target field (due to permissions, for
example), the move button is disabled. If the target field is "(select field)"
and the user doesn't see any possible target field, the move button is
В© 2014 OMNINET GmbH
137
138
OMNITRACKER Web Gateway Manual
also disabled.
4.6.1.5
Field Properties - Columns Subpanel
Introduction
This subpanel is used to display and edit the column layout of a reference list field in the Web Form
Editor.
This subpanel is only available for fields of type "Reference list of objects".
Layout
Window Description
Title
Description
Columns to be
displayed...
Columns to be displayed in the list of references. Each column is
represented by a field name. Referenced fields are shown with
the field names separated by periods ("."). The columns will be
displayed by the Web Gateway in the given order, from left to
right.
Add Column...
Opens a window to select a field, which will be added to the end
of the list of columns.
Delete Column
Deletes the selected column(s) from the list.
Up/Down
arrows
Required
Moves the selected column up or down in the list, which will
result in moving it left or right in the Web Gateway's display,
respectively.
Page size top
level
Determines the max. number of objects which are displayed in
the list control (on top level if tree view is used) per page. "0"
means the default value is used, which is defined in the Web
Gateway Configuration Window (see option Displayed
References)
Page size sub
level
Determines the max. number of objects which are displayed in
the sub levels if the tree view is used. "0" means the default value
is used, which is defined in the Web Gateway Configuration
Window (see option Displayed References)
Height in pixels Sets the height of the reference list. The default is 200 pixels.
List layout
context
Specifies a context number that identifies a specific view layout
in the OMNITRACKER database. This is used only if no columns
В© 2014 OMNINET GmbH
Configuration
139
are specified in the columns list. In this case, the Web Gateway
uses the view layout identified by the context number to display
the list of references.
Force list
layout
Forces a list layout if checked.
The following layouts are supported on web forms:
list layout
tree layout
editable tree layout
4.6.1.6
Field Properties - Extended Subpanel
Introduction
This subpanel is used to display and edit the extended properties of a field in the Web Form Editor.
This subpanel is available for timestamped memo fields and history items.
Layout
Window Description
Title
Sort items:
4.6.1.7
Description
Required
Set the radio button to "Ascending" to have the earliest events
displayed first (default) or to "Descending" to have the latest
events displayed first.
Field Properties - Attachments Subpanel
Introduction
This subpanel is used to display and edit settings related to attachment fields in the Web Form
Editor.
This subpanel is available for attachments.
В© 2014 OMNINET GmbH
140
OMNITRACKER Web Gateway Manual
Layout
Window Description
Title
Options for the button
array / Position
Display
Description
This option sets the position for the button array. Available options
are
Option
Meaning
Default
The default configuration will be
used (option "Default position of
button array for reference lists" in
Web Gateway Configuration
Window)
Left
The button array is displayed on the
left side of the list of referenced
objects (one button per row)
Right
The button array is displayed on the
right side of the list of referenced
objects (one button per row)
Top
The button array is displayed on top
of the list of referenced objects (all
buttons in one row)
Bottom
The button array is displayed at the
bottom of the list of referenced
objects (all buttons in one row)
This option sets the display style for the button array. Available
options are
Option
Meaning
Default
The default configuration will be
used (option "Default style of button
В© 2014 OMNINET GmbH
Configuration
141
array for reference lists" in Web
Gateway Configuration Window).
Icon only
Only an icon will be displayed.
Text only
Only a text will be displayed.
Text & Icon
An icon and a text will be displayed
together.
Upload attachments using
separate dialog
4.6.1.8
If this option is enabled, a separate dialog is used for uploading
attachments. If this check box is not checked, single attachments/
links can be uploaded directly on the object page. As default this
check box is checked.
Field Properties - Reference Subpanel
Introduction
These subpanels are used to display and edit settings related to reference-type fields in the Web
Form Editor.
These subpanels are available for the following field types:
Reference to object
Reference list of objects
Layout - Reference to object
В© 2014 OMNINET GmbH
142
OMNITRACKER Web Gateway Manual
Layout - Reference list of objects
Window Description
Title
Description
Display field as
This setting is only available for fields of type "Reference to object".
It allows you to select how this field will be displayed by the Web
Gateway.
Hide buttons
These checkboxes allow you to hide certain buttons that the Web
Gateway usually displays for reference fields. By default, all buttons
described in the Object Page for modifying reference fields are
shown.
The checkboxes have the following meanings:
Default if empty
Checkbox
Meaning
All
If checked, all buttons are
hidden.
Show referenced object
If checked, the button for
opening the referenced object is
hidden.
Remove reference
If checked, the button for
removing a reference is hidden.
Add reference to existing object
If checked, the button for adding
a reference to an existing object
is hidden.
Add reference to new object
If checked, the button for adding
a reference to a new object is
hidden.
Delete referenced object
If checked, the button for
deleting a referenced object is
hidden.
The default button for fields of the type "Reference to object" can be
defined here.
All visible buttons (show, add, add new, remove and delete) are
combined to a single "Split button". This means only the default
В© 2014 OMNINET GmbH
Configuration
143
action can be performed with a single mouse click. For all other
actions the sub menu of the button must be opened, then the action
can be clicked.
The default action for non-empty fields always is the "Show
referenced object" button (if this button is not hidden).
The default action for empty fields however can be defined here.
Either "Add reference to existing object" or "Add reference to new
object" can be selected.
Options for "Add reference
to new object" / Select
Folder
If this checkbox is checked, the user has to select the subfolder in
which the new object shall be created when clicking the "Add
reference to new object" button. This option only has a meaning if
the reference is defined to include subfolders.
Add as temporary object
If checked, the new object is created temporary when clicking the
"Add reference to new object" button.
Source Object
If one of the following options is set, then the new object is created
from a source object using the field mapping when clicking the "Add
reference to new object" button.
Option
Meaning
Current object
The current object is used as a
source object.
Select object
The user is asked to select the
source object when clicking the
"Add reference to new object"
button.
Selected object
The currently selected object from
the reference list will be used as a
source object for the field mapping
associated with the "Add
reference to new object" button.
For more details on field mappings, see the OMNITRACKER
Administrator Help.
Field Mapping
Selects the field mapping which is used to map the fields between
the source object and the destination object when clicking the "Add
reference to new object" button. For more details on field mappings,
see the OMNITRACKER Administrator Help.
Note:
If a Source Object is selected and if no Field Mapping is used (if "No
Mapping" is selected), then a default mapping is performed. This
means that fields with identical alias/label are mapped
automatically. If the fields are not of the same type, the value is
converted if applicable.
Initial partner field by default
В© 2014 OMNINET GmbH
This checkbox is only available for synchronized reference fields. If it
144
OMNITRACKER Web Gateway Manual
is checked, and the user presses the button "Add reference to new
object", the partner field in the new object will be initialized with a
reference to the current object.
Options for "Add reference
to existing object" / Select
Folder
If this checkbox is checked, the user can select the reference
object from any subfolder of the target folder of the reference field
(only if the reference field is defined to include subfolders).
Otherwise, the reference can only be selected from the target folder
itself.
Options for "Add reference
to existing object" /
Selection Tree
The available selection trees, defined in the referenced folder are
displayed here. Instead of using the default "Select Object" dialog, a
selection tree can be displayed if the "Add reference to existing
objects" button is pressed on the object form.
Note: The "Add reference to existing object" button only is available
for reference lists or if the field is displayed as text field with
buttons.
Options for "Add
reference" / Fill Object
If this checkbox is checked, fields of the current object can be filled
with values from the selected referenced object. Therefore a field
mapping must be selected which is defined in the local folder. This
field mapping must use objects from the selected folder as source.
Field mapping
Selects the field mapping which is used to map the fields between
the source object and the local object when clicking the "Add
reference to new object" button or the "Add reference to existing
object" button. As source object always the selected referenced
object is used. Make sure that the field mapping uses source
objects from the referenced folder. For more details on field
mappings, see the OMNITRACKER Administrator Help.
Overwrite non-empty fields
By default only empty fields will be overwritten by the field mapping.
If this checkbox is checked, the field mapping will also overwrite
non-empty fields (even if the field was modified by the user).
Options for the button
array / Position
This option sets the position for the button array. Available options
are
Option
Meaning
Default
The default configuration will be used (option
"Default position of button array for reference
lists" in Web Gateway Configuration Window)
Left
The button array is displayed on the left side of
the list of referenced objects (one button per
row)
Right
The button array is displayed on the right side
of the list of referenced objects (one button per
row)
Top
The button array is displayed on top of the list
of referenced objects (all buttons in one row)
В© 2014 OMNINET GmbH
Configuration
Bottom
Display
4.6.1.9
145
The button array is displayed at the bottom of
the list of referenced objects (all buttons in one
row)
This option sets the display style for the button array. Available
options are
Option
Meaning
Default
The default configuration will be used
(option "Default style of button array for
reference lists" in Web Gateway
Configuration Window).
Icon only
Only an icon will be displayed.
Text only
Only a text will be displayed.
Text & Icon
An icon and a text will be displayed
together.
Field Properties - Size Subpanel
Introduction
This subpanel is used to display and edit the size properties of a field in the Web Form Editor.
This subpanel is available for history items, attachment, memo and time-stamped memo field types.
Layout
Window Description
Title
Description
Control Height
If this checkbox is unchecked (default), the item's size
may grow unbounded (which might reduce clearness of
the form). Check this box to set the item to a fixed size.
If the item needs more space than given, scrollbars will
appear.
Note: If you check this box and the item is smaller than
the given size, it will use up this space anyway. The
height is measured in pixels
В© 2014 OMNINET GmbH
Required
146
OMNITRACKER Web Gateway Manual
Override item height
This item is only available for time-stamped memo fields
and specifies the height of each section. If you leave the
box unchecked (default), the memo sections will obtain
their size from the stylesheet file.
This only applies to editable memo sections, read-only
memo sections choose their height such that the entire
text fits into them.
Note: The height is measured in pixels
Sizing of time-stamped memo fields
The following image explains how the height of time-stamped memo fields can be set.
Blue Arrow: The height of the whole field is restricted to the size which is defined in "Control height"
Red Arrows: The height of a single section is defined in "Override item height"
4.6.1.10 Field Properties - Values Subpanel
Introduction
This subpanel is used to display and edit settings related to the possible values of a field in the Web
Form Editor.
This subpanel is available for the following field types:
Drop Down List
Reference to user
Workflow
В© 2014 OMNINET GmbH
Configuration
147
Layout
Window Description
Title
Description
Display values as
radio buttons
If this option is selected, the Web Gateway will display this field as a group of
radio buttons, with one button for each possible value. Otherwise, the field will
be displayed as a drop-down list.
You can define aliases only if this box is checked.
Display field as
Drop-down list
If this option is selected, the field is displayed as a drop-down list
Display field as
text box with
Quick Search on
Display Name
This option is only available for reference to user fields.
Display field as
text box with
Quick Search on
Display, Login and
Last Name
This option is only available for reference to user fields.
The field is displayed as a text box that supports Quick Search. The search
will be performed on the field "Display Name" only.
The field is displayed as a text box that supports Quick Search. The search
will be performed on the fields "Display Name", "Login Name" and "Last
Name"
Alias list
Contains alias definitions for the possible values of this field. To define or
change an alias, select an entry in this list, enter a new alias in the "Alias
text" box and press "Change Alias".
Alias text
Contains the alias for the selected value in the "Alias list". You can edit the
alias in this box and then press "Change Alias" to update it in the "Alias list".
Change Alias
Sets the alias for the selected value in the "Alias list" to the value specified in
the "Alias text" box.
Delete Alias
Deletes the alias definitions for the selected values in the "Alias list".
В© 2014 OMNINET GmbH
148
OMNITRACKER Web Gateway Manual
4.6.1.11 Field Properties - HTML Wrapper Subpanel
Introduction
This subpanel is used to define a custom HTML layout for the fields value.
If for example a text field contains the url to an image, the picture can be displayed in the object
form.
Note:
It's not possible to edit the fields value in any way. The fields value can only be displayed readonly
by using an arbitrary design.
Layout
Window Description
Title
Wrap field values
inside HTML
Description
Allows you to define a custom HTML code which is displayed on object
forms. The fields value can be integrated into the HTML code by using the
placeholder "$(VALUE)".
In addition placeholders for the fields label and it's tooltip are available
( $(LABEL), $(TOOLTIP) )
Suppress HTML
code...
Variable...
Displays nothing, if the fields value is empty.
Allows you to insert placeholders at the cursors position.
4.6.1.12 Field/Text Properties - Display Subpanel
Introduction
This subpanel is used to display and edit the visibility condition of a field, Quick Search or text item
in the Web Form Editor.
This subpanel is available for all field types, for text items and Quick Search fields.
The rules are evaluated and applied immediatelly after a field was modified, e.g. after changing the
В© 2014 OMNINET GmbH
Configuration
149
selected item of a dropdown list or after a modified text field looses focus.
Important Note: If items are hidden with this functionality, their data is still contained in the HTML
page which is transferred to the client browser. Therefore, this feature is not suitable for hiding
sensitive data from underprivileged users, as the user can read the data from the page source. The
intent for this feature is convenience, not security. Use permissions to hide data from underprivileged
users.
Layout
Window Description
Title
Description
Display this item if
the following rule
applies
This text box contains the rule which must evaluate to true for the current
object in order for this item to be displayed.
Enable this item if
the following rule
applies
This text box contains the rule which must evaluate to true for the current
object in order for this item to be enabled.
This is only available for field and quicksearch items, as there is no
difference between an enabled and a disabled text item.
If a field is not enabled, it is read-only; i.e. you can see the field value, you
can copy text, you can scroll multiline text, and you can open referenced
objects from read-only reference (list) fields.
The only thing you cannot do when the field is not enabled is to change the
field's value.
Edit rule...
Click these buttons to edit the respective rule.
The left side of the rules can contain the following properties:
Current user (or proxy)
Web configuration
Unique ID of current object
User fields of the current object with the type Boolean, Dropdown,
Workflow, Reference to user or Reference to request. Referenced fields
are also allowed.
В© 2014 OMNINET GmbH
150
OMNITRACKER Web Gateway Manual
4.6.1.13 Field/Text Properties - Design Subpanel
Introduction
This subpanel is used to assign a theme to the field or text item on object forms.
This panel is not available on search forms and it's not available for history items on object forms.
Layout
Window Description
Title
Current Web
Theme
Description
Allows you to select a theme for a field or a text item. If a theme is assigned
to the whole form, the design of a single item can be overwritten here.
Add...
Allows you to add a new theme.
Edit...
Allows you to edit the current selected theme.
4.6.1.14 Text Properties - General Subpanel
Introduction
This subpanel is used to display and edit the general properties of a text element in the Web Form
Editor.
Layout
Window Description
Title
Description
Required
В© 2014 OMNINET GmbH
Configuration
Label
151
The element's text contents, which will be displayed as static
text by the Web Gateway. Pressing "..." opens the Edit
Multilingual Text Window to edit the different language versions of
the elements text.
4.6.1.15 Create Object Button Properties Subpanel
Introduction
This subpanel is used to display and edit the properties of a create object button in the Web Form
Editor.
Layout
Window Description
Title
Label
Tooltip
Description
Required
The button's label in the current language. Pressing "..." opens
the Edit Multilingual Text Window to edit the different language
versions of the button's label.
The button's tooltip in the current language.
Reference Field The new created object will be attached to the field selected
here. Fields of the type "reference to object" and "list of
references" can be selected here.
Folder
The folder associated with this button. An object will be created
in this folder (or a subfolder, see "Select subfolders") when the
user clicks the button.
YES
Pressing "..." opens a window containing all the folders in the
system. Select the desired folder in the tree and then click "OK".
Select
subfolder
Specifies if the user should get a chance to select a subfolder (if
there are any) when clicking the button.
YES
The object will then be created in the selected subfolder, not the
folder specified in the "Folder" field.
Field mapping
Let's you select a "Field Mapping" from the field mappings
specified in the selected folder.
If "(No mapping)" is chosen, default values will be used.
В© 2014 OMNINET GmbH
YES
152
OMNITRACKER Web Gateway Manual
Otherwise, a "Source object" setting must be selected.
For more details on field mappings, see the OMNITRACKER
Administrator Help.
Source object
If you chose a field mapping other than "(No mapping)", you must
also supply a source object setting:
Value
Meaning
(No object)
No source object. Works only with Field
mapping that don't require a "(Local object)"
to copy from.
Current object
The current object will act a source object
when the new object is created. Works only
if the source folder for the field mapping is
the current folder.
Select object
If the field mapping requires a source object,
the user will be asked too choose the
source object when clicking the button.
For more details on field mappings, see the OMNITRACKER
Administrator Help.
4.6.1.16 Fill Object Button Properties Subpanel
Introduction
This subpanel is used to display and edit the properties of a fill object button in the Web Form
Editor.
Layout
Window Description
Title
Label
Description
Required
The button's label in the current language. Pressing "..." opens
the Edit Multilingual Text Window to edit the different language
В© 2014 OMNINET GmbH
Configuration
153
versions of the button's label.
Tooltip
Field mapping
The button's tooltip in the current language.
Let's you select a "Field Mapping" from the field mappings
specified in the current folder.
YES
If "(No mapping)" is chosen, default values will be used.
If the field mapping requires a source object, the user will be
asked to select one.
If the field mapping does not require a source object, it will be
applied directly.
For more details on field mappings, see the OMNITRACKER
Administrator Help.
Overwrite
If this checkbox is checked, user modification will be overwritten
already modified when applying the field mapping to fill the object.
fields
If this checkbox is unchecked, only those fields that were not
subject to user modification will be affected.
YES
4.6.1.17 Task Button Properties Subpanel
Introduction
This subpanel is used to display and edit the properties of a task button in the Web Form Editor.
Layout
Window Description
Title
Label
Tooltip
Task
В© 2014 OMNINET GmbH
Description
Required
The button's label in the current language. Pressing "..." opens
the Edit Multilingual Text Window to edit the different language
versions of the button's label.
The button's tooltip in the current language.
The task associated with this button. This task will be executed
when the user clicks the button.
YES
154
OMNITRACKER Web Gateway Manual
Pressing "..." opens a window containing all the tasks in the
current folder. Select the desired task in the list and then click
"OK".
Please note that the Web Gateway only supports action tasks
and print tasks with Crystal Reports layouts.
Close object
after ...
If this box is checked, then the object will be closed after the
button was clicked and the task executed.
4.6.1.18 Command Buttons Properties Subpanel
Introduction
This subpanel is used to display and edit the properties of the command buttons in the Web Form
Editor.
Layout
Window Description
Title
Visible buttons
Labels
Alignment
Description
Only the checked buttons will be displayed on the web form.
Specifies the text that shall be displayed on the buttons.
Specifies the alignment of the command buttons.
Possible choices are:
Right
Left
Center
Translate labels...
Opens the Translation dialog to allow the translation of the buttons labels.
Note:
You must place at least one OK- and Cancel-Button if you have selected the Option "Hide Toolbar in
Objectform" in the Web Gateway Configuration Window
В© 2014 OMNINET GmbH
Configuration
155
4.6.1.19 Search + Execute Task Button Properties
Introduction
This subpanel is used to display and edit the properties of a checkbox field (Recursive full-text
search, Recursive Filter, AND Combination, Combine Filter and Search, Recursive search) for
search forms.
Layout
Window Description
Title
Label
Output type
Description
The element's label. See here.
This control's visibility and content depends on
the type of the given task. For Action Lists, this
control is hidden. For Report Tasks and Export
Tasks, you can select from the appropriate
output types. You can also select "Ask user", in
this case, a dialog pops up asking the user for
the output format.
4.6.1.20 Search Form Checkbox Properties
Introduction
This subpanel is used to display and edit the properties of a checkbox field (Recursive full-text
search, Recursive Filter, AND Combination, Combine Filter and Search, Recursive search) for
search forms.
Layout
В© 2014 OMNINET GmbH
156
OMNITRACKER Web Gateway Manual
Window Description
Title
Description
Label
The element's label. See here.
Hidden
Checked by default
Check this box to have the field hidden. If the
field is hidden, the value indicated by "checked
by default" is assumed. This may be useful to
override the default behaviour - that is, if there is
no checkbox present - but not to display a
checkbox.
Defines whether this box is checked or
unchecked by default. Its standard value
depends on whether the absence of this box
causes the search to assume a true or a false
value.
Special case "Recursive Filter" checkbox
If the checkbox "Recursive Filter" is placed on the search form and if this option is checked by
default, then a recursive search is started immediately when a user changes into this folder (even if
the search form is minimized).
4.6.1.21 Send Email Button Properties Subpanel
Introduction
This subpanel is used to display and edit the properties of a "Send Email" button for search forms.
Layout
В© 2014 OMNINET GmbH
Configuration
157
Window Description
Title
Description
Label
The element's label. See here.
Tooltip
The tooltip of the button.
Message Template
It's possible to specify a specific message
template here or let the user select a message
template in the Web Gateway
4.6.1.22 Search Reference User Field Properties
Introduction
This subpanel is used to display and edit the properties of a reference (or reference list) field on a
searchform. Reference fields can be displayed as either a textbox with set/reset buttons or as a
dropdown list.
Layout
В© 2014 OMNINET GmbH
158
OMNITRACKER Web Gateway Manual
Window Description
Title
Label
Display mode
Description
The element's label. See here.
Here you can select whether to display the reference field as a text field
with buttons or as a dropdown list.
The dropdown mode is only available if the reference field is located
directly in the current folder.
Selection Tree
This dropdown list enabled if the display mode "Text field with buttons" is
selected.
Instead of the default "Select Object" dialog, a selection tree can be
displayed, if the select object button of the search form item is pressed
in the Web Gateway.
More information about selection trees can be found in the Admin Guide.
Display field
Use restriction filter
Display as
If you select the dropdown list mode, you can select either the object's
name or a text or drop down field of the target folder to be displayed for
each referenced object.
Check this box "Use restriction filter" to have the drop down list's
content restricted by the field's restriction filter. The restriction filter is
updated dynamically depending on other fields of the current search
form. See example below.
Here you can select whether to display the boolean field as a combo box
or a checkbox
Example
Let's assume we are in the folder Incidents of an ITIL template. There is a reference to the folder
"Master Data\Persons" named "Reporting Person" and a reference to the folder "Master
Data\Companies" named "Reporting company". The restriction on the field "Reporting Person" is
defined as "Company = Local object.Reporting company" so that you can only select a person as
the "Reporting person" if it belongs to the "Reporting company".
Now put two items on the form, one for "Reporting Company" and one for "Reporting Person" and
check the "Use restriction filter" box for the "Reporting Person".
В© 2014 OMNINET GmbH
Configuration
159
You can see that at the beginning, all persons in the folder are contained in the drop down list. Now
select a company. After this action, the drop down list only contains the persons who belong to the
selected company.
4.6.2
Web Form Button Configuration Window
Introduction
This window can be accessed from the Web Form Editor. It is used to configure the buttons for a
web form.
Layout
Window Description
Title
Save Button Label
В© 2014 OMNINET GmbH
Description
Specifies the text to be
displayed on the button for
saving the object. If this is left
blank, the default label
Required
160
OMNITRACKER Web Gateway Manual
"Save" (or the equivalent in the
current language) is used.
If the "Hide" box is checked,
this button will be hidden.
Main View Button Label
Specifies the text to be
displayed on the button for
returning to the main view. If
this is left blank, the default
label "Main View" (or the
equivalent in the current
language) is used.
If the "Hide" box is checked,
this button will be hidden.
OK Button Label
Specifies the text to be
displayed on the button for
saving and returning to the
main view. If this is left blank,
the default label "OK" (or the
equivalent in the current
language) is used.
If the "Hide" box is checked,
this button will be hidden.
Logout Button Label
Specifies the text to be
displayed on the button for
logging out on the form. If this
is left blank, the default label
"Logout" (or the equivalent in
the current language) is used.
If "Hide" is selected in the
dropdown list, the button will
be hidden. If "Show" is
selected, the button will always
be shown. If you select "Use
global setting" (this is the
default value), showing or
hiding depends on the value of
"Show logout button" set in the
Web Configuration.
Show/hide logout button
Shows or hides the logout
button. When 'use global
setting' is selected, it relates
on the selection that is made
in the Web Gateway
Configuration Window (Object
form options -> Show logout
button).
В© 2014 OMNINET GmbH
Configuration
Translations
Opens the 'Translations button'
context menu with further
multilingual features.
Enable Submit Button
Check this box to enable the
"Submit" and/or the "Submit &
Copy" buttons. To use these
buttons, you need to specify a
boolean field that is not used
anywhere else in the form (see
"Submit Field"). When the user
presses the "Submit" button,
this field will be set to "Yes"
and the object will be saved.
The same happens when the
user presses the "Submit &
Copy" button, and in addition a
copy of the object is created
and displayed in the form. This
is useful if many similar
objects need to be created in a
row.
Submit Field
Specifies the boolean field to
be used for the "Submit" and/or
the "Submit & Copy" buttons.
You can only select fields that
are not already used elsewhere
in the form.
Set values in copy
Allows you to specify fixed
values for certain fields of a
copied object. When the user
presses the "Submit & Copy"
button to create a copy of the
current object, these fields will
be set to these fixed values,
while all other fields will be
copied from the current object.
Pressing "Edit..." opens a
window to specify the fields
and their values.
Submit Button Label
Specifies the text to be
displayed on the button for
submitting the object (i.e.
setting the submit field to
"Yes" and saving the object). If
this is left blank, the default
label "Submit" (or the
equivalent in the current
language) is used.
В© 2014 OMNINET GmbH
161
162
OMNITRACKER Web Gateway Manual
If the "Hide" box is checked,
this button will be hidden.
Submit&Copy Button Label
Specifies the text to be
displayed on the button for
submitting and copying the
object (i.e. setting the submit
field to "Yes", saving the
object, creating a copy of it
and displaying the copy in the
form). If this is left blank, the
default label "Submit &
Copy" (or the equivalent in the
current language) is used.
If the "Hide" box is checked,
this button will be hidden.
4.6.3
Web Form Preview Window
Introduction
This window can be accessed from the Web Form Editor to display a preview of the currently edited
web form. It shows the form just as it will be displayed by the Web Gateway. In fact, it uses the
Web Gateway itself to display the form. It therefore requires a working installation of the Web
Gateway using the same OMNITRACKER Server that you are currently connected to.
В© 2014 OMNINET GmbH
Configuration
Layout
Window Description
Title
Description
Required
Web Gateway URL
Specifies the URL of the Web
Gateway to be used for preview.
The URL must be of the form
http://<hostname>/<virtualroot>
(see URLs). It must not contain
the name of a specific page such
as Login.aspx.
YES
Object for preview
Allows you to specify an object
to display in the form. If you
select "(none)", the form will be
displayed just as it will look
when creating a new object. To
specify an object, select the
entry "(select...)", which will
open a window to select an
object in the current folder or a
subfolder.
If you change this selection while
В© 2014 OMNINET GmbH
163
164
OMNITRACKER Web Gateway Manual
the form is already displayed, it
will be refreshed automatically.
Language
Allows you to select the
language in which you want to
view to form.
If you change this selection while
the form is already displayed, it
will be refreshed automatically.
Automatic Login
If this box is checked, pressing
the "Start" button will
automatically log into the Web
Gateway using the specified
login name and password.
Password
The password to be used for
automatic login. The password
you enter here is remembered
until you close the
OMNITRACKER Client. It is not
stored in the registry or
anywhere in the file system.
Start
Starts a connection to the Web
Gateway. If "Automatic Login" is
enabled, the login name and
password you specified are
automatically entered into the
Web Gateway's login page, so
you do not need to enter them
manually every time you open
the preview window.
If there already is an open
connection, pressing "Start"
closes it first and then starts a
new connection. Therefore, it
does not hurt to press "Start"
when you are already logged in.
However, it is usually sufficient
to press "Refresh" in this case,
which is faster because it skips
the logout / login procedure.
If you get a message box saying
that the automatic login failed, it
simply means that the login
page was not received from the
Web Gateway yet. In this case
you can wait for the login page to
appear, and then press "Start" to
start the automatic login again. If
В© 2014 OMNINET GmbH
Configuration
165
it still fails, you always have the
option of entering your login
name and password manually
into the Web Gateway's login
page.
Refresh
Refreshes the currently
displayed page. For example, if
you make a change in the Web
Form Editor, you can press this
button to see the change in the
form preview.
Close
Closes the window. If you are
still logged into the Web
Gateway when closing this
window (no matter if you use this
button or the window's
closing button), you will be
logged out automatically.
Therefore, you may experience a
slight delay before the window is
actually closed.
4.7
Web Themes
4.7.1
Introduction to Web Themes
Introduction
With Web Themes the appearance of object forms can be easily adapted. The font, color, border or
background of almost any item on a web form can be configured.
Several Web Themes can be configured and a theme contains several sets of style definitions.
These style definitions can be applied to web forms in general or to separate items on the web form.
To organize different web themes see chapter Managing Web Themes.
General Inheritance of Style Definitions
The appearance of separate web items and of the web form in general depends on the defined style
definitions in the following order (for defining Web Themes see chapter Web Theme Editor):
1. Definitions in the style sheet class files (files with the ending .css in the
OMNITRACKER Web Gateway installation directory).
2. Configurations in a Form Theme (to specify the design of complete object forms).
3. Configurations in Form Item Themes (to specify the design of several items on an
object form).
That means the default style definitions, which are defined in several style sheet class files, can be
В© 2014 OMNINET GmbH
166
OMNITRACKER Web Gateway Manual
overwritten by a global Web Theme (i.e. a Form Theme) and these style definitions itself also can be
overwritten by one or several Form Item Themes.
Furthermore it is possible to configure one or several Form Item Themes to specify the design of
several items on an object form without the configuration of a global Form Theme. That means the
configurations in the Form Item Themes will overwrite the default definitions in the style sheet
classes.
Web Format Options Inheritance
A format option is something like text color, border width, or background image.
Normally, a form’s web theme can specify a format option in various places:
For the whole form.
For a particular web form item (sometimes in a particular state, such as “disabled”,
“mandatory”, …).
For a section. (Each web form item is contained in a section.)
Each format option contains one of the following values:
“default”
a specific value (“non-default value”)
If the value is “non-default”, this value is applied to the web form element to which it is applied. If the
value is “default”, the actual value is determined as follows:
For format options of type “background_*” or “border_*”, an implementation-defined default
value is used. (E.g. the default font color is “black”.) Therefore these format options are not
inherited from the global form configuration (configuration of the "form" item of the item tree
in the Web Theme Editor).
For format options of type “font_*”:
o the corresponding value of the section item (header or footer item in the item tree
in the Web Theme Editor), if that is non-default. This value is only used for the
title of a section.
o the corresponding value of the whole web form is used (configuration of the "form"
item of the item tree in the Web Theme Editor) , if that value is non-default. If the
forms value also is “default” , the implementation-defined default value is used.
o Note: The configuration of a text decoration (e.g. "underline" or "line-through") can
not be undone. That means if the text decoration "line-through" is configured for
the whole form, it is not possible to undo this and use "normal" for a label or a
control on this form.
There is one special case, for labels, options can be defined for “label”, “label (disabled)”,
“label (enabled)”, “label (mandatory)” (configuration of the "Labels" item of the item tree in
the Web Theme Editor). If a format option for “label (xxx)” is default, the actual value is
determined from the corresponding setting for “label”; only if the setting in “label” also is
default, the setting from the form is used.
В© 2014 OMNINET GmbH
Configuration
4.7.2
167
Organize Web Themes
Introduction
The Organize Web Themes window can be accessed through the Web Form Editor by clicking the
button "Organize Web Themes...".
It is used to add, edit, delete, rename, export or import themes.
A theme contains several sets of style definitions which can be applied to web forms or to separate
items on web forms.
Layout
Window Description
Title
Type
В© 2014 OMNINET GmbH
Description
Specifies the theme type which is displayed in the list below.
Required
168
OMNITRACKER Web Gateway Manual
Add Theme...
Edit Theme
Delete Theme
Rename
Theme
4.7.3
Allows you to add a new theme.
Opens the Web Theme Editor to edit the current selected theme.
Deletes the selected theme(s).
Allows you to rename the current selected theme.
Export
Save the theme in a file/the clipboard. Exporting a theme is
useful for re-using a theme definition in another OMNITRACKER
installation.
Import
Create a new theme based on a previously exported theme
definition file or from the clipboard.
Web Theme Editor
Introduction
The Web Theme Editor allows you to specify the design (fonts, colors, borders and backgrounds) of
web forms and/or items.
Currently the following theme types are supported:
Form Themes (to specify the design of complete object forms)
Form Item Themes (to specify the design of several items on an object form)
Depending on the theme type you are currently editing, different items can be selected in the tree
control on the left side. The tree contains all elements which can obtain a custom style. If an
element is selected, a current description about is displayed in the box below the tree control.
Depending on the current selected element, the font, the color, the border and/or the background
can be configured.
В© 2014 OMNINET GmbH
Configuration
169
Layout
Window Description
Title
Description
Font color
Specifies the color of the font. "Default" means that the color is
not changed by this theme.
Font family
Specifies the used font. Several font names separated by
commas can be declared here. If the first font is not available on
the client machine, the next font will be used instead. Click "..."
to open a dialog which allows you to select a font which is
installed on your machine directly or click "x" to use the default
font.
Font size
Specifies the size of the font.
NOTE: Controls on web forms have a fixed height! It's not
possible to use any font sizes.
Font weight
В© 2014 OMNINET GmbH
Specifies the weight of the font. Possible values are "default",
"normal" and "bold".
Required
170
OMNITRACKER Web Gateway Manual
Font style
Specifies the style of the font. Possible values are "default",
"normal" and "italic".
Font
decoration
Specifies the decoration of the font. Possible values are "default",
"normal", "underlined" and "line through".
Border color
Specifies the color of the border. "Default" means that the color
is not changed by this theme.
Border width
Specifies the width of the border.
Border style
Specifies the style of the border. Possible values are "default",
"solid", "none", "dotted", "dashed", "double", "groove", "inset",
"outset" and ridge.
Background
Color
Specifies the background color of an element.
Image URL
Specifies the background image. You can enter absolute or
relative URLs here. It's not allowed to enter file paths here.
NOTE: The background color can be overlapped by background
images. If you want to prevent this, the background image should
be set to "none" by clicking the button "default" twice.
Examples:
Not allowed: "C:\images\background.gif"
Allowed: "http://mainserver/images/background_blue.jpg"
Allowed: "../own_images/bg.gif"
Instead of using background images you can click the button
"default" to use the default setting or click the button twice if you
don't want to use an image.
Image position
Specifies the position of the background image. Possible values
are "bottom", "center", "left", "right", "top" and "left-top".
Image repeat
Specifies if the image is displayed once, or if it is repeated in any
direction. Possible values are "no repeat", "repeat", "repeat-x"
and "repeat-y".
Custom CSS
text
Allows you to specify any Cascading Style Sheet text.
Examples:
"background-position:100px 50%;" (custom position of the
background image)
"display:none" (can be used to hide an element)
"border:none; border-bottom:dotted 1px black" (only display a
black dotted border on the bottom)
Warning: The usage of custom CSS text should be avoided
whenever possible. It's not guaranteed that all custom CSS code
will work in upcoming Web Gateway versions.
Description...
Allows you to edit the description of the current theme.
В© 2014 OMNINET GmbH
Configuration
Preview...
171
Opens the Web Form Preview window to show how the form will
be displayed by the Web Gateway.
NOTE: Before changes will take effect in the preview window,
they must be applied in the Web Theme Editor.
If you log in the Web Gateway directly, changes in web themes
will first take effect after a re-login .
4.8
Arbitrary HTML formatting for lists
4.8.1
Web List Layout Editor Window
Introduction
For the main view and/or for reference lists on web forms any custom list layout is thinkable by using
XSL transformations.
XSL stands for EXtensible Stylesheet Language, and is a style sheet language for XML documents.
The object data will be sent as a XML document to the browser and will be transformed into HTML
code by using the XSL style sheet.
To specify a custom layout, the Web List Layout Editor must be opened by clicking the button "Web
Settings..." within the "Edit Column Settings" dialog.
В© 2014 OMNINET GmbH
172
OMNITRACKER Web Gateway Manual
В© 2014 OMNINET GmbH
Configuration
173
Layout
Window Description
Title
Show the object list...
XML style sheet
Description
Enables the custom layout. Otherwise the
default list layout is used.
Specifies the style sheet which is used to
transform the XML representation of the objects
to HTML.
Regarding the use of JavaScript, please see the
IMPORTANT NOTE in chapter JavaScript
В© 2014 OMNINET GmbH
174
OMNITRACKER Web Gateway Manual
Functions.
Load from file...
Load an existing style sheet.
Save to file...
Save the current style sheet.
Save sample XML data...
Allows you to select objects from the current
folder and save the XML representation of these
objects to a file.
Page Size
The max number of objects which are displayed
per page (if layout is used on the main page).
This setting overwrites the Page Size Top Level
value in the Web Gateway Configuration
Window.
NOTE:
If this layout is used for reference lists on object
forms, this setting has no effect. Please set the
max. number of displayed objects in the Web
Form Editor window (tab "columns" of the
reference list item).
4.8.2
Defining Custom Layouts
Getting started with an example:
In this example we want three fields to be displayed in a custom list layout:
Title (a text field which contains the title of the objects)
ImageUrl (a text field which contains the URL to an image. The Image shall be displayed in the
list control)
Description (a memo field which contains long text with line breaks)
В© 2014 OMNINET GmbH
Configuration
175
It must be possible to open the objects by clicking a link and it must be possible to select several
objects to execute reports.
Furthermore sorting shall only be possible on the fields "Title" and "Description".
Which object data shall be displayed and how to prevent sorting for separate columns?
Only the values of the fields which are included in the column layout can be displayed in the Web
Gateway. Therefore the three fields we want to be displayed must be added to the column layout:
To avoid that users can sort the list by the field "ImageURL", the header name of the column
"ImageURL" must be named to "-".
NOTE:
All columns which have the minus symbol as name are not available for sorting in the Web
Gateway.
The defined value for the column "With" has no effect on the custom list layout and can be
ignored.
В© 2014 OMNINET GmbH
176
OMNITRACKER Web Gateway Manual
Which object data can be accessed?
First open the Web List Layout dialog by clicking the button "Web Settings..." and then save the
sample XML data.
The following text represents the XML data of the first two objects in our example:
<rows language="en">
<object id="139" selected="false" urlopen="_open(this, 139)">
<Title label="Title">Flower</Title>
<ImageURL label="ImageURL">http://localhost/OTWG/pictures/
flower.gif</ImageURL>
<Description label="Description">A flower, sometimes known as a
bloom or blossom, is the re...</Description>
</object>
<object id="140" selected="false" urlopen="_open(this, 140)">
<Title label="Title">Car</Title>
<ImageURL label="ImageURL">http://localhost/OTWG/pictures/car.jpg</
ImageURL>
<Description label="Description">A car is a type of vehicle, most
often in American English an...</Description>
</object>
</rows>
The login language of the current user can be found in the "<rows>" element by accessing the
attribute "language".
Every object begins with an "<object>" element which contains the following attributes:
"id" (the unique id of the object)
"selected" (is true if the user has selected an object. It should be used to preselect objects in
the list after a page reload)
"urlopen" (the name of the JavaScript function which must be called to open this object)
Each field of an object which is included in the column layout is a child of the "<object>" node in the
XML data (in our example these are the elements <Title>, <ImageURL> and <Description>). The
name of these elements is the alias name of the fields or - if no alias is defined - the label in server
language.
For each field the label can be accessed by using the elements attribute "label".
For each field the content can be accessed by using the elements content.
WARNING:
В© 2014 OMNINET GmbH
Configuration
177
If memo fields are displayed, the content is not limited as known from the list or tree view. To avoid
performance problems it is recommend to limit the size of memo fields in the Field Properties
window.
How to create a XSL style sheet and access the object data?
In this simple example XSL style sheet only the value of the field "Title" is accessed.
<?xml version="1.0" encoding="utf-8"?>
<xsl:stylesheet version="2.0" xmlns:xsl="http://www.w3.org/1999/XSL/
Transform">
<xsl:template match="object">
<div style="border:solid 1px Gray; height:40px;margin-bottom:2px;">
<p style="width:100%;font-family:verdana;font-size:12pt;color:
Black;"><xsl:value-of select="Title"/></p>
</div>
</xsl:template>
</xsl:stylesheet>
This XSL transformation creates a <div> element with a gray border for each object.
Within the <div> element, the objects title is written into a <p> element, using black font color.
В© 2014 OMNINET GmbH
178
OMNITRACKER Web Gateway Manual
How to open objects?
To open an object, the JavaScript function which is given in the objects attribute "urlopen" must be
called.
Here an example how to open an object using a HTML link:
<a>
<xsl:attribute name="href"/>
<xsl:attribute name="onclick"><xsl:value-of select="@urlopen"/>;return
false;</xsl:attribute>click here
</a>
Note:
The command "return false" is very important. Otherwise the link will not work correctly!
Here an example how to open an object using a HTML button:
<button type="button">
<xsl:attribute name="onclick"><xsl:value-of select="@urlopen"/></xsl:
В© 2014 OMNINET GmbH
Configuration
179
attribute>
<p>click here</p>
</button>
How to select objects?
If you want to select an object (e.g. to achieve reports or exports) you must call the following
JavaScript function:
"selection_changed(this, id, selected)"
The first parameter always must be "this" to identify the list control.
The second paramter (id) must be replaced by the unique id of the object you want to be selected or
deselected.
The third boolean parameter (selected) must be "true" for selecting and "false" for deselecting the
object.
Here an example how to select objects using a HTML checkbox:
<input>
<xsl:attribute name="type">checkbox</xsl:attribute>
<xsl:if test="@selected='true'">
<xsl:attribute name="checked">checked</xsl:attribute>
</xsl:if>
<xsl:attribute name="onclick">javascript:selection_changed(this, <xsl:
value-of select="@id"/>, this.checked)</xsl:attribute>
</input>
Explanation:
An input element of the type "checkbox" is used (= a simple checkbox).
If the object already is selected, the attribute " checked='checked' " is added to our checkbox. This
is necessary to prevent that selections get lost after a page reload. (If the object is selected or not is
evaluated within a "<xsl:if>" element.)
Within the "onclick" event of the checkbox the selection_changed function is called. The third
parameter "this.selected" is true or false depending on if the checkbox is checked or not.
В© 2014 OMNINET GmbH
180
OMNITRACKER Web Gateway Manual
A more complex style sheet
Here an example with a more complex stylesheet. The resulting layout can be found below.
<?xml version="1.0" encoding="utf-8"?>
<xsl:stylesheet version="2.0" xmlns:xsl="http://www.w3.org/1999/XSL/
Transform">
<xsl:attribute-set name="MyImage">
<xsl:attribute name="style">height:90px;</xsl:attribute>
<xsl:attribute name="src"><xsl:value-of select="ImageURL"/></xsl:
attribute>
</xsl:attribute-set>
<xsl:template match="object">
<div style="border:solid 1px #666666; width:200px; height: 140px;
margin:2px; overflow:hidden;display:inline-block;float:left;">
<table style="table-layout:fixed; width:100%;">
<tr>
<th style="background-color:#009EE0;color:white;font-size:10pt;
text-align:left;" colspan="2"><b>
<xsl:value-of select="Title"/> </b>
</th>
</tr>
<tr>
<td style="width:80px;vertical-align:top;">
<img xsl:use-attribute-sets="MyImage"></img>
</td>
<td>
<a style="font-size:10pt;color:#009EE0;text-decoration:
underline;">
<xsl:attribute name="href"/>
<xsl:attribute name="onclick"><xsl:value-of
select="@urlopen"/>;return false;</xsl:attribute>more info...
</a>
В© 2014 OMNINET GmbH
Configuration
181
<br/><br/>
<input>
<xsl:attribute name="type">checkbox</xsl:attribute>
<xsl:if test="@selected='true'">
<xsl:attribute name="checked">checked</xsl:attribute>
</xsl:if>
<xsl:attribute name="onclick">javascript:selection_changed
(this, <xsl:value-of select="@id"></xsl:value-of>, this.checked)
</xsl:attribute>
</input> Select Object
</td>
</tr>
</table>
<textarea style="width:100%;height:80px;overflow:hidden;border:none;
color:#222288;font-size:10pt;"><xsl:value-of select="Description"/>
</textarea>
</div>
</xsl:template>
</xsl:stylesheet>
Result:
В© 2014 OMNINET GmbH
182
OMNITRACKER Web Gateway Manual
How to add multilingual static texts?
If you want to use multilingual texts, the language attribute of the XML document must be evaluated.
Here an example:
<xsl:if test="../@language='en'">More Details...</xsl:if>
<xsl:if test="../@language='de'">Weitere Details...</xsl:if>
How to invoke combo scripts?
In the following example the function named "cloneObject" in the combo script named "Script1" is
called. As parameter the unique id of the current object is passed. Please read the chapter Invoking
В© 2014 OMNINET GmbH
Configuration
183
Combo Scripts from JavaScript for more details.
<button type="button">
<xsl:attribute name="onclick">invoke_combo_script
('Script1','cloneObject', '<xsl:value-of select="@id" />')</xsl:
attribute><p>execute script</p>
</button>
Some tips:
If memo fields are used in the custom layout, make sure that the content is not too long to avoid
long load times for users with a slow internet connection.
If images are displayed, the image url must never be an empty string! Some browsers try to access
the current URL if the "src"-attribute of an image is empty. In this case The Web Gateways
directory would be accessed what can cause performance problems on you web server. Therefore a
field which contains an URL should always have a default value or should be mandatory...
Image files should be as small as possible to avoid long load times.
A new XSLT style sheet should be tested with different browsers to discover display problems in
time.
Hide fields from sorting by renaming the column to "-".
If text with from memo fields which contains line breaks shall be displayed, the value must be
placed inside textareas.
See the the field "Description" in the example "A more complex style sheet" above.
It's recommended to use external tools to create or modify the XSLT style sheet. Some tools can
check the syntax or can generate the output HTML format by using the sample XML data which can
be stored in the Web List Layout Editor.
Note:
The generated output of external editors can be different from the list layout as it is displayed in the
Web Gateway. In the list control the HTML elements of a custom layout may inherit style sheets
from the Web Gateway.
В© 2014 OMNINET GmbH
184
OMNITRACKER Web Gateway Manual
4.9
Scripting
4.9.1
Introduction
Visual BasicВ® scripts can be executed on search and object forms. These scripts can be triggered
by various events, e.g. if a form is opened or a button is pressed. The scripts are executed on the
web server.
An OMNITRACKER Visual BasicВ® script may contain all language elements, which are supported
by the Visual BasicВ® script engineВ® of MicrosoftВ®. For details please refer to the VBScript
language reference manual of MicrosoftВ®. For those Visual BasicВ® objects, which are specific for
OMNITRACKER please refer to OMNITRACKER’s Automation interface manual.
The chapter "Reference/Global Properties and Methods" of the OMNITRACKER's Automation
interface manual only is valid for server-side scripts and for scripts in the windows clients, not for the
Web Gateway. The Web Gateway has a own set of global properties and methods (described in the
next chapter).
4.9.2
Global Properties and Methods
4.9.2.1
Overview
Here an overview over all script events and global properties/methods which are available in the Web
Gateway. Depending on the script event, some properties and methods may not be available.
These script events are available on object forms:
OnOpen: Invoked once, if an object is opened.
OnSave: Invoked if an object is saved (Save button clicked or method "Save" used by script)
OnChange: Invoked whenever a field (attachment, integer, memo, ...) on an object form was
modified
OnClick: Invoked if a script button was clicked.
These script events are available on search forms:
OnOpen: Invoked whenever a search form is opened (after changing into a folder, even if the
searchform is minimized)
OnSearch: Invoked if the "Search" button was clicked or if the method "Search" was used by
script
OnClick: Invoked if a script button was clicked.
The following table contains a list of all global Web Gateway script properties and methods and
shows where they can be used.
Property or Method
Object Forms
Search Forms
OnOpen OnSave OnChang OnClick
OnOpen OnSearch OnClick
В© 2014 OMNINET GmbH
Configuration
185
ActiveFilter
x
x
x
ActiveFolder
x
x
x
x
x
x
e
ActiveObject
x
x
x
x
ActiveSearchFilter
ActiveSession
x
x
x
x
x
x
x
ActiveUser
x
x
x
x
x
x
x
CancelAction
x
x
CloseObject
x
CombineFilterAndSearch
x
x
x
x
x
x
x
OpenObject
x
x
x
x
OpenNewObject
x
x
x
x
x
x
x
x
x
x
GetSelectedObjects
LogMessage
x
x
x
x
RecursiveSearch
ResultMessage
x
x
Save
x
x
x
x
Search
ServerLanguage
StatusText
4.9.2.2
x
x
x
x
x
x
x
x
x
Properties
4.9.2.2.1 ActiveFilter
ActiveFilter Property
ActiveFilter As OtFilter
This property is only available in Search Form Scripts.
Syntax
' Get the current folder and change the active filter
В© 2014 OMNINET GmbH
x
x
x
x
x
186
OMNITRACKER Web Gateway Manual
Dim filt
Dim fold
Set fold = ActiveFolder
Set filt = fold.MakeFilter
filt.UserField("Responsible") = ActiveUser
ActiveFilter = filt
Access
This property is read-write.
Description
This property returns the filter which is currently selected.
If the ActiveFilter is changed, it is shown as "User Defined" filter in the Filter ComboBox on the
search form.
4.9.2.2.2 ActiveFolder
ActiveFolder Property
ActiveFolder As OtRequestFolder
This property is only available in Search Form Scripts.
Syntax
' Get the current folder and change the active filter
Dim filt
Dim fold
Set fold = ActiveFolder
Set filt = fold.MakeFilter
filt.UserField("Responsible") = ActiveUser
ActiveFilter = filt
Access
This property is read-only.
Description
This property returns the currently selected folder.
4.9.2.2.3 ActiveObject
ActiveObject Property
This property is available in Object Form Scripts.
В© 2014 OMNINET GmbH
Configuration
187
Syntax
Dim val As OtRequest
Set val = ActiveObject
Access
This property is read-only.
Description
The ActiveObject object always is up-to-date and contains the latest (unsaved) modifications the
user has made. If the object is modified by script, the changes become visible on the object form as
soon as the script execution has finished.
The returned OtRequest object is read-only in "before/after deletion scripts".
Important Note for client-side scripting in forms
Never use
ActiveRequest.Save
or
ActiveRequest.SaveEx
in client-side scripts in object forms, because otherwise parts of the object form handling will be
skipped. This may lead to unpredictable effects.
Please use the global method Save instead.
Important Note for server-side scripting in action lists
Please be aware of the fact, that the returned OtRequest object may be outdated in "after creation/
modification/copy" action lists in some cases (see ActiveRequest Property and Action Lists for
details about this).
4.9.2.2.4 ActiveSearchFilter
ActiveSearchFilter Property
ActiveSearchFilter As OtFilter
This property is only available in Search Form Scripts.
Syntax
' Perform a search
Dim filt
Dim fold
В© 2014 OMNINET GmbH
188
OMNITRACKER Web Gateway Manual
Set fold = ActiveFolder
Set filt = fold.MakeFilter
filt.UserField("Responsible") = ActiveUser
ActiveSearchFilter = filt
Search
Access
This property is read-write.
Description
This property returns a filter which contains the search criteria the user has specified in the search
form.
If the ActiveSearchFilter is modified by script, then the search form is updated accordingly, if
corresponding search fields exists on the form.
Please note:
It's not possible to clear search form fields in this way! Only new, non-empty values can be filled into
the form.
Example:
The user fills a search form and searches for objects with the state "New" and the priority "High".
In the OnSearch-Script the ActiveSearchFilter is cleared and changed to "Responsible" is
ActiveUser AND "Priority" is "Very High"
Now the following happens:
Only objects where the current user is responsible for with very high priority are displayed, the state
is completely ignored.
The Search form is updated:
If the search form contains the field "Responsible", it now shows the current user.
"State" still contains "New", because fields which are not included in the ActiveSearchFilter cannot
be cleared.
"Priority" now shows "Very High".
If the user now presses the Search button again and if now the ActiveSearchFilter is not changed by
script, then also the state will be included in the search result.
A workaround for clearing a text search field is to fill it with an asterisk:
filt.UserField("Title") = "*"
filt.AllowWildcards("Title") = True
В© 2014 OMNINET GmbH
Configuration
189
4.9.2.2.5 ActiveSession
ActiveSession Property
Syntax
Dim val As OtSession
Set val = ActiveSession
Access
This property is read-only.
Description
This property returns the currently active session as an OtSession object.
4.9.2.2.6 ActiveUser
ActiveUser Property
Syntax
Dim val As OtUser
Set val = ActiveUser
Access
This property is read-only.
Description
This property returns the current user as an OtUser object.
4.9.2.2.7 CombineFilterAndSearch
CombineFilterAndSearch Property
This property is only available in Search Form Scripts.
Syntax
boolVal = CombineFilterAndSearch
Access
This property is read-write.
Description
This property returns or sets the flag indicating whether filter and search are combined. By default an
"AND" combination is used.
If no "Combine Filter and Search" checkbox is on the search form, filter and search are not
combined by default.
В© 2014 OMNINET GmbH
190
OMNITRACKER Web Gateway Manual
4.9.2.2.8 RecursiveSearch
RecursiveSearch Property
This property is only available in Search Form Scripts.
Syntax
boolVal = RecursiveSearch
Access
This property is read-write.
Description
This property returns or sets the flag indicating whether the search is recursive.
If no "Recursive Search" checkbox is on the search form, the default value of this property is false.
4.9.2.2.9 ServerLanguage
ServerLanguage property
Syntax
Dim val As String
val = ServerLanguage
Access
This property is read-only.
Description
Returns the language identifier (e.g. "de" for German or "en" for English) for the server language of
the ActiveSession.
4.9.2.3
Methods
4.9.2.3.1 CancelAction
CancelAction Method
This method is available in "OnSearch" and "OnSave" Scripts.
Syntax
CancelAction
Description
В© 2014 OMNINET GmbH
Configuration
191
Object Forms:
Prevents an object from being saved, when called within an OnSave event handler.
Search Forms:
Rejects a search action in a search form when called within an OnSearch event handler.
4.9.2.3.2 CloseObject
CloseObject Method
This method is available in Object Form Scripts.
This method is asynchronous.
Syntax
CloseObject
Description
Performs the same actions that would happen if the user pressed the ”Cancel” button in the form.
4.9.2.3.3 GetSelectedObjects
GetSelectedObjects method
This method is available in Object Form Scripts.
Syntax
' Get the selected objects of field "RefList"
Set fld = ActiveObject.RequestFolder
Set def = fld.UserFieldDefinitions("RefList")
field is "RefList"
Set reqs = GetSelectedObjects(def)
'the alias name of the
Return value
Returns a value of type OtRequests
Parameters
def
The desired user-field definition or it's unique Id.
Description
Returns an object of type OtRequests that contains the current selected OtRequest objects.
В© 2014 OMNINET GmbH
192
OMNITRACKER Web Gateway Manual
4.9.2.3.4 LogMessage
LogMessage Method
Syntax
Dim strText As String
LogMessage strText
Parameters
strText
Message text to log
Description
Write a message to OMNITRACKER’s event log.
The event log can be browsed using the "Status" tab in OMNITRACKER’s server setup window.
4.9.2.3.5 OpenObject
OpenObject Method
Syntax
Dim object_id ' As Long
Dim modal As ' Boolean
Dim read_only ' As Boolean
Dim result ' As Long
result = OpenObject object_id, modal, read_only
Return value
If modal is TRUE, then TRUE is returned if the object form was closed using the "OK" button, or
FALSE if the window was aborted using the "Cancel" button.
If modal is FALSE, then FALSE is always returned.
Parameters
object_id
Unique ID of the object that shall be opened.
modal
This parameter is not regarded, if this method is used in a Search Form Script.
If TRUE, the window will be modal; otherwise, the window will be nonmodal. If an
object is opened modal, the user may not modify the parent object. But the user
may navigate to the parent object using the breadcrumb bar. The OpenObject
method will not return until the object has been closed.
read_only
If TRUE, he opened request will be read-only; otherwise the request can be
modified, if the user has the necessary privileges.
Description
В© 2014 OMNINET GmbH
Configuration
193
Opens an object in a new pane tab or as a child of an object form using the breadcrumb bar.
Restriction
In Search Forms which are displayed in the Select Object dialog, it's not allowed to use the
OpenObject method. Then an error will be displayed.
4.9.2.3.6 OpenNew Object
OpenNewObject Method
Syntax
Dim folder_id ' As Long
Dim modal ' As Boolean
object_id = OpenNewObject(folder_id, modal)
Return value
If modal is TRUE, then the unique ID of the created request is returned, or 0 if no request has been
created.
If modal is FALSE, then 0 is always returned.
Parameters
folder_id
Unique ID of the request folder in which the new request shall be created.
modal
This parameter is not regarded, if this method is used in a Search Form Script.
If TRUE, the window will be modal; otherwise, the window will be nonmodal. If an
object is opened modal, the user may not modify the parent object. But the user
may navigate to the parent object using the breadcrumb bar. The OpenNewObject
method will not return until the object has been closed.
Description
Opens a window for the creation of a new object.
Restriction
In Search Forms which are displayed in the Select Object dialog, it's not allowed to use the
OpenNewObject method. Then an error will be displayed.
4.9.2.3.7 ResultMessage
ResultMessage Method
This method is asynchronous.
Syntax
Dim strText As String
ResultMessage strText
В© 2014 OMNINET GmbH
194
OMNITRACKER Web Gateway Manual
Parameters
strText
Message text to display
Description
Displays a message box to the user after the script execution has finished. It's possible to show
multiple message boxes one after another.
4.9.2.3.8 Save
Save Method
Syntax
Save([saveFlags])As Boolean
Parameters
saveFlags
Optional parameter of type "Long". This parameter defines the behaviour of the
save operation (see table below for details).
Description
Performs the same actions that would happen if the user pressed the ”Save” button in the form.
If the "Save" action was successful True is returned, otherwise False.
For the optional parameter "saveFlags", you may provide any combination of the flags listed below:
Flag
Value
Description
otSaveDoNotCheckPermission
s
1
Do not check the permissions
otSaveDoNotValidateInput
2
Do not validate the input data
otSaveDoNotCheckNonAmbigu
its
4
Do not check if another object with the same identifying
fields already exists
otSaveDoNotExecuteActions
8
Do not execute any before/after creation/modification
actions
otSaveDoNotRecalcEscalation
Times
16
Do not recalculate the escalation times for this objects
otSaveDoNotUpdateHistory
32
Do not add any entries to the history
otSaveDoNotUpdateFullTextSe
arch
64
Do not update the full-text search index
В© 2014 OMNINET GmbH
Configuration
195
otSaveDoNotRecalcAutocalcul
ations
128
Do not recalculate the result fields of autocalculations
otSaveDoNotCheckPrivileges
256
Do not check for enough privileges for the current user
in the current folder
otSaveDoNotChangeLastChang
eFields
512
Do not update date/time fields with the option "Set to
current date/time when saving"
Important Note
Since the usage of the optional parameter allows you to skip some of the data consistency checks
(etc.) the OMNITRACKER Server normally performs you must take care yourself that the changes
do not corrupt your data model!
Important Note for server-side scripting in action lists
Please be aware of the fact, that the returned OtRequest object may be outdated in "after creation/
modification/copy" action lists in some cases (see ActiveRequest Property and Action Lists for
details about this).
4.9.2.3.9 Search
Search Method
This method is available in Search Form Scripts.
This method is asynchronous.
Syntax
Search
Description
Performs the same actions that would happen if the user pressed the ”Search” button in the form.
4.9.2.3.10 StatusText
StatusText Method
Syntax
Dim strText As String
StatusText strText [, number]
В© 2014 OMNINET GmbH
196
OMNITRACKER Web Gateway Manual
Parameters
strText
Message text to display
number
Set this optional parameter to a number between "0" and "100" if you want to
display a progress bar
Description
Display a status text to the user while the script is executed.
This method only should be used if a long script execution duration is expected, e.g. if bulk
operations are performed or if external services are accessed. The web client by default displays a
loading symbol while a script is running. To inform the user about the current progress, a StatusText
can be defined.
Note:
In the Web Browser, the status message is updated by a polling mechanism. Depending on the
network speed and the script execution duration, the status text may not become visible in the client
browser.
Warning:
It's recommended to keep script execution times as short as possible, because an impatient User
may press "F5" if an operation takes too long. This may lead to unpredictable effects.
In addition the default request timeout, which is defined in the web.config file, must be considered.
4.9.3
Hints about scripting
Accessing controls on forms
It's not possible to access controls on forms directly as known from the windows client. Instead the
ActiveObject property must be used on object forms to read or write the values in the form controls.
On search forms the ActiveSearchFilter must be used instead.
Example for object forms:
If ActiveObject.UserFields("Title").Value = "" Then
ActiveObject.UserFields("Title").Value = "This title was added by a
script"
End If
Example for search forms:
If ActiveSearchFilter is Nothing Then
ResultMessage "Please enter a search criteria"
ElseIf ActiveSearchFilter.Rule.AffectedFields.Count > 1 Then
For i = 0 To (ActiveSearchFilter.Rule.ChildRules.Count -1)
ResultMessage ActiveSearchFilter.Rule.ChildRules.Item(i)
В© 2014 OMNINET GmbH
Configuration
197
.LeftSideFieldPath & " = " & ActiveSearchFilter.Rule.ChildRules.Item(i)
.RightSideValue
Next
Else
ResultMessage ActiveSearchFilter.Rule.LeftSideFieldPath & " = " &
ActiveSearchFilter.Rule.RightSideValue
End If
"OnChange" scripts
"OnChange" scripts only are invoked if a field loses focus which was modified by the user.
Special case "Move Attachment"
If an attachment is moved from one to another attachment field, then only the source field fires the
"OnChange" event.
"OnChange" scripts on object forms should be avoided if possible due to the following reasons:
Performance: An OnChange script on a form causes that other fields (e.g. numeric fields) must be
validated immediately after editing. This causes a higher network traffic and Web Server load.
Depending on the network speed, the user may notice a delay before he can continue modifying
the next field. In addition an "OnChange" script requires that the whole form is reloaded after script
execution.
Usability: An OnChange script is executed if a field, which was modified by the user, looses the
focus. The focus may get lost because the user pressed a button. Before the button action can be
performed, the OnChange script must be invoked. It's possible that the users action (button
clicked) get's lost under specific circumstances (depending on the performed action or if for
example a ResultMessage is displayed by the OnChange script).
Long running scripts
On principle long running scripts should be avoided, especially if the user does not expect that he
has triggered an action which takes a lot of time.
Impatient Users may press "F5" because they may think that the Web Gateway does not
respond. This may lead to unpredictable effects.
If the request timeout is reached (web.config file), the Web Server may interrupt the script
execution and an error is returned to the client.
The StatusText method can be used to inform the user about the current progress of a script.
Include Scripts
Global Include scripts can be imported using the following syntax at the beginning of a script:
$INCLUDE 'ScriptName'
But there is no Unique Include script which is automatically included.
В© 2014 OMNINET GmbH
198
OMNITRACKER Web Gateway Manual
Field multiple times on an object form
If a field is multiple times on an object form, then only for one field an "OnChange" script can be
defined, but this script is shared by all occurrences of the field and invoked if one of the fields is
modified.
Asynchronous script methods
Some of the global methods are executed asynchronous. This means they are not invoked before
the whole script has finished.
If for example the method "Search" shall be used in a search form script, then it does not play a role
if the method is called in the beginning or as last statement in the script. It even does not play a role
if "Search" is called before the ActiveSearchFilter is set or after. The result will be the same in both
cases.
This applies to the following methods:
ResultMessage
Search
CloseObject
OpenObject (non-modal)
OpenNewObject (non-modal)
File handling
All scripts are executed on the web server. It's not possible to read files on the client machine or to
store files on the client machine by script.
If it is necessary to read or write files, make sure that the identity of the application pool or the
authenticated user (if windows authentication is used) has enough privileges on the file system of the
web server.
Keep that in mind if the the following OtAut objects and methods are used in a script:
OtAttachment (WriteToFile)
OtByteArray (SaveToFile)
OtEmail (SaveHtmlBody)
OtHtmlContent (StoreDocument)
OtReportDefinition (SaveReportDefinition)
OtRequest (SaveAsXML)
OtRequests (SaveAsXML)
OtTask (Execute, WriteLayout, WriteSchema)
(This list may be incomplete)
В© 2014 OMNINET GmbH
Configuration
199
Select Object dialog
If a script is executed in a search form within the Select Object dialog, then the following methods
are not allowed:
OpenObject
OpenNewObject
An error is displayed if one of these script methods is invoked.
4.10
Invoking Combo Scripts from JavaScript
4.10.1 Introduction
Combo scripts are server-side scripts that are invoked usually from the shortcut bar or from a search
form. Inside combo scripts, you can call functions that trigger client side effects after the script
exits. Some of these effects, on their part, can trigger other combo scripts. You can find more
information about Combo scripts in the Automation Interface help.
Combo Scripts can be invoked from JavaScript on the main page and on object forms. Therefore the
JavaScript function named "invoke_combo_script(..)" must be called. On the main page for example
a button which calls this function can be placed within a custom list layout. On object forms there
are several possibilities to use Javascript.
4.10.2 JavaScript Functions
Main Page
To invoke a combo script from a custom list layout on the main page, the following JavaScript
function must be called:
invoke_combo_script(script, function, parameters)
The first two parameters define the name of the Combo script and the name of the function to be
executed.
The third parameter is optional and is available as string in the combo script.
If more than one parameter has to be passed, an array of strings can be used as third parameter.
Optional parameters can be accessed using ScriptParameters.UserData. To access the first
parameter of an array ScriptParameters.UserData(0) can be used, because the index will be zerobased.
В© 2014 OMNINET GmbH
200
OMNITRACKER Web Gateway Manual
Example without parameters
The function invoke_combo_script('combo1', 'subA') will invoke the function named "subA" in the
combo script "combo1". Custom parameters are not used.
Example with one parameter
The function invoke_combo_script('combo1', 'openDoc', 'http://www.omnitracker.biz') will
invoke the function named "openDoc". ScriptParameters.UserData or
ScriptParameters.UserData(0) can be used to access the URL (third parameter).
Here an example combo script which opens a new document.
sub openDoc
PerformAction.OpenDocument ScriptParameters.UserData
'PerformAction.OpenDocument ScriptParameters.UserData(0) can be used
alternatively
end sub
Example with more than one parameter
To pass more than one parameter an array must be created which contains all parameters.
invoke_combo_script('combo1', 'openObj', new Array('ServiceDesc\Incidents','Printer
defect','') )
Here an example combo script which opens an object in the given folder with the given title:
sub openObj
dim folder
set folder = ActiveSession.GetRequestFolderByPath
(ScriptParameters.UserData(0))
for i = 0 to folder.Requests.Count -1
if folder.Requests.Item(i).UserFields("Title").Value =
ScriptParameters.UserData(1) then
PerformAction.OpenObject folder.Requests.Item(i), false, true
exit sub
end if
next
end sub
В© 2014 OMNINET GmbH
Configuration
201
An example how a button which invokes a combo script can be defined in a custom list layout can
be found here.
Note:
On the main page only custom list layouts can be used to invoke JavaScript code!
Object forms
To invoke a combo script from an object form, the following functions can be called:
invoke_combo_script(script, function, parameters)
save_and_invoke_combo_script(script, function, parameters)
The parameters are the same as on the main page. The second function stores the current object
before the combo script is invoked. Only if saving the object was successful, the combo script is
invoked.
Note:
Saving is not successful and combo scripts will not be invoked if
errors occur during saving
the object was opened readonly (all fields are readonly or the object is locked by another user)
a mandatory field was not filled out by the user
If the function "save_and_invoke_combo_scripts(...)" is used, the ActiveRequestId always can be
accessed in combo scripts by using ScriptParameters.UserData("ActiveRequestId"). The Id is
returned as string.
Further JavaScript functions are available on object forms:
get_unique_id()
save()
save_and_close()
cancel()
logout(url)
save_and_logout(url)
get_unique_id()
Returns the unique ID of the current object. Returns "0" if the object was created but not saved yet.
В© 2014 OMNINET GmbH
202
OMNITRACKER Web Gateway Manual
save()
Saves the current object.
save_and_close()
Saves the current object and returns to the main page.
cancel()
Returns to the main page without saving the current object.
logout(url)
The session is closed and the user logged out. If no url was specified the default logout url will be
opened.
save_and_logout(url)
Saves the current object and logs out the current user. If no url was specified the default logout url
will be opened.
There are several options to use JavaScript code on object forms:
custom list layouts for reference lists fields
static text fields (the usage of HTML code must be enabled in the web form editor)
within the HTML wrapper code of fields
Restrictions
Its not allowed to execute several JavaScript functions in a row! This can lead to errors or will simply
not work.
For example it's not possible to invoke a combo script and perform a logout afterwards
( ...onclick="invoke_combo_script('s1', 'f3');logout();")
If the function "save_and_invoke_javascript(...)" will only invoke the javascript if saving was
successful. This means at least one editable field must be on the form. If all fields are readonly, a
saving operation can not be performed.
If you are using variables or custom functions you should use a fixed prefix for all names.
This can help to avoid naming conflicts between your code and the JavaScript code used by the
Web Gateway.
В© 2014 OMNINET GmbH
Configuration
203
Do NOT use very short names like in the following example:
var a = 1;
var b = 3;
f1(a, b);
function f1(p1, p2)
{
//custom code
}
Use prefixes for all names:
var myVar_a = 1;
var myVar_b = 3;
myFunc_f1(myVar_a, myVar_b);
function myfunc_f1(p1, p2)
{
//custom code
}
IMPORTANT NOTE:
Any JavaScript code that you inject in any of OMNITRACKER’s web pages must not do any of the
following:
• Read or modify any DOM objects except those generated by the XSLT stylesheet of the “HTML
formatting for lists” feature.
• Insert HTML code anywhere except in regions generated by the XSLT stylesheet of the “HTML
formatting for lists” feature.
• Call JavaScript functions other than your own or those specified in this online help document.
• Perform refreshs or reloads of the web page.
• Use non-standard JavaScript extensions.
• Use non-standard DOM or CSS extensions.
• Access the file system or load applets or ActiveX controls.
If you do not follow the above rules, your code may cease to work in future versions of
В© 2014 OMNINET GmbH
204
OMNITRACKER Web Gateway Manual
OMNITRACKER or in future web browser versions.
Hints for Troubleshooting
Problem
Solution
ScriptParameters.UserData
("ActiveRequestId") returns an
error
The ActiveRequestId only can be accessed if
"save_and_invoke_combo_script(...)" was used.
I'm using
"save_and_invoke_combo_script
(...)" but the combo script
(sometimes) is not invoked
The combo script only is invoked if the saving action was
successful. Therefore the object must not be readonly. If the
object is locked or if the form does not contain any writable field,
combo scripts can not be invoked by using
"save_and_invoke_combo_script(...)".
I want to save and logout by
Calling more than one function in a row is not supported. The
calling the both functions "save(); function "save_and_logout()" must be used instead.
logout()" but the object only is
saved without logging out.
4.11
Speeding up the Web Gateway using HTTP compression
If users experience bad performance when they are connected to the Web Server via a slow
connection, you might want to use HTTP compression. HTTP compression requires HTTP 1.1 and is
available for most modern browsers.
In this document, we describe how to enable compression for IIS 6.0 and newer. There are programs
that allow compression for IIS 5.1 and earlier, for example "ZipEnable" by Port80 Software (http://
www.port80software.com/products/ZipEnable/evaluation), which is recommended by Microsoft.
Compression will increase your transfer speed but will also place an additional load on the server
and client CPUs. Only activate the compression if your server's average processor does not exceed
80%.
Step 1 - Enable compression:
Launch inetmgr.exe
Select "Website" in the tree, open its context menu and select "Properties", select the tab
"Service"
Check the items “Compress Application files“ and “Compress static files“
В© 2014 OMNINET GmbH
Configuration
Step 2 - Install gzip:
In the IIS Manager, select "Web service extensions"
Open the context menu in the list, select "Add new web service extension"
В© 2014 OMNINET GmbH
205
206
OMNITRACKER Web Gateway Manual
Assign a name like "HTTPCompression", add the file %WINDIR%\system32\inetsrv\gzip.dll (it
might also be located somewhere else) and mark the extension as "Allow"
Step 3 - Adjust MetaBase.xml:
Use a text editor to edit "%WINDIR%\system32\inetsrv\MetaBase.xml" (make a copy to be
safe!)
Find the first two keys with the name "IisCompressionScheme" (the "location" should end with
"deflate" and "gzip")
Edit the keys in the following way:
<IIsCompressionScheme
Location ="/LM/W3SVC/Filters/Compression/deflate"
HcCompressionDll="%windir%\system32\inetsrv\gzip.dll"
HcCreateFlags="0"
HcDoDynamicCompression="TRUE"
HcDoOnDemandCompression="TRUE"
HcDoStaticCompression="TRUE"
HcDynamicCompressionLevel="10"
HcFileExtensions="htm
html
txt
js
css"
В© 2014 OMNINET GmbH
Configuration
HcOnDemandCompLevel="10"
HcPriority="1"
HcScriptFileExtensions="asp
dll
exe
aspx"
>
</IIsCompressionScheme>
<IIsCompressionScheme
Location ="/LM/W3SVC/Filters/Compression/gzip"
HcCompressionDll="%windir%\system32\inetsrv\gzip.dll"
HcCreateFlags="1"
HcDoDynamicCompression="TRUE"
HcDoOnDemandCompression="TRUE"
HcDoStaticCompression="TRUE"
HcDynamicCompressionLevel="10"
HcFileExtensions="htm
html
txt
js
css"
HcOnDemandCompLevel="10"
HcPriority="1"
HcScriptFileExtensions="asp
dll
exe
aspx"
>
</IIsCompressionScheme>
Save the file and restart the IIS service.
Step 4 - Browsers:
In order to use compression, the browsers must have HTTP 1.1 activated. HTTP 1.1 is usually
activated by default. Under Internet Explorer, you can activate it like this:
Extras/Internet options -> Tab Advanced -> HTTP 1.1 Settings -> Check "Use HTTP 1.1"
В© 2014 OMNINET GmbH
207
Part
V
210
OMNITRACKER Web Gateway Manual
5
Troubleshooting
5.1
Limitations
Depending on the used browser, there may be some restrictions in the usability of the Web
Gateway.
On desktop systems, we recommend to use the browser Firefox or Internet Explorer 9 or higher.
If Internet Explorer is used, there are differences in the look-and-feel depending on the used browser
version. We recommend to use at least Internet Explorer version 9.
Further down, the limitations of mobile devices are listed.
Limitations on Desktop systems
Feature
Limit Search Form
Height
Formatted Text
Limitation
Not supported if Internet Explorer 7 or older is used.
Only supported if Internet Explorer or Firefox (desktop versions only) is
used. On all other browsers, formatted text fields which contain formatted
text are readonly. Plain text can be edited.
Limitations if a mobile device (tablet) is used
On Android devices, we recommend to use the latest version of the browser Chrome or Firefox.
Feature
DropDown filtering
Limitation
If chrome is used, it's not possible to filter items in a DropDown list
Workaround: Type in SPACE and then BACKSPACE, then the items are
filtered.
Always Close Session If the screen timeout is reached or if the device is set to sleep mode, then
it's possible that the session is closed after a short time duration. To the
Web Gateway it seems that the browser was closed.
You should enlarge the screen timeout on the mobile device or disable
"Always close session".
Horizontal scrolling in On iPads, it may be necessary to use two fingers for scrolling.
lists
Alternatively it is possible to scroll with one finger in the header of the list.
Attachment upload
On iPads it is not possible to browse the file system. Only images from the
gallery or photos can be uploaded.
Filter definition (Rule) It's not possible to select multiple lines (e.g. to add or remove brackets).
dialog
В© 2014 OMNINET GmbH
Troubleshooting
211
Object/Reference List It's not possible to select multiple objects.
Note:
If you encounter any problems on a mobile device, should do the following:
Check whether the problem is solved by the current version of the browser.
Using any other browser may solve the problem.
5.2
Hints for Troubleshooting
Problem
Solution
When starting the Web Gateway for the first
Check the following:
time, an error appears instead of the login page.
If Internet Information Services (IIS) 6 is
used: Make sure that under "web service
Example errors:
extensions" the options "Active Server
HTTP Error 500.19 - Internal Server Error
Pages" and ".NET Framework" are allowed
On IIS 7 make sure that the Application pool
HTTP Error 500.21 - Internal Server Error
uses the .NET 4.0 framework.
Handler "PageHandlerFactory-Integrated" has a
On IIS 7 make sure that the Application pool
bad module "ManagedPipelineHandler" in its
enables 32-Bit Applications (only necessary
module list
if the 32-bit Automation Interface is installed)
Install the .NET framework with the following
command (run the command shell as
administrator)
(%windir%
\Microsoft.NET\Framework\v4.0.30319
\aspnet_regiis -i)
Make sure that the "ASPNET" and the
"worker process" have sufficient
(read+execute) rights on the directory where
the Web Gateway is installed and on the
directory where the automation interface is
installed.
Error accessing OtAut (32-bit) on a 64 bit
machine
The error message "Retrieving the COM class
factory for component with CLSID..." is
displayed on opening the Login page.
В© 2014 OMNINET GmbH
IIS 6:
Please download and install this special
framework version which contains both, the 64bit and the 32-bit engine: Download here
Run this command: C:\%windir%
\Microsoft.NET\Framework\v4.0.30319
212
OMNITRACKER Web Gateway Manual
\aspnet_regiis -i
To enable IIS 6.0 to run 32-bit applications on
64-bit Windows
- Open a command prompt and navigate to the
%systemdrive%\Inetpub\AdminScripts directory.
- Execute the following command:
cscript.exe adsutil.vbs set W3SVC/AppPools/
Enable32BitAppOnWin64 true
If the steps above do not solve the problem, please
try the following:
In IIS-Manager, Web-Service Extensions please
set the ALLOW flag for ASP.NET v4.0.30319
(32-bit)
Check the user-rights (read-access) of the IIS
(NETWORK SERVICE) in the registry
HKCR\WOW6432Node\CLSID (this is the 32bit
part) and HKCR\CLSID
IIS 7
To enable IIS 7.0 to run 32-bit applications on
64-bit Windows
- Open the Web Gateways application pool in
the IIS manager. Open the properties window
and enable 32-bit Applications
make sure that the OtAut.dll is accessible by
the NETWORK SERVICE (the account which
should be configured in the application pool)
When starting the Web Gateway for the first
If IIS 7 is used, make sure that static content can
time, the login screen is not displayed correctly. be displayed.
(The images are missing)
(Control Panel | Programs and Features | Turn
Windows Features on or off | Internet Information
Services | World Wide Web Services | General
HTTP Features | Static Content)
Edit controls are missing on the "Login" page of Probably you have installed the Internet Information
the OMNITRACKER Web Gateway.
Server after you installed the .NET framework. You
have to re-install the .NET framework to fix the
problem. (%windir%
\Microsoft.NET\Framework\v4.0.30319
\aspnet_regiis -i)
On the login dialog page, an error messages
You did not install the OMNITRACKER Automation
about a missing module with CLSID {...} appears Interface before installing the Web Gateway. The
and it's not possible to log in.
OMNITRACKER Automation Interface can be
installed from OMNITRACKER Client/Server setup
using the "Client only", "Client & server" or
В© 2014 OMNINET GmbH
Troubleshooting
213
"Custom" options.
OR
The Application Pool, which is used by the Web
Gateway (see IIS settings) is not running in 32-bit
mode.
The Web Gateway does not work
HTTP Errors or other errors are displayed
Frequent reasons:
Wrong .NET Framework selected in Application
pool (.NET 4.0 required)
Application pool is not running in 32-bit mode
(only if a 32-bit Automation Interface is installed)
Automation Interface not installed on the web
server
Wrong version of Web Gateway or Automation
Interface is installed
Application pool identity has insufficient
permissions on the file system
Wrong authentication mode configured in IIS
Web Gateway is not configured as an
application in the IIS
.NET Framework not correctly installed (run
aspnet_regiis command)
IIS 6 Manager: Make sure that the .NET
Framework is enabled in the Web Service
Extensions
Firefox shows an authentication dialog if Single This is the default behaviour in Firefox. You can
Sign-On is used.
change it by performing the following steps in
Firefox:
Open the page "about:config" and add the name of
the Web Gateway server to the three following
keys:
network.automatic-ntlm-auth.trusted-uris
network.negotiate-auth.delegation-uris
network.negotiate-auth.trusted-uris
Multiple server names can be separated by ",".
Example: "localhost, ServerDev"
Internet Explorer shows an authentication dialog
if Single Sign-On is used.
В© 2014 OMNINET GmbH
By default, IE shows an authentication dialog if
the URL refers to a web server that is not in the
current Intranet zone. In IE version <= 8, you
can determine the zone by looking at IE's status
bar. In IE9, the zone is displayed using the "File
> Properties" menu. For example "http://
214
OMNITRACKER Web Gateway Manual
myserver" and "http://myserver.mydomain.com"
might refer to different security zone, even if the
local PC is in domain "mydomain.com".
Configure Internet Explorer for automatic logon:
1. Open the Internet Options dialog box by
choosing Internet Options either from Control
Panel or from the Tools menu in Internet
Explorer.
2. In the Internet Options dialog box, on the
Security tab, select Local intranet, and then
click Custom Level.
3. In the Security Settings dialog box, under
Logon, select Automatic logon only in
Intranet zone, and then click OK.
4. In the Internet Options dialog box on the
Security Settings tab with Local intranet still
selected, click Sites.
5. In the Local intranet dialog box, click
Advanced.
6. In the next dialog box, type the URL of the
Web Gateway Server (for example, https://
myserver.mydomain.com) in the Add this
Web site to the zone box, and then click
Add.
7. Close the configuration dialogs by clicking
OK.
Internet Explorer shows an error: An unexpected This problem can be caused if some special
characters are used in the URL, e.g the
error occurred (unknown).
underscore ("_"). Make sure that no underscore is
used in the machine or domain name.
The message "User NT-AUTHORITY/IUSR has
no permission to access OMNITRACKER" is
displayed, if Single Sign-On is used.
In IIS Manager make sure that:
Windows-Authentication is installed and enabled
ASP.NET Impersonation must be enabled
Anonymous Authentication must be disabled
The message "Your session has timed out" is
displayed.
This message is displayed if the Web Gateway
wasn't used for a specified period of time (10
minutes by default). The timeout settings can be
changed with the WebConfig Editor.
The Web Gatway looks strange after an update The page structure of the Web Gateway or the
used visual elements may have changed. It's
possible that old style sheet information are
cached by a proxy or by the browser.
Maybe the OTWG_StyleSheet file contains
В© 2014 OMNINET GmbH
Troubleshooting
215
custom style attributes which cause problems
after an update.
Make sure that the user NETWORK SERVICE has
The message "HTML content of memo fields
cannot be displayed" is shown on object forms sufficient rights to create files in the folder <virtual
with memo fields of subtype "HTML Mail Body". directory>\uploads.
OR
The upload of attachments is not possible
because the path <virtual directory>\uploads is
not accessible.
In a folder which has a custom list layout, the
following error message is displayed:
"The stylesheet does not contain a document
element. The stylesheet may be empty, or it
may not be a well-formed XML document."
Note: NETWORK SERVICE is in most cases
configured as default identity for the Web
Gateways Application Pool (please check the
settings in the IIS)
Make sure that your XSLT style sheet is well
formed. External editors can be used check the
syntax of the style sheet.
Reports are not displayed correctly
missing buttons
missing diagrams
error message "Assembly not found"
Make sure that you have installed the Crystal
Reports Runtime Components for Visual Studio
2010 (CRVS2010) which can be downloaded here.
HTML Reports are not displayed correctly
Make sure that you have installed the Crystal
Reports Runtime Components for Visual Studio
2010 (CRVS2010) which can be downloaded here.
The error message "bobj is undefined" is
displayed
Run the WebConfig Editor and select the Crystal
Reports assembly version "2010".
Run the WebConfig Editor and select the Crystal
Reports assembly version "2010".
If the problem still exists, please try the following:
Change the Application Pool of the crystal reports
web application (aspnet_client) to run in Classic
mode
1. In IIS Manager, select the Application Pool and
Basic Settings
2. Under Managed Pipeline Mode change from
Integrated Mode to Classic Mode
In addition this error may be displayed if cookies
are disabled.
One of the following errors is displayed on the
Login page:
Please read the hints on the Basic Authentication
page
Missing Authorization Header
Missing User Name Header
401 Unauthorized
The upload/download of (very) large attachments Enlarge the executionTimeout attribute of the
stops after one minute before it is complete.
<httpRuntime>-Tag in the web.config file. The
В© 2014 OMNINET GmbH
216
OMNITRACKER Web Gateway Manual
default value for this tag is 60 seconds.
The WebConfig Editor can be used to change the
value.
The WebConfig Editor does not display (all) the Only the Web Gateways that are defined in the
virtual Web Gateways which are listed in the
web.config file can be listed. You should use the
Internet Information Services (IIS) Manager.
WebConfig Editor to create new virtual Web
Gateways.
To make existing virtual Web Gateways
configurable with the WebConfig Editor the
following entry must be added to the "appSettings"
section in the web.config file:
<add key="OT_Hostname_virtWebName"
value="serverName" />
The string "virtWebName" must be replaced by the
name of the virtual Web Gateway which is defined
in the IIS.
If you try to install the .NET framework on a
domain controller host, the site could not be
accessible (see Microsoft Knowledge Base
Q315158, "ASP.NET Does Not Work with the
Default ASPNET Account on a Domain
Controller"). Instead, an event will be logged to
the application log noting that aspnet_wp.exe
could not be started. The HRESULT for the
failure will be 80004005.
There are two workarounds for this problem:
Set the userName attribute to SYSTEM in the
<processModel> section of the Machine.config
file. This configures the worker process to run
as the SYSTEM identity.
To configure an arbitrary account for the
process, the account must be an Administrator
account. You can configure an arbitrary account
for the process in the <processModel> section
of the Machine.config file.
When you try to login for the first time, the
Probably you have installed the Internet Information
Browser offers you to download the login page or Server after you installed the .NET framework. You
asks for the application for this type of file.
have to re-install the .NET framework to fix the
problem. (%windir%
\Microsoft.NET\Framework\v4.0.30319
\aspnet_regiis -i)
It's impossible to upload attachments larger than This is, again, a .NET framework default. The
4 MB.
framework does not accept HTTP-requests (and
therefore uploads) larger than 4096 KB.
All I get is one of the following error messages:
"page not found"
To change this behaviour, edit the
"Maximum request length exceeded"
maxRequestLength attribute of the <httpRuntime>tag in the web.config file (The WebConfig Editor
can be used to change the value).
In addition, there could be a serverwide setting that
will overwrite your application setting. To verify and
possibly change this, look for the <httpRuntime>
in the machine.config of your .NET installation.
В© 2014 OMNINET GmbH
Troubleshooting
217
%windir%\Microsoft.NET\Framework\v4.0.30319
\CONFIG
with %windir% refers to your Windows installation
directory.
It's impossible to upload attachments larger than IIS 7 restricts the maximum content length to
30 MB on IIS 7 web servers.
30000000 kBytes. If you want to change this value,
the key "configuration/system.webServer/security/
The page "Server error in the application
requestFiltering/
DEFAULT WEB SITE/OTWG - HTTP-Error
requestLimits@maxAllowedContentLength" in the
404.13 - Not Found" is displayed.
file "%windir%\system32
\inetsrv\config\applicationhost.config" must edited:
Click "Run" in the windows start menu and enter
the following command:
%windir%\system32\inetsrv\appcmd set config section:requestFiltering requestLimits.maxAllowedContentLength:5000000
0
(The value "50000000" sets the max. uploadable
file size to 50MB.)
Copy & paste not possible in formatted text
fields.
Accessing the clipboard only is possible with
Internet Explorer. It's not supported by Firefox.
There are inexplicable error messages.
Please make sure you have the latest service pack
for the .NET framework installed.
To verify this, please follow the instructions in this
Knowledge Base article.
The Web Gateway seems to halt unexpectedly
at times.
This could be caused by a known issue with the
Microsoft .NET framework. Please make sure you
have the latest Service Pack installed (s. a.)
After I close a popup object form, the object is
still locked.
You probably closed the browser window using the
window's
closing button. Since there's no way
for the server to know when a client window is
closed, the object remains locked. Use the
Button (s. Object Page) instead to
close forms.
All locked objects will be unlocked as soon as you
either log out (s .Main Page) or your session times
out (s. Configuration File).
The option "Always close session" available under
"File | Web Gateway settings" might fix the
problem.
It's not possible to upload/download
attachments.
В© 2014 OMNINET GmbH
Check your IIS configuration. Make sure that the
user NETWORK SERVICE (which is per default
218
OMNITRACKER Web Gateway Manual
OR
configured in the Application Pool) has "Full
Error messages about inaccessible files appear. access" on the <virtualdirectory>\uploads and
<virtualdirectory>\icons directories (usually c:
\inetpub\wwwroot\OTWG\uploads and c:
\inetpub\wwwoot\OTWG\icons, respectively).
Furthermore, make sure a temporary directory
exists on the server (e.g. c:\windows\temp) and is
configured to be world-writeable in case your
operating system utilizes NTFS or a similar
permission-capable file system .
The following error message appears:
"CS0013: Unexpected error writing metadata"
The system variables "TEMP" or "TMP" do not
refer to an existing directory or the directory is not
accessible by the user "ASPNET"
You try to log in using a WebGuest login
Check your configuration for the following:
account with Windows login authentication, but
You are using the Internet Explorer (most
the login page appears nevertheless.
other browsers do not support windows
authentication)
The option "Automatic login using current
username and password" (open "Tools |
Internet options | Security", select the
respective zone and click "Adjust settings")
is set
The client computer from which you try to
log on is in the same domain as the
OMNITRACKER server
The IIS does not allow anonymous logins.
Deactivate this in the IIS Manager
(inetmgr.exe), in the properties dialog of your
Web Gateway directory, open the tab
"Directory security" and deactivate the
option "Anonymous login", activate
"Integrated Windows authentification"
instead.
If you select a export task, the XLS output type The most likely reason is that your IIS network
is not listed.
service can't launch the Excel application due to
insufficient rights. You can confirm this by looking
at the event log, section "System", if there is an
error (with code 10002) whenever a user logs into
the Web Gateway.
To grant the network service the necessary rights,
do the following:
Launch DCOMCNFG.EXE
Open the category "Component services/
Computer/My Computer/DCOM
configuration" in the tree, select the item
"Microsoft Excel"
Open properties
В© 2014 OMNINET GmbH
Troubleshooting
219
In the security tab, set the "Launch
permissions" and "Access permissions"
such that the local user for the network
service (German: NETZWERKDIENST)
(Windows 2003 server) or the local user
ASPNET (Windows XP) has sufficient
access rights. See the event log for details
on which rights to grant.
Restart the Internet Information Service (IIS)
Although it may sound obvious, also check if
Microsoft Excel is installed on the computer
running the Web Gateway.
The Web Gateway works rather slow on slow
internet connections.
Try using HTTP compression. A guide for
installation of HTTP compression is located here.
Not all images are displayed in the Web
Gateway or an icon with a red X on it is
displayed instead of the intended icon.
This could happen if the database recently
changed. Try restarting the Internet Information
Service (IIS).
Pictures in the shortcut bar and/or in the folder
tree are not displayed.
Check your IIS configuration. Make sure that under
Directory, Configuration, Mappings the extension
".axd" exists. Click "Edit" and make sure that the
verbs are limited to "GET,HEAD,POST,DEBUG".
The option "verify that file exists" must not be
selected.
The appearance of the Web Gateway user
Try to clear the browsers cache.
interface is defective after the Web Gateway was
Maybe the file "OTWG_StyleSheet.css" contains
updated.
conflicting CSS code after an update.
There is no shortcut bar for some users although If there are no items to display for a particular user,
the web configuration option "Hide shortcut bar" the entire shortcut bar is hidden. This is probably
is set to false.
the cause, so check the following:
Is there a shortcut bar defined for the current
user in the Web Gateway?
Does the user have the right to see at least
one group?
Does the user have the right to see at least
one item in a visible group?
Does the user have the rights to perform the
action associated with one of these items
(e.g. "create object" permissions for the
folder to which a "create new object"
shortcut link points)?
Sometimes Field Mappings with the option
"selected object" do not work correctly.
OR
Check that your Browser is configured to search
for new versions of the page on each access of the
page.
The main list displays wrong content.
The following error message appears:
"UnauthorizedAccessException: Retrieving the
В© 2014 OMNINET GmbH
Check that the Automation Interface is installed on
the Web Server.
220
OMNITRACKER Web Gateway Manual
COM class factory for component with CLSID...
Error 80070005"
The following error message appears:
"Access denied"
The IIS_WPG Process must have access to the
Automation Interface (C:
\Programme\OMNITRACKER\OtAut.dll)
After creating a new language, the WebGW
The IIS has no write access on the directory
returns the error "Could not create directory for containing the local language files. You have three
server specific languages: ..." when a user tries possibilities:
to login with this language
1. Grant the IIS user full access to the
"Languages" subdirectory of the OMNITRACKER
installation directory on the web server.
2. Create the directory in the error message
manually, the required files are copied during the
first login
3. The easiest way: Login with a OMNITRACKER
client on the web server computer
When the Web Gateway is installed on a
In the IIS settings, deactivate "Impersonating". This
Windows Vista computer with IIS 7.0, executing option is located in the IIS Manager under the
reports fails with the message "Could not write application (OTWG)/Authentication.
RPT file!" or executing exports fails with the
message "The directory name is invalid".
Single Sign-On works in the Windows client, but Make sure that the web configuration option
not in the Web Gateway
"Single Sign-On (allow)" is enabled (under general
options).
If IIS 7 is used, make sure that the feature
"Windows Authentication" is installed. (Control
Panel | Programs and Features | Turn Windows
Features on or off | Internet Information Services |
World Wide Web Services | Security | Windows
Authentication)
Check the IIS settings:
Open the properties dialog of the Web Gateway
website. Select the tab "Folder security" and click
the button to edit the anonymous access and
authentication.
Anonymous Access must be disabled
Use integrated windows authentication must
be enabled
Open the web.config file:
The line "<identity impersonate="true"/>" must be
added to the <system.web> section if not present.
In order to solve any problems regarding single
sign-on, please see Single Sign-On
Troubleshooting in the Administrator Guide
В© 2014 OMNINET GmbH
Troubleshooting
221
An error message like "User
Check that the web.config contains the following
<MACHINENAME>/.... not found" appears when lines within the "<configuration>" section:
you try to execute reports.
<location path="Report.aspx">
<system.web>
<identity impersonate="false" />
</system.web>
</location>
<location path="PrintReport.aspx">
<system.web>
<identity impersonate="false" />
</system.web>
</location>
<location path="Export.aspx">
<system.web>
<identity impersonate="false" />
</system.web>
</location>
Sometimes all open Web Gateway sessions are If IIS 6 is used please check the settings of the
closed simultaneously. The users are redirected Application-Pool that is configured for the Web
to the login page.
Gateway. Open the properties dialog and click the
tab "Recycling". The default setting is that the
worker process is recycled every 1740 Minutes. All
other settings are not selected. When the process
is recycled, all active Sessions will be closed.
The error message "Request status: 12015 This is a known problem of the Internet Explorer, if
unknown" is displayed in Internet Explorer, if the windows authentication is enabled in IIS for the
editable grid is used to modify an object.
Web Gateway.
Possible workarounds:
Make sure that in Internet Explorer a proxy is
configured, which is NOT bypassed if the Web
Gateway is accessed.
Disable windows authentication and enable
anonymous login in the IIS for the Web
Gateway.
Use Firefox instead.
The session is not closed although the Web
Gateway wasn't used for a longer time than
specified as session timeout
В© 2014 OMNINET GmbH
The session cannot be closed automatically if the
main page is displayed and if an automatic refresh
interval is defined for the object list.
222
OMNITRACKER Web Gateway Manual
Note: This interval can be configured in the Web
Gateway Configuration Window
Images of type "icon" are displayed in wrong
size.
If icons are used which contain different sizes,
then most browsers use the smallest size. Since
version 10.2, OMNITRACKER trys to extract the
picture in 32x32 pixels.
For the best appearance all used images of type
icon should contain the following sizes: 16x16px,
24x24px and 32x32px. Otherwise the images will
be scaled from the next available resolution.
The default size (32x32px) can be changed by
adding the following key to the web.config:
<add key="OT_Icon_Default_Size"
value="16"/>
(value="16" means the the default size shall be
16x16px)
The default size also can be disabled:
<add key="OT_Icon_Default_Size"
value="disabled"/>
Downloading Attachments not possible.
(A timeout may occur)
The attachment download may fail due to
insufficient file system permissions of the
Application pool identity.
The temporary file folder depends on the operating
system. The best approach is to use a tool like
"Process Monitor" to check which files/folders are
accessed by the w3wp.exe process.
В© 2014 OMNINET GmbH
Troubleshooting
Sporadic session timeouts
223
Please try to clear the browser cache on the
affected machine.
Make sure that there is no PROXY which
caches information between client and web
server.
If Internet Explorer is used, make sure that a
new version of the page is searched every time a
page is accessed (check IE Cache settings)
supervise the process ID of the W3WP process
to find out if the IIS was restarted.
Check if this problem is caused by the Web
Configuration Option "Always Close Session" by
disabling this feature temporarily.
If this problem is caused by the Feature "Always
Close Session", please try the following:
Search the key "OT_BrowserClosedLogoutTimer"
in the web.config's <appSettings> section.
Set the value to a higher value than 10000 ms
(useful if the network is slow)
OR
Set the value to "false" to disable it. (The polling
mechanism will still be used to detect closed
browsers)
Example:
<add key="OT_BrowserClosedLogoutTimer"
value="70000" />
(If this key is missing in the web.config file, it can
be added. The default value is "20000")
Scroll-bar not visible if Safari browser is used
In order to show the vertical Scroll-bar in safari the
next System Preference is necessary:
Go to: System Preferences -> General ->
Set the option to Always: Show scroll bars:
Always.
Scroll-bar not shown if mobile browsers are used Scroll-bars are by design not shown in many
mobile browsers like Safari, however scrolling is
possible. If Safari Mobile is used, scrolling is
possible with finger over the Shortcuts or Folder
В© 2014 OMNINET GmbH
224
OMNITRACKER Web Gateway Manual
area. For Grids with many columns, with a finger
over the columns header.
Sometimes the DateTime picker does not open.
It has to be clicked multiple times. Not all
browsers are affected.
Make sure that there is no proxy server defined
in the browser settings which caches content of
the Web Gateway.
Try to clear the browser cache
Use the IE caching setting "load new version
every time the web site is accessed"
Unknown exception if the Web Gateway is
embedded inside an IFRAME.
Due to cross domain policies of browsers it may
be possible that some browser cannot access the
session cookie. Please check if disabling cookies
in the WebConfig Editor Tool solves this problem.
В© 2014 OMNINET GmbH
Index
Index
-DDateTime formats
12, 80
Default Folder
109
Default Search Form
71
Delete
40
Deletion of objects
34
Design Subpanel
150
Dialog Titles
97
Display Subpanel
148
-AAttachments
68
Authentication (basic)
24
Authentication (external)
21
-BBase filter
115
Base Filter Window
115
Button configuration
159
Button Properties
155
Button Properties Subpanel
-E151, 152
-CCalendar View
34
Cascading Style Sheet
168
Clipboard data
211
Close search result
74
Column layout
43
Column Layout Definition Page
43
Columns Subpanel
138
Combo Scripts
199
Command Button Properties Subpanel
154
Configuration
84, 87, 97, 159
Configuration File#OT_configuration
84
Configuration options
98, 116
Configuration Overview
84
Configuration Window
159
Control size
145
Cookies
87
Copy & Paste - formatted text
211
Create a virtual Web Gateway
87
Create object
151
Crystal Reports
87
Crystal Reports version
84
CSS
168
Currency formats
80
Custom list layout
171
Edit Filter Parameters
72
Editable Grid
34
Editing in the Tree View
34
Email Notification
87
Enable Quick Serach
136
Errors
211
Execute Task
76, 155
-FField properties
136, 138, 141, 146, 148, 150
Fieldmapping
152
Fill object
152
Filter
17
Filter Edit Page
78
Filter Organize Page
80
Filter Parameter
72
Filter Save Page
79
Folder tree
34
Formatted text
Font family
70
Font size
70
Hyperlink
70
Insert Picture
70
Text align
70
Formatted text - copy & paste
Fullscreen mode
123
Full-text search
74
-GGeneral Subpanel
В© 2014 OMNINET GmbH
225
136, 150
211
226
OMNITRACKER Web Gateway Manual
Guest Login
109, 115
Guest Login Properties Window
Guest Logins
12
109
-HHide Filter
97
Hide Folder Tree
97
Hide Fulltext search
97
Hide Notifications
97
Hide Search Box
97
Hide Search Form
97
Hide Shortcut bar
97
Hide Views
97
Hints for Troubleshooting
211
Hostname
84
HTML Wrapper for field values
148
-IIcon default size
211
Icon quality
211
IIS
211
Image qualiy
211
Import
118, 120
Import Wizard
118, 120
Installation
10, 87
Introduction
8
invoke combo scripts
174
-JJavascript methods
199
Main page
34
Managing Web Themes
167
Max. request Length
87
Maximum file size
87
Modal form (Fullscreen mode)
123
-NNumber formats
12, 80
-OObject forms
58
Object Page#Modifying_reference_fields
58
OK/Apply/Cancel Button Properties Subpanel
OK/Apply/Cancel Buttons
123
OnOpen Script
123
OnSave Script
123
OnSearch Script
123
OpenUniqueMatch
12, 17
OT_LogLoadTimes
28
154
-PPaging
40
Panes Control
34
Performance
204
Port
84
Preview Window
162
-Q-
-LLimit Search form height
List of references
72
List View
34
Locale setting
12
Log directory
87
Logging
87
Logging errors
87
Login Language
12
Login page
15
Login with filter
12
-M-
34
Quick
Quick
Quick
Quick
Search
62, 72
Search Fields
123
Search Limit
97
Search properties
148, 150
-RReadonly Licenses
12
Redirection URL
84, 87
Reference Subpanel
141
Reference to object
72
В© 2014 OMNINET GmbH
Index
Request list
34
Results Page
120
Rich Edit control
211
Rich-Edit Toolbar
70
-UURLs
Usage
-S-
-V-
Search
71, 74, 76, 155
Search and execute task
76
Search Elements
74
Search Form Checkbox Properties
155
Search Options
74
Section properties
134
Section Properties Subpanel
134
Select Objects
40
Select Task
76
Send Email
63
Send Email Button
156
Send test email
87
Session timeout
87
Settings Page
118
Setup
10
Shortcut bar
34
Show name of guest in history and in time-stamped
memo fields
109
Single Sign-On
12, 87
Singleton
17
Singleton Login
12
SMTP server
87
Sorting
139
Style Sheet File
93
Submit / Submit&Copy buttons
159
-TTab properties
133
Tab Properties Subpanel
133
Task button properties
153
Task Button Properties Subpanel
Text properties
148, 150
Theme Editor
168
Themes
123
Timeout after inactivity
87
Tree Layout Definition Page
45
Tree View
34
Troubleshooting
211
В© 2014 OMNINET GmbH
12
40
153
Values Subpanel
146
View Save Page
48
Virtual Web Gateways
87
-WWeb configuration
95, 116, 118, 120
Web Configuration Option Window
116
Web Form Editor Window
123
Web forms
123, 159, 162
Web Gateway Configuration
97
Web Gateway Configuration
Window#URL_End_Session
97
Web Gateway Options
97
Web Gateway Settings Window
95
Web Theme Editor
168
Web Themes
123
web.config file
84
WebConfig Editor
87
WebGW using HTTP compression
204
-XXSLT examples
XSLT list layout
174
171
227
© Copyright 2026 Paperzz