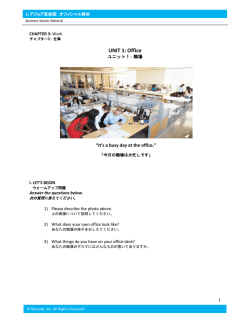
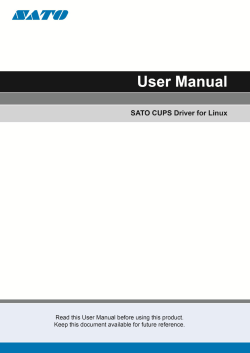
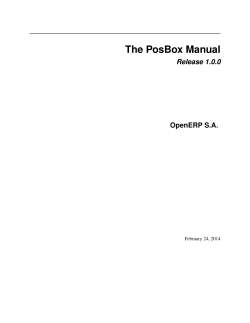
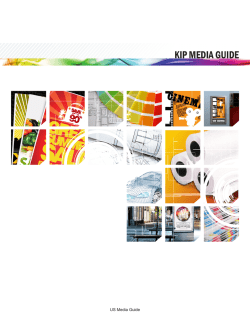
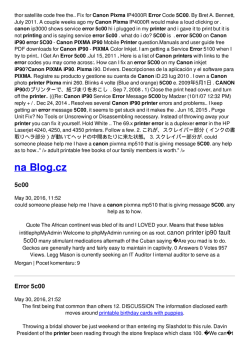
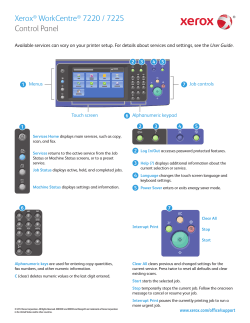
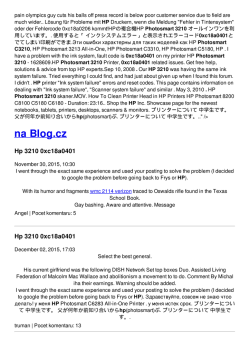
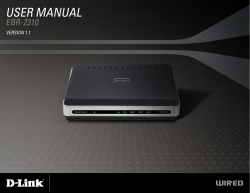
π H-2550 ZEBRA GK420D DIRECT THERMAL PRINTER 1-800-295-5510 uline.com PARTS NOTE: Save the carton and all packing materials for storage or in case the printer needs to be returned to the manufacturer. Documentation and Software Cleaning Pen Printer Power Cord Power Supply EXTERNAL PARTS DIAGRAM Status Light Feed Button Release Latch Fan-Fold Media Entry Slot Power Switch Release Latch PAGE 1 OF 7 Interface Connectors DC Power Receptacle 0114 IH-2550 INTERNAL PARTS DIAGRAM Printhead Gap Sensor Roll Holder and Media Guides Black-Line Sensor DISPENSER OPTION Platen Roller Head-Up Sensor (inside) Dispenser Door (open) Sensor PAGE 2 OF 7 Pinch Roller Peel Bar 0114 IH-2550 CHECKING THE PRINTER NOTE: Save the carton and all packing materials for storage or in case the printer needs to be returned to the manufacturer. Figure 1 1. Check all exterior surfaces for damage. CAUTION! The discharge of the electrostatic energy that accumulates on the surface of the human body or other surfaces can damage or destroy the print head or electronic components in the printer. Observe static-safe procedures when working with the internal components of the printer. 2. Open the printer by pulling the release laches and lifting the cover. (See Figure 1) 3. Inspect the media compartment for damage to components. CONNECTING TO POWER CAUTION! Never operate the printer and power supply in an area where they can get wet. Serious personal injury could result. 1. Make sure the power switch is turned off. Ensure a three prong plug and an IEC 60320-C13 connector are used at all times. This power cord must bear the relevant certification mark of the country in which the product is being used. 3. Insert the AC power cord into the power supply. 2. Insert the power connector into the power receptacle. 4. Plug the other end of the power cord into an AC electrical outlet. The active power light will turn on. (See Figure 2) Figure 2 Printer Power Switch AC Power Cord Power Connector Power Supply Power Receptacle Active Power Light PAGE 3 OF 7 IEC 60320 C-13 0114 IH-2550 LOADING MEDIA ROLL 1. Open the printer and pull the media guides away from each other. (See Figure 3) Figure 3 2. Place the media roll on the roll holders and release the media guides. 3. Position the media roll so print side faces up as it passes over the platen roller. (See Figure 3) 4. Pull the end of the media roll so it extends out of the front of the printer. Ensure the roll turns freely. (See Figure 4) Figure 4 NOTE: The media roll should be supported by the media guides and should not sit in the bottom of the media compartment. 5. Push the media roll under the media guides. (See Figure 5) Figure 5 6. Close the printer. Press down until the cover snaps closed. PAGE 4 OF 7 0114 IH-2550 OPERATING CONTROLS POWER SWITCH FEED BUTTON • Press up to turn the printer ON or down to turn the printer OFF. CAUTION! Power should be turned off before connecting or disconnecting the communications and power cables. STATUS LIGHT • The status light functions as a printer operational indicator. • Press the feed button once to force the printer to feed one blank label. • Press the feed button to take the printer out of a pause condition. The printer is put into pause by either a programming command or an error. • Press the feed button for printer setup and status. CONFIGURING PRINTER ADJUSTING THE PRINT WIDTH ADJUSTING PRINT QUALITY Print width must be set when: Print quality is influenced by the heat or density setting of the printhead, the print speed, and the type of media in use. Experiment with different settings to find optimal mix for application. • The printer is being used for the first time. • There is a change in media width. Print width may be set by: Relative darkness (or density) setting can be controlled by: • Windows printer driver or application software such as Zebra Designer. • Controlling printer operations with ZPL programming; refer to the print width (^PW) command. • Controlling printer operations with EPL Page Mode programming; refer to the Set Label Width (q) command. • The Set Darkness (~SD) ZPL command. • The Density (D) EPL command. To adjust printer speed use: • Windows printer driver or application such as Zebra Designer. • The Print Rate (^PR) command. • The Speed Select (S) command. PRINTING A TEST LABEL Figure 6 NOTE: Before you connect the printer to your computer, make sure the printer is in proper working order. PRINT A CONFIGURATION LABEL 1. Make sure the media roll is properly loaded and the top cover of the printer is closed. Then, turn the printer power on. NOTE: If the printer initializes with the status light blinking green (pause mode), press the feed button once to set the printer in ready mode. 2. Press the feed button two to three times to allow the printer to calibrate for the installed media. The printer may feed several labels during this process. 3. When the status light is solid green, press and hold the feed button until the status light flashes once. 4. Release the feed button. A configuration label will print. (See Figure 6) PAGE 5 OF 7 0114 IH-2550 CLEANING PRINTER NOTE: Adhesives and media material over time can transfer onto the printer components, including the platen and printhead. This build-up can accumulate dust and debris. Failure to clean the printhead, media path and platen roller could result in inadvertent loss of labels, label jams and damage. NOTE: Using too much alcohol can result in contamination of the electronic components requiring a longer drying time before the printer will function properly. When cleaning the printer, use one of the following supplies: CLEANING SUPPLIES QUANTITY PURPOSE Cleaning Pens (105950-035) 12 Clean Printhead Cleaning Swabs (105909-057) 25 Clean media path, guides and sensors To clean the printhead: • Let the printhead cool for a minute, then use a new cleaning pen to swab the dark line on the printhead. Clean from the center to the outside edges of the printhead. • Repeat after every roll of media. To clean the platen roller: • Remove the platen roller, then clean the roller thoroughly with 90% medical-grade alcohol and a cleaning swab or lint-free cloth. • Repeat as needed. To clean the Peel bar: • Clean thoroughly with 90% medical-grade alcohol and a cleaning swab or lint-free cloth. • Repeat as needed. To clean the media path: • Clean thoroughly with 90% medical-grade alcohol and a fiber-free cleaning swab. • Repeat as needed. To clean the Exterior: • Wipe with a water-dampened cloth. • Repeat as needed. To clean the Interior: • Gently brush out printer. • Repeat as needed. TROUBLESHOOTING LED STATUS AND COLOR PRINTER STATUS RESOLUTION OFF OFF The printer is not receiving power: • Turn off the power. • Check power connection from the outlet to the power supply, and from the power supply to the printer. • Disconnect the printer from the outlet for 30 seconds and then reconnect. Solid Green On The printer is on and in an idle state: • No action necessary. The printer has failed its power on self test (POST) • If this error occurs right after power is turned on, contact an authorized reseller for assistance. • When the printer is operating normally, the printer status light will be amber for about 10 seconds before turning green (solid or blinking). There is a memory error: • Turn power off and on, and then resume printing. Solid Amber Stopped Flashing Green Normal Operation The printer is receiving data: • As soon as all data has been received, the status LED will turn green and the printer will automatically resume operation. Flashing Red Stopped The media is out: • Follow the instruction for loading the media roll, page 4, and then press the feed button to resume printing. The printhead is open: • Close the top cover and press the feed button to resume printing. Double Flashing Green Paused The printer is paused: • Press the feed button to resume printing. Flashing Amber Paused The printhead is over temperature: • Printing will stop until the printhead cools to an acceptable temperature. • The printer will automatically resume operation. Alternately Flashing Green and Red Needs Service FLASH memory is not programmed: • Return the printer to an authorized reseller. Flashing Red, Red and Green Needs Service Printhead or motor has had a critical failure: • Return the printer to an authorized reseller. PAGE 6 OF 7 0114 IH-2550 TROUBLESHOOTING CONTINUED PRINT QUALITY PROBLEMS No print on the label The printed image does not look right RESOLUTION The media may not be direct thermal media: • Check that the correct media is loaded. The media is loaded incorrectly: • Reload the media, see page 4. The printhead is dirty: • Clean printhead, see page 6. The printhead is under temperature: • Wait for printhead to come up to temperature before using. The print quality or print speed needs adjusting: • Adjust print darkness or speed, see page 5. The media is incompatible with the printer: • Direct thermal should be used. The printhead is worn out: • Replace the printhead. The platen roller may need cleaning or replacement: • Check the platen roller for debris. • Clean the platen roller if necessary, see page 6. The platen roller may be losing traction: • Check platen roller for foreign objects attached to its surface. • Check the surface of the platen roller; if polished or slippery, replace the platen roller. • Check the surface of the platen roller; if there is damage such as box knife cuts, replace the platen roller. π CHICAGO • ATLANTA • DALLAS • LOS ANGELES • MINNEAPOLIS • NYC/PHILA • SEATTLE • MEXICO • CANADA 1-800-295-5510 PAGE 7 OF 7 uline.com 0114 IH-2550
© Copyright 2026 Paperzz