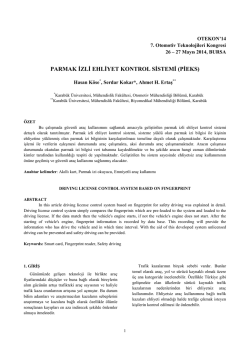
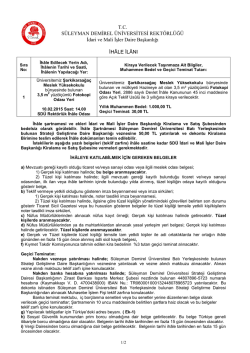
DSE 6020 AMF
KONTROL MODÜLÜ
ÇALIŞTIRMA EL KİTABI
DSE 6020 AMF
CONTROL MODULE
OPERATING MANUAL
DSE 6020 AMF
DSE
6020
AUTO
DSE 6020 AMF KONTROL MODÜLÜ
ÇALIŞTIRMA EL KİTABI
ÜRETİCİ FİRMA
AKSA JENERATÖR SANAYİ A.Ş.
Gülbahar Caddesi 1. Sokak
34212 No: 2 Güneşli / İSTANBUL
T: + 90 212 478 66 66
F: + 90 212 657 55 16
e-mail: [email protected]
YETKİLİ SERVİS
AKSA SERVİS & KİRALAMA
Muratbey Beldesi, Güney Girişi Caddesi No:8
34540 Çatalca / İSTANBUL
T: + 90 212 887 11 11
F: + 90 212 887 10 20
e-mail: [email protected]
1.
2.
3.
4.
5.
5.1.
5.2.
5.3.
6.
6.1.
6.2.
7.
7.1.
7.2.
8.
8.1.
8.2.
9.
KONTROL BUTONLARININ İŞLEVİ ................................................................................... 1
KONTROL BUTONLARI......................................................................................................... 2
MOTORUN ÇALIŞTIRILMASI ................................................................................................ 3
MOTORU DURDURMA .......................................................................................................... 3
OPERASYON .............................................................................................................................. 4
OTOMATIK OPERASYON................................................................................................................................ 4
MANÜEL OPERASYON...................................................................................................................................... 5
TEST OPERASYON................................................................................................................................................ 6
MODÜL EKRANI ....................................................................................................................... 6
ÖLÇÜ ALETLERI....................................................................................................................................................... 7
OLAY GÜNLÜĞÜ................................................................................................................................................... 7
KONUM İKONLARI.................................................................................................................. 8
OTOMATIK ÇALIŞMA İKONLARI ................................................................................................................ 8
ÖLÇÜ ALETLERI İKONLARI ............................................................................................................................. 8
KORUMALAR ............................................................................................................................. 9
İKAZ ALARMLARI.................................................................................................................................................... 9
DURDURMA ALARMLARI ................................................................................................................................ 10
KABLOLAMA .............................................................................................................................. 11
1. KONTROL BUTONLARININ İŞLEVİ
Genel durum gösterge
ekranı
Ortak Alarm Göstergesi
Ekran ilerletme
butonu
DSE
6020
Sayfa butonu
Motoru başlatma
(manuel konumunda)
Stop konumu
AUTO
Alarm sus / lamba test
Manüel konumu
Yükte test konumu
DSE
Otomatik konumu
6020
AUTO
Şebeke hazır LED.
Jeneratör hazır LED
Şebeke devrede LED.
Jeneratör devrede LED.
1
2. KONTROL BUTONLARI
Stop / Reset konumu
Bu buton, modülü Stop / Reset konumuna getirir. Herhangi bir alarm durumuna sebep olan kriteri ortadan
kaldırmak için bu butona basarak sıfırlama yapılır. Eğer motor çalışıyorsa ve modül Stop pozisyonuna alınırsa,
modül jeneratörü otomatik olarak yüksüz duruma alır (transfer panosunda jeneratör anahtarını devre dışı
bırakır). Yakıt yolunu kapatarak motor durdurulur. Bu konumda uzaktan çalıştırma gerçekleştirilemez.
Manüel konumu
Bu konumda jeneratör manüel olarak kontrol edilir. Modül manüel konumuna alınıp start
butonuna basıldığında
dizel motor marşlanacak ve yüksüz olarak çalışacaktır. Motor manüel pozisyonda yüksüz çalışıyorken şebeke enerjisi
kesildiğinde veya uzak start sinyali alındığında modül otomatik olarak transfer anahtarına sinyal gönderecek
ve sistem yükünü jeneratöre verecektir.
Şebeke enerjisi normale dönse ve- veya uzak start sinyali kesilse dahi modül STOP/RESET’ veya
‘OTO’ konumuna alınıncaya kadar jeneratör yükte çalışmağa devam edecektir.
Otomatik konumu
Bu buton, modülü ‘Otomatik’ konumuna getirir . Bu konumda, jeneratörün otomatik kontrolü yapılır. Modül
şebekenin durumunu ve uzak start sinyalini izleyecek ve şebeke enerjisinin anormal durumunda veya uzak start
sinyali
alındığında
otomatik
olarak
jeneratörü
çalıştıracak
ve
yüke
verecektir.
Şebeke enerjisinin normal duruma dönmesi veya uzak start sinyali kaldırıldığında modül otomatik olarak yükü
jeneratörden şebekeye transfer eder ve soğutma süresinin sonunda jeneratör durdurulur. Modül bir sonraki start
olayını bekleyecektir.
AUTO
Test
Bu buton, modülü ‘Test’ konumuna getirir. Bu konumda jeneratörün yükte testi yapılır. Modül ‘Test’ konumuna
alınıp start
butonuna basıldığında motor çalıştırılır ve jeneratör yüke verilir.
Start
Bu buton sadece STOP/RESET
veya MANUEL
konumda aktiftir.
Modül manüel veya test konumundayken bu butona basıldığında motor çalıştırılacak ve jeneratör (manüel de)
yüksüz veya (test de) yüklü çalışacaktır. Modül STOP/RESET
konumunda iken bu butona basıldığında ECU
haberleşmesini açacaktır.(bu ancak doğru birşekilde programlanmış ve uygun bir ECU ya bağlanmış kartlar için
geçerlidir)
Korna susturma / Lamba test
Bu buton sesli alarmı susturur ve lamba test özelliği ile LED‘lerin tümünü yakar. Doğru bir şekilde
programlanmış ve uygun bir ECU ya bağlanmış kontrol kartlarında, Modül STOP/RESET
konumunda iken
bu butona ve sonra start
butonuna basmak (ECU enerjilenir) ECU daki her bir pasif alarm ı silecektir.
Scroll
Ekranda gösterilen ölçü aletleri sayfası bu buton ile ilerletilir.
Page
Ölçü aletleri sayfası ile alarm kayıt sayfası arasında geçiş butonu
2
3. MOTORUN ÇALIŞTIRILMASI
DSE
6020
Sonra start tuşuna basarak
motoru marşlayın
Önce manuel
konumunu seçin
AUTO
NOT: Detaylı bilgi için bu manüelin ‘OPERASYON’ bölümüne bakınız.
4. MOTORUN DURDURMA
DSE
6020
Stop konumuna
aldığınızda jeneratör
durur
AUTO
NOT: Detaylı bilgi için bu manüelin ‘OPERASYON’ bölümüne bakınız.
3
5. OPERASYON
5.1. OTOMATİK OPERASYON
Otomatik konumun etkin olması için
butonuna basınız. Alarm durumu yoksa ekranda Otomatik çalışma
ikonu gösterilir.
Otomatik konum, kullanıcının müdahalesine ihtiyaç duyulmadan jeneratörün start ve stop edilmesi, tam otomatik
olarak çalışmasına olanak sağlar.
5.1.1. OTOMATİK KONUMDA BEKLEME
Jeneratörü başlatma talebi yapıldığında çalışma için işlem sırası başlar.
Jeneratörün çalışması için talep aşağıdaki kaynaklardan gelebilir. Motor OTO. Pozisyonda çalışıyorken, çalışma
sebebinin nereden geldiği İkon ile ekranda gösterilir.
Otomatik çalışma sebebi
İkon
Uzak start sinyali
Akü şarjı düşük
Eksersiz çalışması
Şebeke arızası
5.1.2. BAŞLATMA SIRASI
Başlatma sırası , ister şebeke enerjisinin kesilmesiyle veya uzaktan başlatma sinyali ile başlatılsın, aşağıdaki sıralama
uygulamaya geçer.
Kısa süreli şebeke dalgalanmaları ve yanlış uzaktan start durumlarında , jeneratör direk devreye girmemesi için
başlatma zamanı gecikmesi (start delay) aktif olur.
Bu esnada sınır değerler normale dönüp ve start talebi ortadan kalkarsa, jeneratör kontrol ünitesi çalışmayı stand-by
durumuna döndürür.
Start gecikme zamanı sonunda start talebi mevcut ise motorun, yakıt yolunu açma bobinine enerji gönderilir ve
dizel motor marş yapılır.
Not: Modül CAN için programlanmış ise , ECU CAN vasıtasıyla start komutu alacaktır.
Eğer motor marşlama esnasında çalışmaz ise marş motoru devreden çıkar ve bir sonraki marşlamaya kadar (1-3
sn) bekler sonra 2. kez tekrar marşlanır ,Motora en fazla 3 kez marşlama yaptırılır. Motor çalışmaz ise tekrar marş
yapılmaz ve ekranda
Start Arızası alarmı gösterilir.
Motor çalıştığı zaman alternatörden okunan frekans 21 Hz e ulaştığında marş motorunun enerjisi kesilir.
Buna ek olarak yükselen yağ basıncıda marşı kesmek için kullanılabilir.
Emniyet devreleri etkin, zaman devresi çalışır. Bu zaman süresince yağ basıncı, yüksek motor sıcaklığı, düşük hız,
şarj arızası ve diğer yardımcı arıza girişleri dengeli hale gelene kadar alarm verilmez.
5.1.3. DİZEL MOTOR ÇALIŞIYOR
Motor çalışıyor ve tüm başlatma zamanlayıcıların süresi dolduğunda motor çalışıyor
ikonu ekranda
gösterilir.
NOT: Yük transfer sinyali , motor yağ basıncı belli bir seviyeye gelene kadar aktif edilmez , bu motorun ilk
yük alma anında aşırı aşınmasını engeller.
Jeneratör çalış talebi sinyali kalkarsa, jeneratörü durdurma (stop) sırası başlayacaktır.
4
5.1.4. DURDURMA SIRASI
Şebeke voltajı ve frekansı, modül programında ayarlanan sınır değerlere döndüğünde, veya uzak start talebi
kalktığında geri dönüş zaman sayıcı çalışır, sürenin sonunda yük jeneratörden şebeke beslemesine transfer edilir
ve jeneratör soğutma zaman sayıcısı çalışır.
Soğutma zamanı süresince jeneratör yüksüz çalıştırılıp yeterli soğutmayı yapmasına izin verilir., Soğutma durumu
özellikle turbo-şarjlı motorlar için önemlidir.
Soğutma zamanın sonunda jeneratör otomatik olarak kontrol modülü tarafından durdurulur.
Soğutma süresi esnasında şebeke voltajında kesilme olduğunda (yada uzaktan start sinyali alındığında) jeneratör
hemen yüke verilecektir.
Soğutma süresinin sonunda jeneratör stop edilir.
5.2. MANUEL OPERASYON
butonuna basıldığında Manüel konumu etkin hale geçer. Butonun arkasında bulunan LED lambası yanarak
bu hareketi doğrular.
Manüel konumu, kullanıcının jeneratörü manüel olarak start ve stop etmesine ve gerektiğinde modül üzerindeki
butonlar kullanılarak transfer anahtarının konum değiştirmesine izin verir.
5.2.1. EL KONUMUNDA BEKLEME
El konumuna geçildiğinde jeneratör otomatik olarak başlamayacaktır.
Jeneratörü başlatma işlemi için start
butonuna basınız.
5.2.2. BAŞLATMA SIRASI
NOT: bu işletim konumunda start gecikme süresi yoktur.
Yakıt yolunu açma bobinine enerji gönderilir ve dizel motor marş yapılır.
Eğer motor marşlama esnasında çalışmaz ise marş motoru devreden çıkar ve bir sonraki marşlamaya kadar (1-3
sn) bekler sonra 2. kez tekrar marşlanır ,Motora en fazla 3 kez marşlama yaptırılır. Motor çalışmaz ise tekrar marş
yapılmaz ve ekranda
Start Arızası alarmı gösterilir.
Motor çalıştığı zaman, alternatör çıkış voltajında 21Hz görüldüğünde, marş motorunun enerjisi kesilir.
Buna ek olarak yükselen yağ basıncıda marşı kesmek için kullanılabilir.
Emniyet devreleri etkin, zaman devresi çalışır. Bu zaman süresince yağ basıncı, yüksek motor sıcaklığı, düşük hız,
şarj arızası ve diğer yardımcı arıza girişleri dengeli hale gelene kadar alarm verilmez.
5.2.3. DİZEL MOTOR ÇALIŞIYOR
Manuel konumunda, yükleme ihtiyacı olmadıkça yük jeneratöre transfer edilmez. Jeneratöre yük verme ihtiyacı
aşağıda yazılı kaynaklar tarafından talep edilir ise jeneratör bu konumda yükte çalışır.
• Şebeke beslemesinin sınır değerlerin dışında olması
• Yükte çalışma, uzaktan start girişinin etkin hale getirilmesi
• Egzersiz programının etkin olması
• Düşük akü voltajı
Bir kez yük jeneratöre transfer edilmişse, otomatik olarak yük şebeke beslemesine geri transfer edilmez. Manüel
olarak yükü şebekeye transfer etmek için aşağıda yazılı işlemlerden birisi yapılır.
• Otomatik konumuna dönmek için
butonuna basınız. Jeneratör, otomatik konum durdurma işlemini sıraya
koymadan önce tüm otomatik konum start sinyalleri ve stop zamanlayıcıların işleyip işlemediğine bakacaktır.
• Stop
butonuna basınız.
AUTO
5.2.4. DURDURMA SIRASI
Manüel konumda, aşağıdaki komutlar yapılıncaya kadar jeneratör sürekli çalışacaktır:
5
•
stop butonuna basıldığında – jeneratör hemen stop edecektir.
•
Otomatik butonuna basıldığında, jeneratör, otomatik konum durdurma işlemini sıraya koymadan önce tüm
otomatik konum start sinyalleri ve stop zamanlayıcıların işleyip işlemediğine bakacaktır.
AUTO
5.3. TEST OPERASYONU
butonuna basıldığında test konumu etkin olur. Butonun arkasında bulunan LED lambası yanarak bu hareketi
doğrular. Test konumunda jeneratör çalıştırılır ve yük jeneratöre transfer edilerek Yükte Test fonksiyonu sağlanır.
5.3.1. TEST KONUMUNDA BEKLEME
Test konumuna geçildiğinde jeneratör otomatik olarak çalıştırılmayacaktır.
butonuna basılarak start işlemi başlatılır
5.3.2. BAŞLATMA SIRASI
Jeneratör marş yapılır
Eğer motor marşlama esnasında çalışmaz ise marş motoru devreden çıkar ve bir sonraki marşlamaya kadar (1-3 sn)
bekler sonra 2. kez tekrar marşlanır ,Motora en fazla 3 kez marşlama yaptırılır. Motor çalışmaz ise tekrar marş
yapılmaz ve ekranda
Start Arızası alarmı gösterilir.
Motor çalıştığı zaman, alternatör çıkış voltajında 21Hz görüldüğünde, marş motorunun enerjisi kesilir.
Emniyet devreleri etkin, zaman devresi çalışır. Bu zaman süresince yağ basıncı, yüksek motor sıcaklığı, düşük hız,
şarj arızası ve diğer yardımcı arıza girişleri dengeli hale gelene kadar alarm verilmez.
5.3.3. DİZEL MOTOR ÇALIŞIYOR
Yük otomatik olarak şebekeden jeneratöre transfer edilir.
Test konumunda, aşağıda yazılı işlemlerden birisi yapılmadığı takdirde jeneratör sürekli yük altında çalışacaktır.
•
Stop butonuna basıldığında – jeneratör hemen stop edecektir.
•
Otomatik butonuna basıldığında, jeneratör, otomatik konum durdurma işlemini sıraya koymadan önce tüm
otomatik konum start sinyalleri ve stop zamanlayıcıların işleyip işlemediğine bakacaktır.
AUTO
6. MODÜL EKRANI
LED AYDINLATMALI EKRAN
Ünitenin yeterli besleme voltajı olduğunda, modül enerji tüketim koruması durumunda değilse ünite
devredeyken ekran aydınlanacaktır, veya motor marşlanıyorsa ekran ışığı yanmayacaktır.
GRAFİK EKRAN
- 4- sıra, 48 x 132 piksel, arkadan LED aydınlatmalı Grafik Ekran
- İkon ve sayısal ekran.
- Yazılımla kontrol edilen kontrast
- LCD üzerinde 4 mimik gösterge
48 x 132 piksel LCD ekran. Ekranda ölçü aleti, birimler, alarm ikonları ve değişik diğer ikonlar
Ölçü aleti ikonu
Ölçü aleti
Birimi
Etkin
Yapılandırma/
Olay günlüğü
fihristi
Ölçü aleti
Birimi
Ölçü aleti
Birimi
6
Alarm İkonu
Konum İkonu
ÖRNEK EKRAN
Bu örnekte jeneratör voltajı
Jeneratör sembolü tarafından gösterilir.
Ölçü aleti
Ölçü aleti ikonu
Birimi
Etkin yapılandırma
Konum ikonu
6.1. ÖLÇÜ ALETLERİNİN GÖRÜNTÜLENMES
Ekran aktif hale gelirken önce yazılım versiyonu ekrana gelecek daha sonra Jeneratör Frekansını gösterecektir.
İlerletme
butonuna tekrar basarak farklı bilgi sayfalarını LCD ekranına getirmek mümkündür
Bilgi
butonuna basarak ölçü aletleri sayfası ile olay günlüğü sayfası arasında geçiş yapılır.
Bir kez sayfa seçildiğinde, kullanıcı farklı sayfa seçene kadar LCD ekran üzerinde kalacaktır veya belli bir süre sayfa
hareketsiz kaldıktan sonra, modül ekranda diğer bilgileri döndürecektir.
butona basarak manüel olarak ilerletme yapıldığında ekran otomatik olarak Durum sayfasına dönecektir.
Eğer Durum sayfası gösterilirken bir alarm olursa, operatörün dikkat etmesi için ekranda ilgili alarm sayfası gösterilir.
Ölçü aletleri:
Jeneratör Voltajı, 3- faz, F-F ve F- N
Jeneratör Frekansı
Jeneratör Akımı
Şebeke Voltajı, 3- faz, F-F ve F- N
Akü Voltajı
Motor çalışma Saati
Yağ Basınç Göstergesi
Motor Sıcaklık Göstergesi
Yakıt Seviyesi /opsiyon)
6.2. OLAY GÜNLÜĞÜ
Bilgi
butonuna basarak ölçü aletleri sayfası ile olay günlüğü sayfası arasında geçiş yapılır.
Aşağı
butonuna basarak geçmiş olay değiştirilecek, olay günlüğüne en son gelen alarm gösterilecektir. Ölçü
aletlerinden olay günlüğüne geçiş yapıldığında en son olan alarm gösterilecektir.
Olay günlüğüne giriş yapan olayın numarası ekranın sol alt kısmında gösterilir. Hafızada son beş olay tutulur. Olay
günlüğünde alarm tipini açıklayan alarm ikonu gösterilir. Ekranın gösterge kısmında alarmın meydana geldiği motor
çalışma saati gösterilir. Ekranın alt kısmında sağda modülün konumu gösterilir.
Aşağıda örnekte Durdurma Alarmının modülün İlave Girişinden yapıldığını gösterir.
Alarm, ilave giriş
A’dan kayda geçirilmiş
Olay günlüğü
Olay numarası
Alarm kaydedildiğinde
motorun çalışma
saatinin sayısı
7
7. KONUM İKONLARI
Ünitenin hangi konumda olduğu ekranda ikon ile gösterilir.
İkon
Grafik
Detaylar
Motor çalışıyor animasyonu
Ünite stop konumunda ve motor çalışmıyorken bu ikon
ekranda görünür.
Ünite otomatik konumunda ve motor çalışmıyorken bu ikon
ekranda görünür.
Ünite manüel konumunda ve motor çalışmıyorken bu ikon
ekranda görünür
Bir zamanlayıcı aktif olduğunda, örneğin marş zamanlayıcısı, marş arası
dinlenme zamanlayıcısı, v.s. ekranda görünür.
Motor çalışıyorken ve tüm zamanlayıcıların süresi dolmuş,
jeneratör yükte veya yüksüz durumdayken ekranda görünür.
Ön panel editörü
Ünite ön panelden programa alındığında ekranda görünür.
Durmuş / Kapalı
Otomatik
Manüel
Zamanlayıcı animasyon
7.1. OTOMATİK ÇALIŞMA İKONU
Jeneratör OTOMATİK konumda çalışıyorken ekranda jeneratörün çalışma sebebi için ilgili ikon gösterilir.
Otomatik çalışmanın sebebi
İkon
Uzaktan start sinyali
Akü şarjı düşük
Eksersiz çalışması
Şebeke arızası
7.2. ÖLÇÜ ALETİ İKONLARI
Gösterge aletinden ölçme bilgisi verilirken göstergeye ait ikon ekranda gösterilir.
İkon
Grafik
Detaylar
Jeneratör
Jeneratör voltajı ve jeneratör frekansı için kullanılır.
Şebeke
Şebeke voltajı ve şebeke frekansı için kullanılır.
Motor hızı
Motor hızı gösterge ekranı
Çalışma saati
Çalışma saati gösterge ekranı
Akü Voltajı
Akü voltajı gösterge ekranı
Motor Sıcaklığı
Su sıcaklığı gösterge ekranı
Yağ Basıncı
Yağ basınç gösterge ekranı
Esnek algılayıcı
Esnek algılayıcı gösterge ekranı
Olay günlüğü
Olay günlüğü görüntülendiğinde gösterilir.
Ünite zamanı
Ünitede tutulan şimdiki zaman
Eksersiz ayarı
Eksersiz çalışmasının şimdiki değeri ve çalışma süresi.
CAN DTC
ECU arıza teşhis kodu
8
8. KORUMALAR
Bir alarm durumu meydana geldiğinde ortak alarm LED i yanacaktır.
LCD ekran ‘Bilgi sayfası’ dan ‘Alarm Sayfası’ na atlayacaktır.
LCD ekranda birçok alarm örneğin “ Yüksek Motor Sıcaklığı durdurma”, “ Acil Stop” gösterilecektir.
Bu alarmlar meydana geldiğinde sırayla ekranda otomatik olarak gösterilecektir. Bir ikaz alarm olduğunda ilgili ikon
ekranda gösterilecektir. İkaz alarmından sonra durdurma alarmı meydana gelmişse modül ilgili ikonu tekrar
gösterecek ve ikon yanıp sönecektir.
8.1. İKAZ ALARMLARI
İkaz alarmları kritik olamayan alarm durumudur ve jeneratör sisteminin çalışmasına etki etmez.
Bir alarm alındığında LCD ekran, alarm sayfasına atlayacaktır ve tüm aktif ikaz alarmları ve durdurma alarmları
ekranda gösterilir.
İkaz alarmları, arıza durumu ortadan kalktığında, kendinden sıfırlanır.
Ekr an
Sebebi
Akü Yüksek Voltaj
Akü Düşük Voltaj
ECM
CAN ECU İkaz
Motor ECU sundan ikaz alarmı alındığında modülün ekranında
gösterilir.
Şarj Alternatör Arızası
Şarj alternatörünün W/L terminalinden düşük şarj voltajı alındığında.
Sayısal Giriş A-D
İlave sayısal giriş yapılandırıldığında
Analog Giriş A-C
İlave analog giriş yapılandırıldığında
Stop Arızası
Motora durma talimatı verildiğinde motorun çalışmağa devam ettiği
tespit edilirse.
NOT : ‘Stop Arızası’ yağ basınç algılayıcısının arızalı olduğunu
gösterebilir. Motoru durdurup yağ algılayıcının devresini, kablosunu
kontrol ediniz.
Jeneratör Yüksek Voltaj İkaz
Jeneratör Düşük Voltaj İkaz
Yüksek Su Sıcaklığı İkaz
Düşük Yağ Basıncı İkaz
Hz
Hz
Akü voltajı, belli bir sure için modül programında ayarlanmış
yüksek voltaj seviyesini aştığında
Akü voltajı, belli bir sure için modül programında ayarlanmış
düşük voltaj seviyesinden aşağı düştüğünde
Jeneratör çıkış voltajı, modül programında ayarlanmış değeri aştığında.
Emniyet devreleri zaman sayıcının süresinin sonunda, Jeneratör çıkış
voltajı, modül programında ayarlanmış değerden aşağıya düştüğünde.
Emniyet devreleri zaman sayıcının süresinin sonunda, modül
programında ayarlanmış yüksek motor sıcaklığı değeri aşıldığı
modül tarafından tespit edildiğinde
Emniyet devreleri zaman sayıcının süresinin sonunda modül
programında ayarlanmış düşük yağ basıncı değerinden aşağıya
düştüğü modül tarafından tespit edildiğinde
Düşük Yakıt Seviyesi
Modül programında ayarlanmış düşük yakıt seviyesi değeri aşıldığı
modül tarafından tespit edildiğinde
Yüksek Frekans İkaz
Jeneratör çıkış frekansı, modül programında ayarlanmış değeri aştığında.
Aşırı Hız İkaz
Motor hızı, modül programında ayarlanmış değeri aştığında
Düşük Frekans İkaz
Emniyet devreleri zaman sayıcının süresinin sonunda, Jeneratör çıkış
frekansı, modül programında ayarlanmış değerden aşağıya düştüğünde.
Düşük Hız İkaz
Motor hızı, modül programında ayarlanmış düşük hız değerinden aşağı
düştüğünde
Esnek Algılayıcı
Esnek algılayıcıdan ikaz alarmı alındığında
9
8.2. DURDURMA ALARMLARI
Durdurma alarmları jeneratörü durdurur ve alarmlar kilitlenir. Alarm durumu ortadan kaldırıldıktan sonra
Stop/Sıfırlama
butonuna basılarak modül sıfırlanır.
NOT: - Alarm durumu ortadan kaldırılmadıysa modülde alarm durumu sıfırlanmaz.
Ekran
Sebebi
CAN ECU Veri Hatası
ECM
CAN ECU Durdurma alarmı Motor elektronik control ünitesinden durdurma alarm sinyali DSE
modülüne gönderildiğinde ilgili alarm durumu modül ekranından gösterilir.
Sayısal Giriş A-D
Düşük Yakıt Seviyesi
Yüksek Frekans Durdurma
Jeneratör çıkış frekansı ayarlanan sınır değerin üzerine çıktığında
motor durdurulur.
Aşırı Hız Durdurma
Motor hızı ayarlanan sınır değeri aştığında motor durdurulur.
Düşük Frekans Durdurma
Jeneratör çıkış frekansı ayarlanan sınır değerin altına düştüğünde
motor durdurulur.
Düşük Hız Durdurma
Motor hızı ayarlanan sınır değerin altına düştüğünde motor durdurulur.
Sıcaklık algılayıcı devresi
kopuk
Yağ basınç algılayıcı devresi
kopuk
Sıcaklık algılayıcı devresi kopuk olduğunda motor durdurulur.
Esnek algılayıcı
Esnek algılayıcı devresinden sinyal alındığında motor durdurulur.
Manyetik okuyucu devresi
kopuk
Manyetik okuyucu devresi kopuk olduğunda motor durdurulur.
Acil Stop
Başlatma Arızası
Jeneratör Yüksek Voltaj
Durdurma
Jeneratör Düşük Voltaj
Durdurma
Yüksek Soğutma Sıvısı
Sıcaklığı Durdurma
Manyetik okuyucu
sinyalinin kaybı
Düşük Yağ Basıncı
Durdurma
Hz
Yardımcı sayısal girişten alarm sinyali alındığında ekranda ilgili ikon gösterilir.
Yardımcı analog giriş modül programında yapılandırıldığında ekranda
ilgili ikon gösterilecektir.
Acil stop butonuna basıldığında jeneratör hemen durdurulur.
Daha sonra sinyal kaldırılmalı.
Motoru başlatmak için en fazla 3 kez marş yapılır motor
çalışmadığında deneme yapılmaz.
Jeneratör çıkış voltajı programda ayarlanan sınır değerini aştığında
durdurulur.
Jeneratör çıkış voltajı programda ayarlanan sınır değerin altına
düştüğünde motor durdurulur.
Motor soğutma sıvısı sıcaklığı programda ayarlanan sınır değerini
aştığında motor durdurulur.
Manyetik okuyucudan hız sinyali DSE modül tarafından alınmadığında
motor durdurulur.
Motor yağ basıncı programda ayarlanan sınır değerin altına
düştüğünde motor durdurulur.
Yakıt seviyesi programda ayarlanan sınır değerin altına düştüğünde
modül algılar.
Analog Giriş A-C
Hz
Modül CAN çalışması için yapılandırılmışsa ve motor Can veri
hattından sinyal alınmadığında motor durdurulur.
Yağ basınç algılayıcı devresi kopuk olduğunda motor durdurulur.
10
9. KABLOLAMA
11
DSE
6020
AUTO
DSE 6020 AMF CONTROL MODULE
OPERATING MANUAL
HEAD OFFICE
AKSA JENERATÖR SANAYİ A.Ş.
Gülbahar Caddesi 1. Sokak
34212 No: 2 Güneşli / İSTANBUL
T: + 90 212 478 66 66
F: + 90 212 657 55 16
e-mail: [email protected]
AUTHORIZED SERVICE
AKSA SERVICE & RENTAL
Muratbey Beldesi, Güney Girişi Caddesi No:8
34540 Çatalca / İSTANBUL
T: + 90 212 887 11 11
F: + 90 212 887 10 20
e-mail: [email protected]
1.
DESCRIPTION OF CONTROLS ......................................................................................... 1
2.
CONTROLS.............................................................................................................................. 2
3.
STARTING THE ENGINE ..................................................................................................... 3
4.
STOPPING THE ENGINE...................................................................................................... 3
5.
OPERATION............................................................................................................................. 4
5.1. OTOMATIC OPERATION ............................................................................................................................. 4
5.2. MANUAL OPERATION ................................................................................................................................... 5
5.3. TEST OPERATION .............................................................................................................................................. 6
6.
MODULE DISPLAY ................................................................................................................. 7
6.1. VIEWING THE INSTRUMENTS .................................................................................................................. 7
6.2. EVENT LOG............................................................................................................................................................. 8
7.
MODE ICON ............................................................................................................................ 8
7.1. AUTO RUN ICON .............................................................................................................................................. 9
7.2. INSTRUMENTATION ICON ........................................................................................................................ 9
8.
PROTECTIONS........................................................................................................................ 10
8.1. WARNINGS............................................................................................................................................................. 10
8.2. SHUTDOWN ALARMS ................................................................................................................................... 11
9. 6020 AMF CONTROL MODUL WIRING........................................................................... 12
1. DESCRIPTION OF CONTROLS
Main status display
Common alarm indicator
Display scroll button
DSE
6020
Page Button
(information)
Start engine
Select stop mode
AUTO
Alarm mute / lamp test
Select manual
mode
Select test mode
DSE
Select auto mode
6020
AUTO
Generator Available
Mains available
Mains on load
Generator on load
1
2. CONTROLS
Stop / Reset
This button places the module into its Stop/Reset mode. This will clear any alarm conditions for which the
triggering criteria have been removed. If the engine is running and the module is in Stop mode, the module will
automatically instruct the changeover device to unload the generator. The fuel supply de-energises and the engine
comes to a standstill. Should a remote start signal be present while operating in this mode, a remote start will
not occur.
Manual
This mode allows manual control of the generator functions. Once in Manual mode the module will respond to
the start
button, start the engine, and run off load. If the engine is running off-load in the Manual mode and
a remote start signal becomes present, the module will automatically instruct the changeover device to place
the generator on load (‘Close Generator’ becomes active (if used)).
Upon removal of the remote start signal, the generator remains on load until either selection of the
‘STOP/RESET’ or ‘AUTO’ modes.
Auto
This button places the module into its ‘Automatic’ mode. This mode allows the module to control the function
of the generator automatically. The module will monitor the remote start input and mains supply status and once
a start request is made, the set will be automatically started and placed on load.
Upon removal of the starting signal, the module will automatically transfer the load from the generator and shut
the set down observing the stop delay timer and cooling timer as necessary. The module will then await the
next start event
AUTO
Test
This button places the module into its ‘Test’ mode. This allows an on load test of the generator.
Once in Test mode the module will respond to the start button, start the engine, and run on load.
Start
This button is only active in STOP/RESET
or MANUAL
mode.
Pressing this button in manual or test mode will start the engine and run off load (manual) or on load (test).
Mute / Lamp Test
This button silences the audible alarm if it is sounding and illuminates all of the LEDs as a lamp test feature.
Scroll
This buttons scrolls through the instruments in the currently displayed page
Page
Toggles the display between instrumentation an event log mode,
2
3. STARTING THE ENGINE
DSE
6020
...Then, press the Start
button to crank the engine
First select Manual
mode
AUTO
NOTE:- For further details, see the section entitled ‘OPERATION’ elsewhere in this manual.
4. STOPPING THE ENGINE
DSE
6020
Select Stop/Reset
mode. The generator
stops.
AUTO
NOTE:- For further details, see the section entitled ‘OPERATION’ elsewhere in this manual.
3
5. OPERATION
5.1. AUTOMATIC OPERATION
This mode is activated by pressing the
pushbutton. The icon is displayed to indicate Auto Mode operation
if no alarms are present.
Auto mode will allow the generator to operate fully automatically, starting and stopping as required with no user
intervention.
5.1.1. WAITING IN AUTO MODE
If a starting request is made, the starting sequence will begin.
Starting requests can be from the sources shown below. When the engine is running in AUTO mode, an icon
is displayed to indicate the reason for the set being run:
Auto run reason
İcon
Remote start input
Low battery run
Scheduled run
Mains failure
5.1.2. STARTING SEQUENCE
Whether the start sequence is initiated by mains (utility) failure, or by remote start input, the following sequence
is followed:
To allow for short term mains supply transient conditions or false remote start signals, the Start Delay timer is
initiated.
Should all start requests be removed during the start delay timer, the unit will return to a stand-by state.
If a start request is still present at the end of the start delay timer, the fuel relay is energised and the engine will
be cranked.
NOTE: If the unit has been configured for CAN, compatible ECU's will receive the start command via CAN.
If the engine fails to fire during this cranking attempt then the starter motor is disengaged for the crank rest
duration after which the next start attempt is made. Should this sequence continue beyond the 3 cranking
attempts, the start sequence will be terminated and the display shows
Fail to Start.
When the engine fires, the starter motor is disengaged and locked out at 21Hz measured from the Alternator
output.
Additionally, rising oil pressure can be used to disconnect the starter motor
After the starter motor has disengaged, the Safety On delay is activated.
‘Delayed’ alarms (under speed, low oil pressure etc) will be monitored after the end of the Safety On delay.
5.1.3. ENGINE RUNNING
Once the engine is running and all starting timers have expired, the animated
4
icon is displayed
NOTE: The Load transfer signal remains inactive until the oil pressure has risen .This prevents excessive
wear on the engine .
If all start requests are removed, the stopping sequence will begin.
5.1.4. STOPPING SEQUENCE
On the return of the mains supply, (or removal of the Remote Start signal if the set was started by remote
signal), the return delay timer is initiated, once it has timed out, the load is transferred back to the mains (utility).
The Cooling timer is then initiated, allowing the engine a cooling down period off load before shutting down.
This is particularly important for where turbochargers are fitted to the engine. Once the Cooling timer expires
the Fuel Solenoid is de-energised, bringing the generator to a stop.
Should the mains supply fall outside limits again (or the Remote Start signal be re-activated) during the cooling
down period, the load will be immediately transferred to the generator.
Selecting STOP (O) de-energises the FUEL SOLENOID, bringing the generator to a stop.
5.2. MANUAL OPERATION
This mode is activated by pressing the
pushbutton. An LED indicator beside the button confirms this action.
Manual mode allows the operator to start and stop the set manually, and if required change the state of the load
switching devices.
5.2.1. WAITING IN MANUAL MODE
When in manual mode, the set will not start automatically.
Press the
button to begin the start sequence
5.2.2. STARTING SEQUENCE
NOTE:- There is no Start Delay in this mode of operation.
The Fuel relay is energised, then the Starter Motor is engaged.
If the engine fails to fire during this cranking attempt then the starter motor is disengaged for the crank rest
duration after which the next start attempt is made. Should this sequence continue beyond the 3 cranking
attempts, the start sequence will be terminated and the display shows
Fail to Start.
When the engine fires, the starter motor is disengaged and locked out at 21Hz measured from the Alternator
output.
Additionally, rising oil pressure can be used to disconnect the starter motor
After the starter motor has disengaged, the Safety On delay is activated.
‘Delayed’ alarms (underspeed, low oil pressure etc) will be monitored after the end of the Safety On delay.
5.2.3. ENGINE RUNNING
In manual mode, the load is not transferred to the generator unless a ‘loading request’ is made.
A loading request can come from a number of sources :
• Remote start input
• Low battery run
• Scheduled run
• Mains failure
5
Once the load has been transferred to the generator, it will not be automatically removed. To manually transfer
the load back to the mains.
• Press the auto mode
button to return to automatic mode. The set will observe all auto mode start
requests and stopping timers before beginning the Auto mode stopping sequence.
• Press the stop button
AUTO
5.2.4. STOPPING SEQUENCE
• In manual mode the set will continue to run until either :
• The stop button
is pressed – The set will immediately stop
• The auto button
is pressed. The set will observe all auto mode start requests and stopping timers before
beginning the Auto mode stopping sequence
AUTO
5.3. TEST OPERATION
This mode is activated by pressing the
pushbutton. An LED indicator beside the button confirms this action.
Test mode will start the set and transfer the load to the generator to provide a Test on load function.
5.3.1. WAITING IN TEST MODE
When in test mode, the set will not start automatically.
To begin the starting sequence, press the
button.
5.3.2. STARTING SEQUENCE
The set begins to crank
If the engine fails to fire during this cranking attempt then the starter motor is disengaged for the crank rest
duration after which the next start attempt is made. Should this sequence continue beyond the 3 cranking, the
start sequence will be terminated and the display shows Fail to Start.
When the engine fires, the starter motor is disengaged and locked out at 21Hz measured from the Alternator
output.
Additionally, rising oil pressure can be used to disconnect the starter motor
After the starter motor has disengaged, the Safety On delay is activated.
‘Delayed’ alarms (under speed, low oil pressure etc) will be monitored after the end of the Safety On delay.
5.3.3. ENGINE RUNNING
Load will be automatically transferred from the mains supply to the generator.
NOTE:- The Load transfer signal remains inactive until the oil pressure has risen .This prevents excessive
wear on the engine .
In test mode, the set will continue to run on load until either:
• The stop button
is pressed – The set will immediately stop
• The auto button
is pressed. The set will observe all auto mode start requests and stopping timers before
beginning the Auto mode stopping sequence.
AUTO
6
6. MODULE DISPLAY
BACKLIGHT
The backlight will be on if the unit has sufficient voltage on the power connection while the unit is turned on,
unless the unit is in Power Save mode, or if the engine is cranking for which the backlight will be turned off.
GRAPHICAL DISPLAY
- 4- line, 64 x 132 small Graphic Display with LED Backlight
- Icon and numeric display.
- Software controlled contrast
- Mimic of 4 x indicators via LCD
A 48x132 pixel LCD is used for the display. The display is segmented into areas for instrumentation, units, alarm
icons and various other icons
Inst. Icon
Active config
/ FPE, event index
Instrumentation
Units
Instrumentation
Units
Instrumentation
Units
DISPLAY EXAMPLE
This example shows Generator Volts as shown by the Generator
Instrumentation Icon
Alarm Icon
Mode Icon
symbol
Instrumentation
Units
Active configuration
Mode Icon
6.1. VIEWING THE INSTRUMENTS
At power up, the display will show the software version and then show the default screen, which will display
Generator Frequency.
It is possible to scroll to display the different pages of information by repeatedly operating the down button
Pressing the information
button toggles between instrumentation and event log displays
Once selected the page will remain on the LCD display until the user selects a different page or after an extended
period of inactivity, the module will revert to the status display.
When scrolling manually by pressing the
button, the display will automatically return to the Status page if
no buttons are pressed for the duration of the configurable LCD Page Timer.
If an alarm becomes active while viewing the status page, the display shows the Alarms page to draw the operator’s
attention to the alarm condition.
7
Metering:
Generator Voltage, 3-phase, L-L and L-N
Generator Frequency
Generator Current
Mains Voltage, 3-phase, L-L and L-N
Battery Voltage
Engine hours Run
Oil Pressure Gauge
Engine Temperature Gauge
Fuel Level
6.2. EVENT LOG
The info
button toggles between the display of the instrumentation and the event log. Pressing the down
button will move to the previous event, the event log entry at position 1 being the most recent. On moving
from the instrumentation value to the event log the unit will display the most recent entry.
A number in the bottom left indicates the event log entry currently displayed. There are five event log entries
in the 60xx units. When the event log is displayed the icon in the alarm icon area indicates the alarm type at
that position of the event log. The hours run at the time of the alarm shows in the instrumentation area. The
bottom right icon indicates the current mode as normal.
Example of Auxiliary Input Shutdown Alarm.
Event log icon
Auxiliary input a
is logged
Event number 1
Number of engine running hours when
the event was logged (99hrs 9mins)
7. MODE ICON
An icon is displayed in the mode icon area of the display to indicate what mode the unit is currently in.
Icon
Graphic Details
Stopped
Appears when the engine is at rest and the unit is in stop mode.
Auto
Appears when the engine is at rest and the unit is in auto mode.
Manual
Appears when the engine is at rest and the unit is in manual mode/
Timer animation
Running animation
Front panel editor
Appears when a timer is active, for example cranking time,
crank
rest
etc.
Appears when the engine is running, and all timers have expired,
either on or off load. The animation rate is reduced when running
in idle mode.
Appears when the unit is in the front panel editor.
8
7.1. AUTO RUN ICON
When the engine is running in AUTO mode, an icon is displayed to indicate the reason for the set being run.
Auto run reason
Icon
Remote start input
Low battery run
Scheduled run
Mains failure
7.2. INSTRUMENTATION ICONS
When displaying instrumentation a small icon is displayed in the instrumentation icon area to indicate what value
is currently being displayed.
Icon
Graphic
Details
Generator
Used for generator voltage and generator frequency
Mains
Used for mains voltages and mains frequency
Engine speed
Engine speed instrumentation screen
Hours Run
Hours run instrumentation screen
Battery Voltage
Battery voltage instrumentation screen
Engine Temperature
Coolant temperature instrumentation screen
Oil Pressure
Oil pressure instrumentation screen
Flexible sensor
Flexible sensor instrumentation screen
Event log
Appears when the event log is being displayed
Unit time
Current time held in the unit
Scheduler setting
The current value of the scheduler run time and duration
CAN DTC
ECU diagnostic trouble codes
9
8. PROTECTIONS
When an alarm is present, the Common alarm LED will illuminate.
The LCD display will jump from the ‘Information page’ to display the Alarm Page. See section entitled Graphical
Display for details of alarm icons.
The LCD will display multiple alarms E.g. “High Engine Temperature shutdown”, “Emergency Stop” and “Low
Coolant Warning”. These will automatically scroll round in the order that they occurred;
In the event of a warning alarm, the LCD will display the appropriate icon. If a shutdown then occurs, the module
will again display the appropriate icon, flashing.
8.1. WARNINGS
Warnings are non-critical alarm conditions and do not affect the operation of the generator system, they serve
to draw the operators attention to an undesirable condition.
In the event of an alarm the LCD will jump to the alarms page, and scroll through all active warnings and
shutdowns. Warning alarms are self-resetting when the fault condition is removed.
Display
Battery High Voltage
Battery Low Voltage
ECM
CAN ECU Warning
Charge Alternator Failure
Digital Input A-D
Analogue Input A-C
Fail To stop
Generator High Voltage
Warning
Generator Low Voltage
Warning
High Coolant Temperature
Warning
Low Oil Pressure Warning
Hz
Hz
Reason
The DC supply has risen above the high volts setting level for the
duration of the high battery volts timer
The DC supply has fallen below the low volts setting level for the
duration of the low battery volts timer
The engine ECU has detected a warning alarm and has informed the
DSE module of this situation. The exact error is also indicated on the
module’s display.
The auxiliary charge alternator voltage is low as measured from the
W/L terminal.
Auxiliary Digital inputs can be user configured as Digital inputs and
will display the relevant icon.
Auxiliary Analogue inputs can be user configured as Digital inputs
and will display the relevant icon.
The module has detected a condition that indicates that the engine
is running when it has been instructed to stop. Note:"Fail to Stop"
could indicate a faulty oil pressure sensor - if engine is at rest ,check
oil sensor wiring and configuration.
The generator output voltage has risen above the pre-set pre-alarm
setting.
The generator output voltage has fallen below the pre-set pre-alarm
setting after the Safety On timer has expired.
The module detects that the engine coolant temperature has
exceeded the high engine temperature pre-alarm setting level
after the Safety On timer has expired.
The module detects that the engine oil pressure has fallen below
the low oil pressure pre-alarm setting level after the Safety On
timer has expired.
Low Fuel Level
The module detects that the fuel level is below the configured setting
Over Frequency Warning
The generator output frequency has risen above the pre-set
pre-alarm setting.
Over Speed Warning
The engine speed has risen above the over speed pre alarm setting
Under Frequency Warning
The generator output frequency has fallen below the pre-set
pre-alarm setting after the Safety On timer has expired.
Under Speed Warning
The engine speed has fallen below the under speed pre alarm setting
Flexible Sensor
The flexible sensor warning alarm has been triggered.
10
8.2. SHUTDOWN ALARMS
Shutdowns are latching alarms and stop the Generator. Clear the alarm and remove the fault then press
Stop/Reset
to reset the module.
NOTE:- The alarm condition must be rectified before a reset will take place. If the alarm condition remains, it
will not be possible to reset the unit (The exception to this is the Low Oil Pressure alarm and similar ‘delayed
alarms’, as the oil pressure will be low with the engine at rest).
Display
Reason
CAN ECU Data Fail
ECM
CAN ECU Shutdown
Digital Input A-D
Analogue Input A-C
The module is configured for CAN operation and does not detect
data on the engine Can data link, the engine shuts down.
The engine ECU has detected a shutdown alarm and has informed the
DSE module of this situation. The exact error is also indicated on the
module’s display.
Auxiliary Digital inputs can be user configured as Digital inputs and
will display the relevant icon.
Auxiliary Analogue inputs can be user configured as Digital inputs and
will display the relevant icon.
Emergency Stop
The emergency stop button has been depressed. This is a failsafe
(normally closed to battery negative) input and will immediately stop
the set should the signal be removed.
NOTE:- The Emergency Stop Negative signal must be present
otherwise the unit will shutdown.
Fail To Start
The engine has not fired after the preset number of start attempts
Generator High Voltage
Shutdown
Generator Low Voltage
Shutdown
The generator output voltage has risen above the pre-set level.
The generator output voltage has fallen below the pre-set level
High Coolant Temperature
Shutdown
The module detects that the engine coolant temperature has exceeded
the high engine temperature shutdown setting level after the Safety On
timer has expired.
Loss of Mag. Pickup Signal
The speed signal from the magnetic pickup is not being received
by the DSE controller.
The engine oil pressure has fallen below the low oil pressure
Low Oil Pressure Shutdown trip setting level after the Safety On timer has expired.
Hz
Hz
Low Fuel Level
The module detects that the fuel level is below the configured setting
Over Frequency Shutdown
The generator output frequency has risen above the pre-set level
Over Speed Shutdown
The engine speed has exceeded the pre-set trip
Under Frequency Shutdown The generator output frequency has fallen below the preset level
Under Speed Shutdown
Temperature sensor open
circuit
Oil pressure sensor open
circuit
Flexible Sensor
The engine speed has fallen below the pre-set trip after the
Safety On timer has expired.
Temperature sensor has been detected as being open circuit.
Oil pressure sensor has been detected as being open circuit.
The flexible sensor shutdown alarm has been triggered.
Magnetic pickup open circuit Magnetic pickup sensor has been detected as being open circuit.
11
9. 6020 AMF CONTROL MODUL WIRING
12
İSTANBUL AVRUPA YAKASI
AVCILAR
MUSTAFA KEMAL PAŞA MAH. YILDIRIM BEYAZIT CAD. DEMET SOK. NO:132 AVCILAR/İSTANBUL
T:0 212 428 66 66 PBX F:0 212 423 22 22
BAĞCILAR
ORTAK BÖLGE (GÖKSU) FATİH, ZEYTİNBURNU, GAZİOSMANPAŞA, EYÜP
MERKEZ MAH. ATATÜRK CAD. NO:24 YENİBOSNA T:0212 630 79 80/0212 630 79 98
KAĞITHANE
ÇAĞLAYAN MAH. KAĞITHANE CAD. NO:93 KAĞITHANE
T:0212 222 13 38 PBX F:0212 210 08 81
KARAKÖY
NECATİBEY CAD NO.74 KARAKÖY / İSTANBUL T: 0212 251 92 48 - 293 07 32 - 33 F: 0212 251 92 64
DOLAPDERE SAN. SİT. 13.ADA NO:9 İKİTELLİ T: 0212 671 35 48 - 49 F: 0212 671 35 41
SEFAKÖY
YEŞİLOVA MAH. DİLEK SOK. NO:2 KÜÇÜKÇEKMECE
T:0212 425 65 80 (3 HAT) F:0212 425 65 84
İSTANBUL ANADOLU YAKASI
KADIKÖY
ESKİ ÜSKÜDAR YOLU CAD. MEZARLIK SK. NO:4 İÇERENKÖY
T:0216 469 58 58
PENDİK
AYDINEVLER ÂŞIK VEYSEL SOK. AK PLAZA NO:24 KÜÇÜKYALI/MALTEPE
T:0216 489 68 68 PBX F:0216 489 21 60
İSTANBUL DIŞI SERVİS NOKTALARI
ANKARA
ÇETİN EMEÇ BULVARI 2.CAD. 1309 SK. NO:7/A ÖVEÇLER
T:0312 472 71 71 F:0312 472 76 01
GAZİANTEP
FATİH MAH. FEVZİ ÇAKMAK BULVARI NO:152 ŞEHİTKÂMİL
T:0342 321 39 59 F:0342 321 37 67
ADANA
TURHAN CEMAL BERİKER BUL. MERKEZ CAD.
ADANA Ş MERKEZİ A BLOK NO:24/27 YEŞİLOBA SEYHAN
T:0322 428 11 61 PBX F: 0322 428 15 40
İZMİR
KAZIM DİRİK MAH. YENİYOL ANKARA CAD.
NO:75 BORNOVA
T:0232 461 82 82 F:0232 462 24 63
ANTALYA
YEŞİLOVA MAH. ASPENDOS BULVARI 196-1
T:0242 322 16 88 – 322 91 88 F:0242 322 97 55
KAYSER
OSMAN KAVUNCU CAD. SOYLUM APT. NO:185/A
MELİKGAZİ T:0352 336 17 42-43 F: 0352 336 17 40
BODRUM
ATATÜRK BUL. BEYLİKKIRLARI MEVK
BALKANOĞLU-2 İŞ MERKEZİ G-BLOK NO:1 KONACIK
T:0252 358 70 30 F: 0252 358 70 25
DİYARBAKIR
URFA YOLU 1. KM. DR. SITKI GÖRAL CAD.
VELAT 3 APT.ALTI NO:1
T:0412 238 04 44 PBX F:0412 238 10 11
BURSA
NİLÜFER TİC. MRK. ALAADDİNBEY MAH. 70 SK.
NO:30/A NİLÜFER
T:0224 443 53 15-16-17-18 F:0224 443 53 15
MARMARİS
DATÇA YOLU CAD. NO:14/B
T:0252 413 58 93 F: 0252 413 85 93
DENİZL
İZMİR ASFALTI NO:56 GÜMÜŞLER
T:0258 371 71 10/372 08 44 F:0258 372 09 46
TRABZON
YAVUZ SELİM BULVARI MANOLYA SİTESİ NO:281
T:0462 230 10 60-61 F: 0462 230 10 64
ALGERIA
Aksa Algeria
Chemin du Parc d'Attraction
Cooperative El Baraka No: 417 Tixerain
Bir Moruad Rais / Alger
T : + 213 21 40 26 72
F : + 213 21 40 27 94
e-mail: [email protected]
CHINA
Aksa Power Generation
(Changzhou) Co. Ltd.
No.19 Tongjiang Road, New District,
Changzhou Jiansu Zone / China
T: + 86 (0) 519 856 01 307
F: + 86 (0) 519 851 50 132
e-mail: [email protected]
IRAQ
Aksa Power Generation (Iraq)
English Village House
No:353 Arbil / Iraq
T : + 964 (0) 770 761 12 20 (Erbil Service)
T : + 964 (0) 790 148 99 09 (Bagdat Service)
e-mail: [email protected]
KAZAKHSTAN
Aksa Kazakhstan Ltd.
M54-6 Abdullinyh Str.
Corner of Tole Bi Str.
Almaty - Kazakhstan
T : + 7 727 250 67 31 / 250 67 41
F : + 7 727 250 67 91
e-mail: [email protected]
RUSSIA
OOO AKCA
121471, Moscow
Metro Kuntsevskaya
Gzhatskaya street, 2
T : +7 495 710 88 62
e-mail : [email protected]
SINGAPORE
Aksa Far East(Pte.) Ltd.
94 Tuas Avenue 11
639103 Singapore
T : + 65 6863 2832
F : + 65 6863 0392 - 6863 2956
e-mail: [email protected]
U.A.E.
Aksa Middle East FZE
Post Box:18167 Warehouse
No.RA08 / LC07
Jebel Ali Free Zone - Dubai
T : + 971 4 880 91 40
F : + 971 4 880 91 41
e-mail: [email protected]
UNITED KINGDOM
Aksa International (UK) Ltd
Unit 6, Pine Court Walker Road,
Bardon Hill Coalville Leicestershire,
LE67 ISZ U.Kingdom
T : + 44 (0) 1530 837 472
F : + 44 (0) 1530 519 577
e-mail: [email protected]
VIETNAM
Aksa Vietnam
43 Le Thi Hong Gam,
Dist. 1, HCM City - Vietnam
T : + 84 8 391 47 014
F : + 84 8 391 47 015
e-mail: [email protected]
Evren Mah. Camii Yolu Cad.
No:5 34212 Güneşli,
Bağcılar - İstanbul
+ 971 4 880 9140
+ 971 4 880 91 41
29.01.14
Ç‹N / CHINA
No.19 Tongjiang Road, New District,
Changzhou Jiansu Zone / China
T : + 86 (0) 519 856 01 307
F : + 86 (0) 519 851 50 132
e-mail: [email protected]
© Copyright 2026 Paperzz