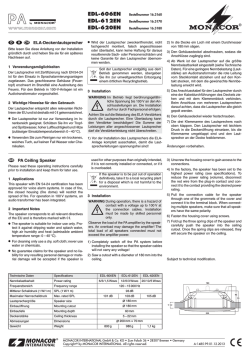
MKS-26/SW
MKS-26/WS
Bestellnummer 13.2370
Bestellnummer 13.2380
ELECTRONICS FOR SPECIALISTS ELECTRONICS FOR SPECIALISTS ELECTRONICS FOR SPECIALISTS ELECTRONICS FOR SPECIALISTS ELECTRONICS FOR SPECIALISTS ELECTRONICS
D
A
CH
Lautsprecherboxen-Paar
Bitte lesen Sie diese Anleitung vor der Installation gründlich durch und heben Sie sie für ein späteres Nachlesen
auf.
G
Verwenden Sie zum Reinigen nur ein trockenes, weiches Tuch, nie Wasser oder Chemikalien.
in die Aussparung auf der Rückseite der Lautsprecherboxen schieben.
G
Werden die Lautsprecherboxen zweckentfremdet, nicht
fachgerecht montiert, falsch angeschlossen oder überlastet, kann keine Haftung für daraus resultierende
Sach- oder Personenschäden und keine Garantie für die
Lautsprecherboxen übernommen werden.
3) Werden die Wandhalter (b) verwendet, diese nach der
Abbildung unten zusammenschrauben. Jeweils die
Schraube so fest ziehen, dass das Kugelgelenk
beweglich ist, aber auch das Gewicht der Box halten
kann.
Bei Bedarf jeweils die Lautsprecherleitung durch die
Kabeldurchführung der Halterung ziehen. Die Halterungen an geeigneter Stelle der Wand festschrauben.
Nach dem elektrischen Anschluss der Boxen diese auf
die Zapfen der Halterungen stecken. Zur Sicherung die
kleineren Gummistücke (a) verwenden.
1 Verwendungsmöglichkeiten
Diese Miniatur-Lautsprecherboxen sind universell einsetzbar. Sie können frei aufgestellt oder mit dem beiliegenden Halter an einer Wand montiert werden.
Sollen die Lautsprecherboxen endgültig aus
dem Betrieb genommen werden, übergeben Sie
sie zur umweltgerechten Entsorgung einem örtlichen Recyclingbetrieb.
2 Wichtige Hinweise für den Gebrauch
Die Lautsprecherboxen entsprechen allen relevanten
Richtlinien der EU und sind deshalb mit gekennzeichnet.
G
Die Lautsprecherboxen sind nur zur Verwendung im
Innenbereich geeignet. Schützen Sie sie vor Tropf- und
Spritzwasser, hoher Luftfeuchtigkeit und Hitze (zulässiger Einsatztemperaturbereich 0 – 40 °C).
GB
3 Installation
1) Den Verstärker ausschalten, an den die Lautsprecher
angeschlossen werden sollen, damit die Lautsprecherleitung spannungsfrei ist!
4) Die Boxen an die Lautsprecherausgänge des Verstärkers anschließen. Dabei darauf achten, dass die Lautsprecher alle gleich gepolt werden (roter Klemmanschluss = Pluspol, schwarzer Anschluss = Minuspol).
2) Werden die Wandhalter (b) nicht verwendet, jeweils
zwei Gummistücke (a) und (c) zusammenstecken und
Änderungen vorbehalten.
G
Pair of Speaker Systems
Please read these instructions carefully prior to installation
and keep them for later reference.
1 Applications
No guarantee claims for the speaker systems and no
liability for any resulting personal damage or material
damage will be accepted if the speaker systems are
used for other purposes than originally intended, if they
are not correctly installed or connected, or if they are
overloaded.
These miniature speaker systems are designed for universal applications. Place the speaker systems as desired
or use the brackets provided to install them on a wall.
If the speaker systems are to be put out of operation definitively, take them to a local recycling
plant for a disposal which is not harmful to the
environment.
2 Important Notes
The speaker systems correspond to all relevant directives
of the EU and are therefore marked with .
G
The speaker systems are suitable for indoor use only.
Protect them against dripping water and splash water,
high air humidity and heat (admissible ambient temperature range: 0 – 40 °C).
G
For cleaning only use a dry, soft cloth; never use water
or chemicals.
F
B
CH
Set d'enceintes
Veuillez lire la présente notice avec attention avant lʼinstallation et conservez-la pour pouvoir vous y reporter ultérieurement.
1 Possibilités dʼutilisation
Ces enceintes miniatures sont conçues pour des applications universelles. Elles peuvent être posées librement ou
fixées sur un mur via les supports livrés.
3 Installation
1) Switch off the amplifier to which the speaker systems
are to be connected so that the speaker cable will not
carry any voltage!
2) If the wall brackets (b) are not used, join the two rubber
parts (a) and (c) supplied with each speaker, then push
G
Pour le nettoyage utilisez uniquement un chiffon doux et
sec, en aucun cas de produits chimiques ou dʼeau.
G
Nous déclinons toute responsabilité en cas de dommages matériels ou corporels résultants si les enceintes
sont utilisées dans un but autre que celui pour lequel
elles ont été conçues, si elles ne sont pas correctement
montées ou branchées ou sʼil y a surcharge ; en outre,
la garantie deviendrait caduque.
Lorsque les enceintes sont définitivement retirées du service, vous devez les déposer dans
une usine de recyclage adaptée pour contribuer
à leur élimination non polluante.
2 Conseils importants dʼutilisation
Les enceintes répondent à toutes les directives nécessaires
de lʼUnion européenne et portent donc le symbole .
G
Les enceintes ne sont conçues que pour une utilisation
en intérieur. Protégez-les de tout type de projections
d'eau, des éclaboussures, d'une humidité élevée de l'air
et de la chaleur (plage de température de fonctionnement autorisée : 0 – 40 °C).
3 Installation
1) Eteignez lʼamplificateur auquel les enceintes doivent
être reliées pour que le câble haut-parleur ne soit pas
porteur de tension !
Technische Daten
Specifications
Caractéristiques techniques
Belastbarkeit
Power rating
Puissance
Max. Frequenzbereich
Max. frequency range
Bande passante max.
Impedanz
Impedance
Impédance
Mittlerer Schalldruck
SPL
Pression sonore moyenne
Maximaler Nennschalldruck Max. rated SPL
Pression sonore nom. max.
Lautsprecherbestückung
Speaker configuration
Configuration enceinte
Abmessungen, Gewicht
Dimensions, weight
Dimensions, poids
Anschlüsse
Connections
Branchements
®
the parts into the recess on the rear of each speaker
system.
3) If the wall brackets (b) are used, assemble them
according to the figure below. Fasten the screw of each
bracket so that the ball joint is movable but still able to
bear the weight of the speaker system.
Pull the speaker cable through the cable inlet of the
bracket, if required. Fasten the brackets to a suitable
place on the wall. After making the electrical connection of the speaker systems, place the speaker systems on the pivots of the brackets. Use the small rubber parts (a) to secure the brackets.
4) Connect the speaker systems to the speaker outputs of
the amplifier. Make sure that all speaker systems have
the same polarity (red terminal = positive pole, black
terminal = negative pole).
Subject to technical modification.
2) Si vous nʼutilisez pas les supports muraux (b), assemblez les deux pièces caoutchouc (a) et (c) livrées, puis
mettez-les dans lʼencoche sur la face arrière des
enceintes.
3) Si vous utilisez les supports muraux (b), assemblez-les
selon le schéma ci-dessous. Serrez la vis de chaque
étrier de sorte que lʼarticulation soit mobile mais puisse
soutenir le poids de lʼenceinte.
Si besoin, faites passer le câble haut-parleur via le
passage de câble du support. Vissez les supports à
lʼendroit souhaité sur le mur. Une fois le branchement
électrique des enceintes effectué, mettez-les sur les
pivots des supports. Utilisez les petites pièces caoutchouc (a) pour les sécuriser.
4) Reliez les enceintes aux sorties haut-parleur de lʼamplificateur. Veillez à ce que les haut-parleurs aient tous
la même polarité (borne de branchement rouge = pôle
plus, borne noire = pôle moins).
Tout droit de modification réservé.
MKS-26 / SW • MKS-26 / WS
10 WRMS, 20 WMAX
150 – 22 000 Hz
8Ω
88 dB (1 W/1 m)
100 dB
6,5-cm-Breitbandlautsprecher (2,5″)
6.5 cm (2.5″) full range speaker
haut-parleur large bande 6,5 cm (2,5″)
90 × 90 × 115 mm, 450 g
LS-Klemmanschluss
speaker terminal
bornier haut-parleur
MONACOR INTERNATIONAL GmbH & Co. KG • Zum Falsch 36 • 28307 Bremen • Germany
A-1611.99.01.10.2014
Copyright © by MONACOR INTERNATIONAL. All rights reserved.
MKS-26/SW
MKS-26/WS
Order number 13.2370
Order number 13.2380
ELECTRONICS FOR SPECIALISTS ELECTRONICS FOR SPECIALISTS ELECTRONICS FOR SPECIALISTS ELECTRONICS FOR SPECIALISTS ELECTRONICS FOR SPECIALISTS ELECTRONICS
I
Coppia di casse acustiche
Vi preghiamo di leggere attentamente le presenti istruzioni
prima dell'installazione e di conservarle per un uso futuro.
G
Per la pulizia usare solo un panno morbido, asciutto;
non impiegare in nessun caso acqua o prodotti chimici.
G
Nel caso dʼuso improprio, di montaggio non a regola
d'arte, di collegamenti sbagliati o di sovraccarico delle
casse, non si assume nessuna responsabilità per eventuali danni consequenziali a persone o a cose e non si
assume nessuna garanzia per le casse.
1 Possibilità d'impiego
Queste casse acustiche mini sono previste per impieghi
universali. Possono essere collocate liberamente oppure
possono essere montate a una parete per mezzo dei supporti in dotazione.
Se si desidera eliminare le casse definitivamente, consegnarle per lo smaltimento ad
un'istituzione locale per il riciclaggio.
2 Avvisi importanti per l'uso
Le casse acustiche sono conformi a tutte le direttive rilevanti dellʼUE e pertanto portano la sigla .
G
Le casse acustiche sono previste solo per lʼuso allʼinterno di locali. Proteggerle dall'acqua gocciolante e
dagli spruzzi d'acqua, da alta umidità dell'aria e dal
calore (temperatura dʼimpiego ammessa fra 0 e 40 °C).
E
Pareja de Recintos
Lea atentamente estas instrucciones antes de la instalación y guárdelas para usos posteriores.
3 Installazione
1) Spegnere l'amplificatore al quale si devono collegare le
casse perché i cavi degli altoparlanti siano senza tensione!
PL
G
No podrá reclamarse garantía o responsabilidad alguna
por cualquier daño personal o material resultante si los
recintos se utilizan para otros fines diferentes a los originalmente concebidos, si no se instalan o conectan
correctamente o si se sobrecargan.
3) Si se utilizan los soportes de pared (b), ensámblelos de
acuerdo con la figura a continuación. Fije el tornillo de
cada soporte de modo que la articulación de rótula se
pueda mover pero que todavía pueda sostener el peso
del recinto.
Tire del cable de altavoz a través de la entrada de
cable del soporte, si es necesario. Fije los soportes en
un lugar adecuado de la pared. Después de realizar la
conexión eléctrica de los recintos, coloque los recintos
en los pivotes de los soportes. Utilice las pequeñas
partes de caucho (a) para asegurar los soportes.
Si va a poner los recintos fuera de servicio definitivamente, llévelos a la planta de reciclaje más
cercana para que su eliminación no perjudique
el medioambiente.
3 Instalación
1) ¡Primero desconecte el amplificador al que se conectarán los recintos de modo que el cable de altavoz no
contenga ningún voltaje!
4) Conecte los recintos a las salidas de altavoz del amplificador. Asegúrese de que todos los recintos tienen la
misma polaridad (terminal rojo = polo positivo, terminal
negro = polo negativo).
2) Si no se utilizan los soportes de pared (b), junte las dos
partes de caucho (a) y (c) entregadas con cada alta-
Sujeto a modificaciones técnicas.
G
Para zestawów głośnikowych
Przed rozpoczęciem użytkowania proszę dokładnie zapoznać się z niniejszą instrukcją i zachować ją do wglądu.
1 Zastosowanie
Producent i dostawca nie ponoszą odpowiedzialności
za powstałe szkody: uszkodzenia sprzętu bądź obrażenia użytkownika, jeżeli zestaw głośnikowy był używany
niezgodnie z przeznaczeniem, niepoprawnie zainstalowany, podłączony lub przeciążony.
Niniejsze miniaturowe zestawy głośnikowe przeznaczone
są do uniwersalnych zastosowań. Należy ustawić je na
solidnym podłożu lub zamontować do ściany, za pomocą
dołączonych uchwytów.
Po całkowitym zakończeniu eksploatacji, urządzenie należy oddać do punktu recyklingu, aby
nie zaśmiecać środowiska.
2 Środki bezpieczeństwa
Zestawy głośnikowe spełniają wszystkie wymagania norm
UE dzięki czemu zostały oznaczone symbolem .
G
Zestawy głośnikowe przeznaczone są tylko do zastosowań wewnętrznych. Należy chronić je przez wodą, dużą
wilgotnością oraz wysokimi temperaturami (dopuszczalny zakres 0 – 40 °C).
G
Do czyszczenia należy używać suchej i miękkiej ściereczki, nie używać wody ani środków chemicznych.
3 Montaż
1) Przed przystąpieniem do podłączania należy bezwzględnie wyłączyć wzmacniacz, aby kabel głośnikowy nie znajdował się pod napięciem!
2) Jeżeli uchwyt montażowy (b) nie będzie wykorzystywany, połączyć dwie gumowe zaślepki (a) i (c), i wsunąć je w wycięcie na tylnej stronie obudowy.
Dati tecnici
Especificaciones
Specyfikacja
Capacità di carico
Potencia nominal
Moc
Gamma max. di frequenze Rango máx. de frecuencias
Max pasmo przenoszenia
Impedenza
Impedancia
Impedancja
Pressione sonora media
SPL
SPL
Press. son. nominale max. SPL máx.
Dimensioni, peso
Dimensiones, peso
Wymiary, waga
Contatti
Conexiones
Złącza
Z zastrzeżeniem możliwości zmian.
150 – 22 000 Hz
8Ω
88 dB (1 W/1 m)
100 dB
Rozmiar głośnika
4) Połączyć zestaw głośnikowy z wyjściami wzmacniacza. W przypadku podłączania kilku zestawów głośnikowych, zwrócić uwagę, aby wszystkie miały jednakową polaryzację (czerwony terminal = dodatni biegun,
czarny terminal = ujemny biegun).
10 WRMS, 20 WMAX
Altoparlante a larga banda di 6,5 cm (2,5″)
Altavoz Full Range de 6,5 cm (2,5″)
6,5 cm (2,5″) pełnopasmowy
Configuración de altavoz
3) Jeżeli uchwyt montażowy (b) będzie wykorzystywany,
zmontować go w sposób pokazany na rysunku. Przykręcić śrubę do uchwytu w taki sposób, aby możliwa
była regulacja na przegubie kulowym.
Przeciągnąć kabel głośnikowy przez przepust w
uchwycie, jeżeli trzeba. Przykręcić uchwyt w odpowiednim miejscu na ścianie. Po podłączeniu kabla do
głośnika, umieścić go na trzpieniu uchwytu. Zabezpieczyć połączenie gumową zaślepką (a).
MKS-26 / SW • MKS-26 / WS
Max poziom SPL
Altoparlanti
®
Con riserva di modifiche tecniche.
voz, luego presione las partes dentro del hueco de la
parte posterior de cada recinto.
2 Notas Importantes
Los recintos están adecuados para utilizarlos sólo en
interiores. Protéjalos de goteos y salpicaduras, elevada
humedad del aire y calor (temperatura ambiente admisible: 0 – 40 ºC).
4) Collegare le casse con le uscite per altoparlanti dell'amplificatore. Fare attenzione che tutti gli altoparlanti
abbiano la stessa polarità (morsetto rosso = polo positivo, morsetto nero = polo negativo).
Utilice sólo un paño suave y seco para la limpieza; no
utilice nunca ni agua ni productos químicos.
Estos recintos miniatura están diseñados para todo tipo
de aplicaciones. Coloque los recintos según convenga o
utilice los soportes entregados para instalarlos en la
pared.
G
3) Se si usano i supporti (b) a parete, avvitarli come dimostrato dall'illustrazione in basso. Stringere la vite al
punto tale che lo snodo sferico si possa muovere ma
che la vite possa resistere al peso dalla cassa.
Se necessario, far passare il cavo dell'altoparlante
attraverso il passacavi del supporto. Avvitare i supporti
in punti adatti della parete. Dopo il collegamento elettrico delle casse inserirle sui perni dei supporti. Per
assicurarle usare i pezzi più piccoli (a) di gomma.
G
1 Aplicaciones
Los recintos cumplen con todas las directivas relevantes
de la UE y por lo tanto están marcados con el símbolo .
2) Se non si usano i supporti a parete (b) unire i due pezzi
di gomma (a) e (c) e inserirli negli incavi sul retro delle
casse.
90 × 90 × 115 mm, 450 g
Morsetti per altoparlanti
Terminal de altavoz
terminal głośnikowy
MONACOR INTERNATIONAL GmbH & Co. KG • Zum Falsch 36 • 28307 Bremen • Germany
A-1611.99.01.10.2014
Copyright © by MONACOR INTERNATIONAL. All rights reserved.
© Copyright 2026 Paperzz