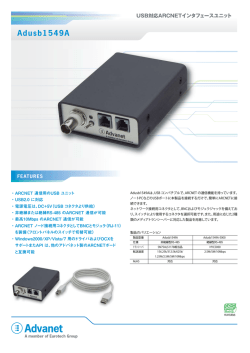
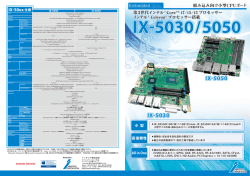
STABILIZED LIGHT SOURCE
LD安定化光源
MODEL 385H
1310/1550nm
INSTRUCTION MANUAL
取扱説明書
Graytechnos Co., Ltd.
Table of Contents
1. General.......................................................................................................................1
2. Specifications .............................................................................................................1
3. Operating Instructions................................................................................................1
3-1. Preparation........................................................................................................1
3-2. Control Panel Descriptions ..............................................................................2
3-3. Connector adapter replacement ......................................................................4
4. Maintenance ...............................................................................................................5
4-1. Cleaning ............................................................................................................5
4-2. Repair service ..................................................................................................5
5. Optional Accessories .................................................................................................5
目
次
1 . 概
要
............................................................................................................7
2 . 仕
様
............................................................................................................7
3 . 操
作
方
法
.........................................................................................8
3-1 各部の説明と操作方法 ........................................................................................8
3-2 準備 ..................................................................................................................10
3-3 取扱上の注意....................................................................................................11
4 . オ プ シ ョ ン ................................................................................................12
5 . ア フ タ ー サ ー ビ ス
............................................................................12
1. General
The 385H is a hand-held LD stabilized light source featuring 2 different built-in
LDs, 1310 and 1550nm. It is designed for use in optical loss tests of fiber optics
and other optical devices.
The output waveforms are CW (constant wave) and modulated rectangular wave
of 2kHz and 270Hz.
2. Specifications
Output wavelength
Spectral width (RMS)
Output power
Laser safety
Output number
Stability
Instant stability
:
:
:
:
:
:
:
Output mode
Optical connector
Power supply
:
:
:
Power consumption
Battery life
Operating temperature
/humidity
Outer dimensions
Weight
Accessories
:
:
:
:
:
:
1310nm ±30nm, 1550 ±30nm
5nm or less
-6dBm or greater
Laser Class 1
1
0.7dB or less (at 0 to 40degC)
0.1dB or less (at a uniform temperature in 0 to 40
degC for one hour)
CW, 2kHz, 270Hz
SC standard, others (optional)
UM-3 (AA) battery 4 pcs
AC100V with an AC adapter (optional)
Approx. 240mW
Approx. 20 hours (CW, Alkaline)
-10 to 50degC
80%RH or less (non condensing)
65(W) x 175(H) x 35(D) mm
350g (including batteries)
Connector adapter .................................... 1
UM-3 type battery .................................... 4
Carrying case ........................................... 1
Instruction manual .................................... 1
3. Operating Instructions
3-1. Preparation
Install 4 batteries in the battery compartment according to their polarities.
(See 3-2-⑦ Battery compartment below.) Manganese, Alkaline and NiCd
batteries can be used, however, this light source does not recharge NiCd
batteries.
Note: 1) Do not use the light source in high temperatures or high humidity.
2) During light emission, do not vibrate the light source.
- 1 -
3-2. Control Panel Descriptions
5
6
9
9
3
4
2
8
1
7
① Power switch
ON : The power is on and the light source starts to emit.
OFF : The power is off.
When highly stabilized output is necessary, turn the power on allow a 30
minute or more warm up period.
② Power indicator
When the power is turned on, the power indicator is lit. If the battery
voltage is down, the indicator will blink. Change the batteries with new
ones.
③ Wavelength selection switch
This switch change the wavelength from 1310nm to 1550nm and vice versa.
④ Output mode selection switch
Constant wave (CW), modulated rectangular wave of 2kHz and 270Hz are
set by this switch.
- 2 -
⑤ Output port
Remove the covering case (⑥). An SC type connector adapter (181-SC) has
been attached inside. Besides the SC type connector, other types can be
used by simply changing the connector adapter.
CAUTION : Danger!
Class 1 laser is output from here. Never look directly into
the port or a fiber. Eye damage may result.
CAUTION :
The ferrule face inside the port should be kept clean.
Dust on the ferrule face may cause abnormal reflection and
affect normal operation.
⑥ Covering case
Use this case to protect the head of the light source
when it is not in use. When using it, open the case
and slide it down to the back. It can be used as a
sloping stand to support the light source.
To take off the case, open it by half and twist it
diagonally.
⑦ Battery compartment
Install four batteries here. To open the compartment,
insert a coin or something similar in the gap beside the
lid and slide it downward. If the power indicator blinks,
change all four batteries at the same time.
⑧ Jack for AC adapter
When supplying power from AC line, plug the
AC adapter (optional) in this jack. Do not
use AC adapters other than the one
designated. Batteries can stay in the
compartment while supplying power from AC
line
Note: Never use any adapters other than
the one designated.
⑨ Strap ring
This ring is used to hook a shoulder strap (optional) used to carry the light
source.
- 3 -
3-3. Connector adapter replacement
When using a different type of connector, replace the
SC type connector adapter for the appropriate one
(optional).
Unscrew the connector adapter counterclockwise and
pull it out. Insert the new adapter into the output port.
When it stops, hold the top of the adapter and turn it
around slowly until the pin on the bottom of the
adapter lines up with the corresponding hole inside the
output port. Then push in the adapter and screw it
clockwise.
Ferrule
Dust cap
Connector adapter
The output may be unstable because of the backreflection. Please connect an
APC ferrule to the Optical Power Meter side to prevent it.
〔Reference〕
Connect two reference cables to the Light Source and measure output at that time.
P1(dBm)
Reference cable A
LD Light source
APC ferrule
Reference cable B
Optical Power Meter
P1 (dBm)
〔Measurement〕
Connect the measuring fiber between reference cables and measure output at that
time. P2(dBm)
The measuring fiber
Reference cable B
Reference cable A
Optical Power Meter
LD Light source
APC ferrule
P2 (dBm)
-P1 (dBm)
The insertion loss of the measuring fiber (dB) = P2 (dBm)-
- 4 -
4. Maintenance
4-1. Cleaning
The ferrule inside the output port is PC with a small light path of φ10μm.
If there is dust on the face, it cannot be connected to fiber optics properly.
Dust may cause damage to the ferrule, therefore, clean off the ferrule face
following the procedures below.
1)
2)
3)
4)
Remove the connector adapter.
Wipe the ferrule face with a swab moistened with ethanol.
Wipe it again with a dry swab.
Blow it with canned air.
4-2. Repair service
When making requests for repair service, please bring the product to the
distributor or send it directly to Graytechnos Head Office in Tokyo, Japan.
When sending it, always pack it in its original or equivalent packing material a
nd pack together with your name, address and telephone number.
To ensure speedy and reliable repair, always include information as to the
type of failure and cause. If required, always return accessories with the
product.
When contacting us, provide the serial number of the product.
5. Optional Accessories
Product Name
Connector adapter
(for silica fiber)
Model No.
Remarks
181-FC
NTT
FC type
181-SC
NTT
SC type
181-ST
AT&T
ST type
181-DIN
DIAMOND
DIN type
181-SMA/DIA
DIAMOND
SMA type
Shoulder strap
199-SRA
AC adapter
DP-1005
for AC100V
DP-1206
for AC120V
DP-2206
for AC220V
- 5 -
Warranty
Graytechnos Co.,Ltd. warrants this product to be free from defects in material
and/or workmanship for one full year from date of shipment. During the
warranty period, we will, at our option, repair or replace any product which prov
es to be defective.
For warranty service, send the product prepaid to the distributor or Graytechnos
Head Office in Tokyo, Japan. The repaired product will be returned prepaid
to Buyer.
Limitation of Warranty
This warranty shall not apply to defects resulting from any misuse,
misapplication, unauthorized modification, improper maintenance or operation or
storage outside of the environmental specifications.
Graytechnos makes no other warranties, expressed or implied, including without
limitation thereof, any implied warranty of merchantability or fitness for a
particular purpose.
Graytechnos shall not be responsible for any direct, indirect , special, incidental
or consequential damages.
- Specifications are subject to change without notice.
Graytechnos Co., Ltd.
Kojima-build 2F, Ueno 1-6-5, Taito-ku, Tokyo, 110-0005 Japan
Phone:+81-3-5807-6081 Fax:+81-3-5807-6082
email: [email protected]
- 6 -
この度は当社のLD安定化光源をお買い上げいただきありがとうございます。本器は、優れた
技術から創り出された信頼性の高いLD安定化光源です。はじめに、この「取扱説明書」をよくお
読みいただき、本器の操作になれてから、性能を充分に発揮されるよう、ご使用願います。
1 . 概
要
本器は、光ファイバ及び各種光デバイスの損失測定が可能なLD安定化光源です。
出力波形は、直流 (CW) 光および270Hzと2kHzの内部変調矩形波チョップ光の設定が可能
です。
また、本器は小形、軽量なハンディタイプで携帯に便利です。
2 . 仕
様
波長
1310/1550±30nm
適合ファイバ
SM
1
-6dBm以上
レーザ安全基準*2
レーザクラス1
光出力*
スペクトル幅 (RMS)
5nm以下
出力安定度
*3
0.7dB以下
瞬時安定度
*4
0.1dB以下
出力モ-ド
CW、270Hz、2kHz
コネクタ
電源
SC標準(181-SC) 他はオプション
単三型乾電池4本 又はACアダプタ(オプション)
消費電力
約240mW
電池寿命*5
約20時間
使用温湿度
-10℃~50℃、RH80%以下 (結露がないこと)
寸法・重量
65 (W) X175 (H) X35 (D)、350g(電池含む)
付属品
単三電池X4、取扱説明書X1、保証書X1、ハードケースX1
コネクタアダプタ 181-SC X1
*1. SM 10/125 弊社標準光ファイバコード接続時
*2. JIS C 6802、IEC60825-1に準拠
*3. 0℃~40℃、弊社標準光ファイバコード接続時
*4. 0℃~40℃、一定温度1時間、弊社標準光ファイバコード接続時
*5. アルカリ乾電池、光出力CW設定において連続使用時
- 7 -
3 . 操
作
方
法
3-1 各部の
各部の説明と
説明と操作方法
5
6
9
9
3
4
2
8
1
7
① 電源スイッチ
ON:
電源が入り光源が発光します。
OFF: 電源が切れます。
② 電源表示
電源スイッチONになると点灯し、OFFになると消灯します。電池が消耗して正常動作
が不可能になると点滅します。
③ 光源切換スイッチ
光源出力を「1310nm」、「1550nm」、「1310/1550nm同時」のいずれかに切り替えるス
イッチです。
④ 光出力モード切換スイッチ
光出力を直流(CW)光、270Hz矩形波変調光、2kHz矩形波変調光に切り替えるスイッ
チです。
⑤ 光源部
光源部にコネクタアダプタを取り付ける事により、各種コネクタ付き光ファイバを接続で
きます。
- 8 -
⑥ ケースカバー
光源部の保護カバーです。使用しない時は、光源部保
護のためにカバーをかぶせておきます。使用する時は、
カバーを上にあけながら背面にずらして、右図Aの状態
にします。ケースカバーを外して使用する場合は、半分
開いた状態で斜めにケースカバーをひねると容易に取
り外すことができます。
⑦ 電池収納部
電池を収納します。フタを取るときは右図のようにフタの
溝にコイン等を差込み、矢印の方向に力を加えます。
電池は収納部内の極性マークに従って収納して下さ
い。
使用中にLEDが点滅した場合は、速やかに新しい電池
と交換して下さい。電池は4本同時に交換し、古い電池と
の併用は避けて下さい。
⑧ ACアダプタ用ジャック
ACアダプタを使用する時は、図の部分にAC
アダプタのコネクタを挿入して下さい。ACアダ
プタは指定したタイプのものを使用して下さ
い。
⑨ 吊り金具
肩かけストラップを使用する時は、ここに取り付けます。
- 9 -
A
3-2 準備
(1) 電源の取り付け
電池ケースに、単三電池4本を内部の極性マークに従って装填します。
または、ACアダプタ(別売)を、電池ケース内部のACアダプタ用ジャックに接続します。
電池はマンガン乾電池、アルカリ乾電池、NiCd電池が使用できますが、本器ではNiCd
電池の充電はできません。
(2) 光出力端子の清掃
光出力端子はPC研磨端面で、光の通る径が非常に小さいため、汚れやほこりがある
と光ファイバと正しく接続することができなくなり、接続損失や反射が多くなります。
また、ほこりによる損傷を受けることもあります。
使用しない時は、常に光出力部やコネクタアダプタに保護キャップを付け、ケースカバ
ーをかぶせて汚れを防いで下さい。
さらに、使用前は次の手順で光出力端子を清掃して下さい。
1).
2).
3).
4).
コネクタアダプタを外す。
エタノールをしみこませた綿棒で、光入出力端子フェルール端面を拭く。
乾いた未使用で綺麗な綿棒で、もう一度端面を拭く。
綺麗なエアーブローで端面を吹く。
(3) コネクタアダプタの取り付け、交換
接続する光ファイバのコネクタの種類に応じ
たコネクタアダプタを選択します。
光入出力端子のフェルールにコネクタアダプ
タのスリーブをかぶせ、コネクタアダプタのピ
ンがガイド穴に入るようにスリーブを押し込み
ながら、アダプタのネジを締め付けます。
※.光ファイバの反射によりLD光源出力が不
安定になることがあります。それを防ぐに
は、光パワーメータ側を斜めPC研磨コネ
クタにすることが有効です。
フェルール
ダストキャップ
コネクタアダプタ
〔基準値〕
基準値〕
〔測定〕
測定〕
光源にリファレンスケーブル2本を接続し、その時の光
パワーを測定します。 P1(dBm)
測定する被測定ファイバをリファレンスケーブル間に入
れ、その時の光パワーを測定します。 P2(dBm)
リファレンスケーブル
A
B
LD光源
APCフェルール
フェルール
光パワーメータ
P1 (dBm)
被測定ファイバ
リファレンスケーブルB
光パワーメータ
リファレンスケーブルA
LD光源
APCフェルール
フェルール
被測定ファイバ
被測定ファイバの
ファイバの損失 (dB)=P2 (dBm)-P1 (dBm)
- 10 -
P2 (dBm)
3-3 取扱上の
取扱上の注意
① 危険:
クラス1レ
クラス レ-ザー
光出力部や電源スイッチがON時、目に見えないレーザー光が出ています。
この部分や、ここに接続した光ファイバをのぞき込んだりしないで下さい。
レーザー光およびその反射光が目に入ると、目を損傷する恐れがあります。
② 規定の電源を使用して下さい。
③ 安定な光出力を必要とする場合は、電源投入後30分以上のウォームアップを行っ
て下さい。
④ 高温多湿の場所及び振動の多い場所での使用は避けて下さい。
⑤ 光源を使用しない場合は、ケースカバーを取り付け、ゴミ、ホコリ等が付着しないよ
うにして下さい。
⑥ 使用される光ファイバの先端は清潔にし、汚れ等を落とした後ご使用下さい。
⑦ 光ファイバの損失等に使用する場合は、正確な測定のためリファレンスケーブル用
の光ファイバ等を接続して下さい。
⑧ 光ファイバ接続部での反射により機能に異常をきたす事があります。接続点はPC
(球面研磨)コネクタを使用してください。また、PCコネクタを使用出来ない場合は、マ
ッチングオイルを使う等、極力反射防止を行って下さい。
- 11 -
4 . オ プ シ ョ ン
本器には次のようなオプション製品が用意されております。
NO
品
名
1
2
3
コネクタアダプタ
(石英ファイバー用)
4
型
名
備
考
181-SC
SC型
NTT他
181-FC
FC型
NTT他
181-ST
ST型
AT&T他
181-DIN
DIN型
DIAMOND他
5
ストラップ
199-SRA
肩掛け用ストラップ
6
ACアダプタ
DP-1005
商用100V電源
5 . ア フ タ ー サ ー ビ ス
御使用中に万一故障した場合は、保証書の規定内容に従って修理いたします。その場
合は、お手数でも最寄りの弊社代理店または営業所に送付して下さい。発送する場合は
十分クッション材等で保護してからダンボール等の外箱に収納して、故障箇所および内容、
住所、氏名、電話番号を明記し、保証書といっしょに宅配便などで送付して下さい
HR1034-13J-03/1006017
グレイテクノス株式会社
〒110-0005東京都台東区上野1-6-5小島ビル2F
電話:03-5807-6081 Fax:03-5807-6082
email:[email protected]
- 12 -
―
メ
モ
―
グレイテクノス株式会社
保証書
保 証 規 定
1. 保証期間中に正常な使用状態で、万一故障等が生じました場合は無償で修理いたしま
す。
2. 本保証書は、日本国内でのみ有効です。
3. 下記事項に該当する場合は、無償修理の対象から除外いたします。
a. 不適当な取扱い使用による故障
b. 設計仕様条件等をこえた取扱い、または保管による故障
c. 当社もしくは当社が依嘱した者以外の改造または修理に起因する故障
d. その他当社の責任とみなされない故障
機種 名
シリアルNo.
保証期間
暻
日 1
様
お名前.
ご住所.
お客様
電話番号.
販売店
グレイテクノス株式会社 本社
〒110-0005 東京都台東区上野1-6-5小島ビル2F
電話(03)5807-6081 FAX(03)5807-6082
© Copyright 2026 Paperzz