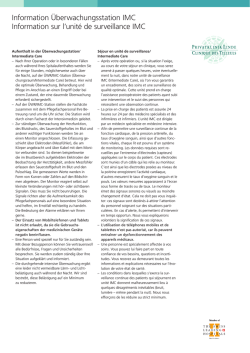
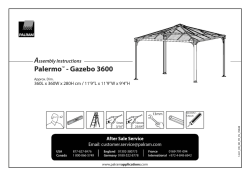
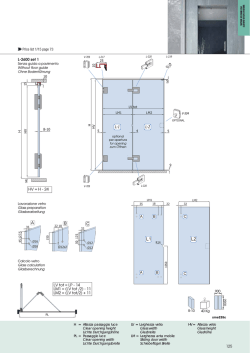
3-210-143-02 (1) 下記の注意を守らないと、高温・火災などにより 安全のために Projector Screen 死亡や大けがにつながることがあります。 ソニー製品は安全に充分に配慮して設計されています。しかし、まち がった使いかたをすると、火災や感電などにより死亡や大けがなど人身 事故につながることがあり、危険です。 事故を防ぐために次のことを必ずお守りください。 •. 安全のための注意事項を守る。 •. 破損したら使わずに、お客様相談センターに修理を依頼する。 プロジェクタースクリーン 取扱説明書........................................... (JP) Operating Instructions.......................... (GB) Mode d’emploi...................................... (FR) スクリーンケースが倒れ、けがの原因となることがあります。収納時は水 平な場所に保管してください。 暖炉・ガスレンジ・石油ストーブなど炎の出る機器の近くに設置 しない スクリーン面は薄い素材なので、炎が燃え移って火災の原因となることが あります。 警告表示の意味 Bedienungsanleitung........................... (DE) スクリーンケースを立てかけない この取扱説明書および製品では、次のような表示をしています。表示の内容を よく理解してから本文をお読みください。 Manual de instrucciones...................... (ES) 下記の注意を守らないと、 けがをしたり、周辺の物品に損害を与えることがあります。 Istruzioni per d’uso............................... (IT) ........................................... (CS) この表示の注意事項を守らないと、 火災や高温などにより死亡や大けが など人身事故につながることがあり ます。 お買い上げいただきありがとうございます。 安全のための注意事項を守らないと、火災や人身事故にな ることがあります。 この説明書には、事故を防ぐための重要な注意事項と製品の取り扱いか たを示しています。この説明書をよくお読みのうえ、製品を安全にお使 いください。お読みになったあとは、いつでも見られるところに必ず保 管してください。 行為を禁止する記号 この表示の注意事項を守らないと、 事故によりけがをしたり周辺の物品 に損害を与えたりすることがありま す。 注意を促す記号 スクリーン面の両側に触れない スクリーン面は薄い素材なので、両側のエッジに触れたまま擦ると切り傷 によるけがの原因となることがあります。 風の当たる場所に設置しない エアコン・扇風機からの風が当たる場所や窓際に設置すると、スクリーン が倒れけがの原因となることがあります。 また、投射映像がゆれて見える原因となることがあります。 不安定な場所に設置しない 不安定な台や棚の上、あるいは傾いた所に設置する と、スクリーンが倒れけがの原因となることがありま す。また、設置の際はスタンドをケースに対し直角に なるよう調整してください。 この説明書は古紙 70% 以上の再生紙と VOC( 揮発性有機化 VPS-80DS 合物 ) ゼロ植物油型インキを使用しています。 Printed.on.70%.or.more.recycled.paper.using.VOC.(Volatile. Organic.Compound)-free.vegetable.oil.based.ink. 2007 Sony Corporation Printed in Japan 高さを調整する際や収納時は、手でスクリーン ポールを持った状態でロックを解除する 手を離した状態でロックを解除すると、スクリーン ポール上部の可動部分が勢いよく下がり、けがの原因 となることがあります。またハンドルの変形など故障 の原因となることがあります。 使用上のご注意 スクリーン設置について 天井つり設置のプロジェクターの投射に対して、スクリーンの特性都合 上、明るい最適な映像を得られないことがあります。 設置の詳細は、本書の「設置位置例」を参照してください。 スクリーンにぶらさがらない スクリーン設置後、スクリーン面やスクリーンポールにぶらさがったりす ると、転倒しけがの原因となることがあります。 スクリーン面の跡について スクリーン収納の際に指を巻き込んだり挟んだりしない ジは、スクリーンケースに収納し再度取り出すと、改善される場合があ スクリーン面の収納は慎重に行ってください。指が巻き込まれけがの原因 となることがあります。 また、スクリーンポールやスタンド収納時に、指を挟まないようにしてく ださい。 スクリーン面に触れた際の凹凸や、引き出して止めた位置にできる横ス ります。 スクリーン面のお手入れについて • スクリーン面の汚れをふきとるときは、乾いた柔らかい布で軽くふき とってください。スクリーン面の汚れがひどいときは、水・薄めた中 性洗剤・アルコール類を含ませた布で軽くふきとり、乾いた布でカラ ぶきしてください。 • シンナー、ベンジン等溶剤は使用しないでください。スクリーン面を 傷めることがあります。 English Warning •Do not lean the screen case against a wall. If the screen case falls, it may cause to injury. When you store the screen case, place it on a flat surface. •Do not place the screen near a device used to produce flames such as a fireplace, a gas range, or an oil heater, etc. The screen surface is made from a thin material. It may catch a fire from a device producing flames. Caution •Do not touch both edges of the screen surface. The screen surface is made from a thin material. If you touch the edges and rub the screen surface, it may cause an injury such as cuts. •Do not place the screen near a windy place. If you place the screen near an air conditioner, fan or a window, the screen may fall. This may cause an injury. This may cause the projected image to sway as well. •Do not place the screen on an unstable surface. If you place the screen on an unstable surface such as an unsteady rack or shelf, the screen may fall. When you install the screen, adjust the stands in a vertical position against the screen case. •When you adjust the height of the screen or store the screen, be sure to unlock the screen pole by holding it with your hand. If you unlock the screen pole without holding it, the moving part on the upper part of the screen pole may drop quickly. This may cause an injury or damage to the screen, such as a handle distortion. •Do not hang from the screen. If you hang from the screen surface or the screen pole after the installation of the screen, it may fall and cause an injury. •Do not wind in or catch your finger when storing the screen. Be careful not to wind in your finger when storing the screen surface. Also, be careful not to catch your finger when storing the screen pole or stands. Precautions Installation of the screen When installing the projector on a ceiling, a clear and optimum image may not be projected, due to the features of the projector. For details on installation, refer to “Example of installation position” of this operating instruction. •Lors du réglage de la hauteur de l’écran ou lors de son rangement, tenez bien le poteau de l’écran d’une main pendant que vous le déverrouillez. Si vous déverrouillez le poteau de l’écran sans le tenir, la partie mobile en haut du poteau risque de tomber brusquement. Cela pourrait vous blesser ou endommager l’écran, par exemple en tordant la poignée. •Ne vous suspendez pas à l’écran. Si vous vous accrochez à la surface ou au poteau lorsque l’écran est installé, celui-ci risque de tomber et vous pourriez vous blesser. •N’enroulez pas et ne coincez pas vos doigts lors du stockage de l’écran. Veillez à ne pas enrouler vos doigts lors du stockage de la surface de l’écran. Veillez aussi à ne pas coincer vos doigts lorsque vous stockez le poteau ou les socles. Précautions Installation de l’écran Lors de l’installation du projecteur sur un plafond, il se peut que vous ne puissiez projeter une image claire et optimale, en raison des caractéristiques du projecteur. Pour plus de détails sur l’installation, consultez la section « Exemple d’une position d’installation » dans ce mode d’emploi. Traces apparaissant sur la surface de l’écran Les rugosités apparaissant sur la surface de l’écran à la suite d’un contact, ou les marques horizontales visibles à l’endroit où l’écran a été tiré et bloqué peuvent s’estomper ou disparaître en repliant l’écran dans son boîtier et en le dépliant à nouveau. Nettoyage de la surface de l’écran •Pour nettoyer l’écran, essuyez légèrement avec un chiffon doux sec. En cas de tache persistante, essuyez-la avec un chiffon doux légèrement imbibé d’eau, de solution détergente diluée ou d’alcool, puis essuyez ensuite avec un chiffon sec. •Ne jamais utiliser de détergents forts comme un solvant ou du benzène. Cela pourrait endommager l’écran. Limpieza de la superficie de la pantalla •Cuando limpie la pantalla, frótela suavemente con un paño suave seco. Si hay manchas graves, frote con un paño suave humedecido ligeramente con agua, una solución diluida de detergente suave o alcohol, y séquela después con un paño seco. •No utilice nunca disolventes fuertes tales como aguarrás o benceno. Puede dañar la pantalla. Italiano Avvertenze •Non appoggiare l’astuccio dello schermo contro una parete. Se l’astuccio dello schermo dovesse cadere, potrebbe causare delle lesioni. Riporre l’astuccio dello schermo su una superficie piana. •Non mettere lo schermo nelle vicinanze di dispositivi che generano fiamme come caminetti, fornelli a gas, stufe a petrolio ecc. Il materiale che costituisce la superficie dello schermo è sottile. Potrebbe incendiarsi in presenza di dispositivi che generano fiamme. Attenzione •Non toccare ambedue i lati della superficie dello schermo. La superficie dello schermo è di materiale sottile. Toccare i bordi dello schermo o strofinarne la superficie potrebbe causare lesioni come dei tagli. •Non mettere lo schermo in una posizione soggetta a correnti d’aria. Non mettere lo schermo vicino a un condizionatore d’aria, ventilatore o finestra, affinché non cada. Ciò potrebbe causare lesioni. Inoltre, l’immagine proiettata potrebbe oscillare. •Non mettere lo schermo su un piano instabile. Se lo schermo fosse piazzato su un piano instabile come una mensola o scaffale malfermo, potrebbe cadere. Nel montare lo schermo, regolare i sostegni in posizione verticale contro l’astuccio dello schermo. •Quando si regola l’altezza dello schermo oppure lo si smonta, sbloccare l’asta dello schermo sostenendola con la mano. Se si sblocca l’asta dello schermo senza sostenerla con la mano, la parte libera superiore dell’asta potrebbe cadere improvvisamente, causando lesioni o danneggiando lo schermo, ad esempio piegandone la maniglia. •Non appendersi allo schermo. Se ci si appoggia alla superficie dello schermo o all’asta dopo che lo schermo è stato montato, potrebbe cadere e causare lesioni. Deutsch Warnung •Lehnen Sie das Leinwandgehäuse nicht gegen eine Wand. Falls das Leinwandgehäuse umkippt, kann es Verletzungen verursachen. Legen Sie das Leinwandgehäuse zur Aufbewahrung auf eine ebene Fläche. •Stellen Sie die Leinwand nicht in der Nähe eines Gerätes auf, das Flammen erzeugt (z. B. Kamin, Gasherd oder Ölheizung usw.). Da das Leinwandmaterial sehr dünn ist, kann es Feuer von Flammen erzeugenden Geräten fangen. Vorsicht •Berühren Sie nicht die beiden Seitenkanten der Leinwandfläche. Das Leinwandmaterial ist sehr dünn. Falls Sie die Kanten berühren und die Leinwandfläche reiben, können Sie Verletzungen, wie z. B. Schnitte, erleiden. •Stellen Sie die Leinwand nicht an einem windigen Platz auf. Falls Sie die Leinwand in der Nähe einer Klimaanlage, eines Ventilators oder eines offenen Fensters aufstellen, kann sie umkippen. Dies kann zu Verletzungen führen. Dies kann auch zu Schwankungen des projizierten Bilds führen. •Stellen Sie die Leinwand nicht auf eine instabile Fläche. Falls Sie die Leinwand auf eine instabile Fläche (z. B. ein wackliges Gestell oder Regal) stellen, kann sie umkippen. Richten Sie die Ständer beim Aufstellen der Leinwand rechtwinklig zum Leinwandgehäuse aus. •Wenn Sie die Höhe der Leinwand einstellen oder die Leinwand verstauen, halten Sie die Leinwandstütze beim Entriegeln unbedingt mit der Hand fest. Falls Sie die Leinwandstütze entriegeln, ohne sie festzuhalten, kann der bewegliche obere Teil der Leinwandstütze plötzlich herunterfallen. Dies kann Verletzungen oder Beschädigung der Leinwand, wie z. B. Verzug des Griffs, verursachen. •Hängen Sie sich nicht an die Leinwand. Falls Sie sich nach der Installation der Leinwand an die Leinwandfläche oder die Leinwandstütze hängen, kann die Leinwand umkippen und Verletzungen verursachen. •Non inserire o pizzicare le dita nell’avvolgere lo schermo. Prestare attenzione a non inserire le dita nell’avvolgere la superficie dello schermo quando viene smontata. Prestare anche attenzione a non pizzicare le dita nello smontare l’asta o i sostegni dello schermo. Precauzioni Montaggio dello schermo Se il proiettore viene installato sul soffitto, l’immagine proiettata potrebbe non essere nitida e di buona qualità, a causa delle caratteristiche del proiettore. Per dettagli sull’installazione, fare riferimento a “Esempio di posizione di installazione” in queste istruzioni per d’uso. Tracce sulla superficie dello schermo Le ondulazioni della superficie dello schermo dovute al maneggiarlo e le strisce orizzontali nelle posizioni in cui è stato estratto e bloccato possono essere ridotte o eliminate riponendo lo schermo nell’astuccio e montandolo nuovamente. Pulizia della superficie dello schermo •Per pulire lo schermo, strofinarlo leggermente con un panno morbido e asciutto. Nel caso di macchie persistenti, strofinare con un panno morbido leggermente inumidito con acqua, soluzione leggermente detergente oppure alcool, quindi strofinare con un panno asciutto. • Non usare mai solventi forti come diluente o benzene che potrebbero danneggiare lo schermo. •Klemmen Sie sich nicht die Finger beim Einrollen der Leinwand. Achten Sie beim Einrollen der Leinwandfläche darauf, dass Sie sich nicht die Finger klemmen. Achten Sie auch darauf, dass Sie sich beim Einklappen der Leinwandstütze oder der Ständer nicht die Finger klemmen. Vorsichtsmaßnahmen Installation der Leinwand Bei Deckenmontage des Projektors wird aufgrund der Eigenschaften des Projektors eventuell kein klares und optimales Bild projiziert. Einzelheiten zur Installation finden Sie unter „Beispiel der Installationsposition“ in dieser Bedienungsanleitung. Streifen auf der Leinwandfläche Die durch Berührung entstehende Welligkeit der Leinwandfläche oder der horizontale Streifen, der an der Stelle entsteht, an der die Leinwand nach dem Herausziehen gestoppt wird, kann reduziert oder beseitigt werden, wenn die Leinwand in das Leinwandgehäuse eingerollt und wieder herausgezogen wird. Reinigen der Leinwandfläche •Wischen Sie die Leinwand zum Reinigen sachte mit einem trockenen, weichen Tuch ab. Um hartnäckige Flecken zu entfernen, wischen Sie die Leinwand mit einem weichen Tuch ab, das Sie leicht mit Wasser, verdünnter milder Reinigungslösung oder Alkohol angefeuchtet haben, und wischen Sie mit einem trockenen Tuch nach. •Verwenden Sie keinesfalls starke Lösungsmittel, wie Verdünner oder Benzin, weil die Leinwand dadurch beschädigt werden kann. Español Advertencia •No incline la caja de la pantalla contra la pared. Si la caja de la pantalla se cae puede provocar lesiones. Cuando guarde la caja de la pantalla, colóquela sobre una superficie plana. •No ponga la pantalla cerca de dispositivos que produzcan llamas tales como chimeneas, cocinas de gas, calentadores de aceite, etc. La superficie de la pantalla está hecha de un material delgado. Los dispositivos que producen llamas pueden prenderle fuego. ᶑ㓫 ㇹ⻕㚞⮳ⶹ 嫊⎮ •!孛≣⭪⮳ⶹ䬕曄⟽⠥㒢仒Ɂ ⣦㜀⮳ⶹ䬕ὶ厡濇⍓偡Ṿ径ㅴḞ帏Ẉ⬗Ɂ⪼㒢⮳ⶹ䬕㕚濇孛⭪⃚㒢 ⚌㮘埌曆Ɂ •!孛≣⭪⮳ⶹ㒢⚌䒃㿏䒌嬢⡫濃⣦⠥㿭ɀ䃈㭸㿭ㅺ㰝∄䁑◌䪭濄斨張Ɂ ⮳ⶹ曆䒕哨⮦㚴㓽↚ỀɁ⍓偡Ṿ堏䒃㿏嬢⡫䗨㿏䂔䄧Ɂ 㱌び •!孛≣奊㏜⮳ⶹ曆䗨ᶈ弝Ɂ ⮳ⶹ曆䒕哨⮦㚴㓽↚ỀɁ⣦㜀「奊㏜⮳ⶹ弝乼⏰㑊ⅶ⮳ⶹ曆濇⍓偡 Ṿ径ㅴḞ帏Ẉ⬗濃⣦ⅶẈ濄Ɂ •!孛≣⭪⮳ⶹ㒢⚌㙭栲䗨⚞ㆤɁ ⣦㜀⭪⮳ⶹ㒢⚌䧞孧ɀ栲ㆫㅺ䧻㆛斨張濇⮳ⶹ⍓偡Ṿὶ厡Ɂ弽⍓偡 Ṿ径ㅴḞ帏Ẉ⬗Ɂ 弽弼⍓偡⭠兘ㇹ⻕⻕″㖧∌Ɂ •!孛≣⭪⮳ⶹ㒢⚌ᵱ䦗⫾䗨埌曆Ɂ ⣦㜀⭪⮳ⶹ㒢⚌ᵱ䦗⫾䗨埌曆濇⣦ᵱ䦗⫾䗨㜚⪴ㅺ᷊㜚ᵮ濇⮳ⶹ⍓ 偡Ṿὶ厡Ɂ⫭堩⮳ⶹ㕚濇孛⭪ⷹ⸋孧処ᶞ䙜⭝ᷲ⮳ⶹ䬕⛦䙘䗨ằ仒Ɂ •!孧処⮳ⶹ樼⸊ㅺ⪼㒢⮳ⶹ㕚濇孛∅⼩⚌䒌ㆯ㍅ẳ⮳ⶹ㒓㝕䗨䈚⽥ᵯ 奇旈摥⫾Ɂ ⣦㜀「ᵱ䒌ㆯ㍅ẳ⮳ⶹ㒓㝕⮕奇旈摥⫾濇⮳ⶹ㒓㝕ᵮ䩓䗨䥟∌恌Ⅺ ⍓偡Ṿ䧥䂚㋭厡Ɂ弽⍓偡Ṿ径ㅴḞ帏Ẉ⬗ㅺ⮳ⶹ㋃⚳濇⣦ㆯ㜨⌼⻆Ɂ •!孛≣Ḳ⮳ⶹ【⍮Ɂ ⣦㜀「⚌⫭堩⮳ⶹ⍲Ḳ⮳ⶹ曆ㅺ⮳ⶹ㒓㝕恌Ⅺ【㉦濇⮳ⶹ⍓偡Ṿὶ 厡ⷚ径ㅴḞ帏Ẉ⬗Ɂ •!⪼㒢⮳ⶹ㕚濇孛≣⋛ㅺ乂↔ㆯ㉫Ɂ ⪼㒢⮳ⶹ曆㕚濇孛⭳⼧ᵱ壥⋛ㆯ㉫Ɂ㫈⡺濇⚌⪼㒢⮳ⶹ㒓㝕ㅺⷹ ⸋㕚濇᷃孛⭳⼧ᵱ壥乂↔ㆯ㉫Ɂ Traces left on the screen surface The roughness left on the screen surface from your contact or the horizontal stripe trace made at the position where the screen is pulled out and stopped may be reduced or recovered when you store the screen into the screen case and pull it out again. Cleaning the screen surface •On cleaning the screen, wipe gently with a dry soft cloth. For persistent stains, wipe with a soft cloth slightly moistened with water, diluted mild detergent solution, or alcohol, and wipe with a dry cloth afterward. •Never use strong solvents such as thinner or benzene. The screen may be damaged. Français Avertissement •Ne laissez pas reposer le boîtier de l’écran contre un mur. Si le boîtier de l’écran tombe, il pourrait provoquer des blessures. Lorsque vous stockez le boîtier de l’écran, placez-le sur une surface plate. •Ne placez pas l’écran près d’un appareil produisant des flammes, tel une cheminée, une cuisinière à gaz ou un appareil de chauffage, etc. La surface de l’écran est fabriquée avec un matériau fin. Placé trop près d’un appareil produisant des flammes, il pourrait prendre feu. Attention •Ne touchez pas les bords de la surface de l’écran. La surface de l’écran est fabriquée avec un matériau fin. Si vous touchez les bords ou si vous frottez la surface de l’écran, vous risquez de vous blesser, par exemple en vous coupant. •Ne placez pas l’écran près d’un endroit exposé à un courant d’air. Si vous installez l’écran près d’un appareil de climatisation, d’un ventilateur ou d’une fenêtre, l’écran risque de tomber et vous pourriez vous blesser. Ceci peut aussi provoquer l’oscillation de l’image projetée. •Ne placez pas l’écran sur une surface instable. Si vous placez l’écran sur une surface instable, telle une étagère, l’écran pourrait s’effondrer. Lors de l’installation de l’écran, ajustez les socles en position verticale contre le boîtier de l’écran. Precaución •No toque los bordes de la superficie de la pantalla. La superficie de la pantalla está hecha de un material delgado. Si toca los bordes y roza la superficie de la pantalla, puede provocarse lesiones tales como cortes. •No ponga la pantalla cerca de lugares con mucho movimiento de aire. Si pone la pantalla cerca de un acondicionador de aire, un ventilador o una ventana, la pantalla puede caerse. Esto puede provocar lesiones. Esto puede hacer que la imagen proyectada también oscile. •No ponga la pantalla sobre superficies inestables. Si pone la pantalla sobre una superficie inestable, tal como un bastidor o una estantería inestables, la pantalla puede caerse. Cuando instale la pantalla, ajuste los soportes en posición vertical contra la caja de la pantalla. •Cuando ajuste la altura de la pantalla o guarde la pantalla, no olvide desbloquear el mástil sujetándolo con la mano. Si desbloquea el mástil de la pantalla sin sujetarlo con la mano, la parte móvil de la parte superior del mástil puede caer rápidamente. Esto puede provocar lesiones, o daños en la pantalla tales como la deformación del asa. •No se cuelgue de la pantalla. Si se cuelga de la superficie o del mástil de la pantalla después de instalarla, la pantalla puede caerse y provocar lesiones. •No se enrede ni se atrape los dedos al guardar la pantalla. Tenga cuidado de no enredarse los dedos al guardar la superficie de la pantalla. Además, tenga cuidado de no atraparse los dedos cuando guarde el mástil o los soportes de la pantalla. Precauciones Instalación de la pantalla Cuando instale el proyector en el techo, es posible que no se proyecte una imagen clara y óptima, debido a las características del proyector. Para ver información detallada sobre la instalación, consulte el “Ejemplo de posición de instalación” en este manual de instrucciones. Marcas en la superficie de la pantalla Las irregularidades que quedan en la pantalla después de tocarla, y la marca en forma de banda horizontal que se forme en la posición donde se extrae y se detiene, pueden reducirse o recuperarse cuando guarde la pantalla en su caja y, más tarde, la saque de nuevo. ⫭㱌びᷯ柝 ⮳ⶹ䗨⫭堩 ⚌⢍刕㛣ᵮ⫭堩ㇹ⻕㚞㕚濇䒕ᷲㇹ⻕㚞䗨䇝⾋⌃♄濇⍓偡㕄㰹ㇹ⻕㵩㗔 ⏰䍪し䗨⻕″Ɂ 㙭⃗⫭堩䗨孊个存㕲濇孛⌦敩㚐ợ䒌存㕲᷊䗨ĥ⫭堩ằ仒䢞ữĦɁ ⮳ⶹ曆ᵮ䒽ᵯ䗨䔹彝 ⺷「⭪⮳ⶹ⪼㒢⚌⮳ⶹ䬕ᶑ⍲㪅⌺⅞㕚濇「奊㏜⮳ⶹ⍲䒽ᵯ䗨䯻䰽 ᶯ⡨ㅺ㈭⅞⮳ⶹ⍲⚌῀㫆ằ仒䒽ᵯ䗨㮘㛅丝䔹彝⍓偡Ṿ㳬⢕Ɂ 㵩㱥⮳ⶹ曆 •!㵩㱥⮳ⶹ曆㕚濇孛䒌ⷖ䅉䗨廓ⵧ廟廟㑊㉑Ɂ㵩㱥柡♞䗨㯅✆㕚濇孛 䒌䥱喜㮘ɀ䥤愮弫䗨ᶑ⾋㱻㴈↦ㅺ悶䰢䗨廓ⵧ㑊㉑⍲濇䒌ⷖⵧ㑊ℤɁ •!Ⅻ≣ợ䒌孜⣦䥤愮↦ㅺ剓ᶯ䯟䗨䀬⾋㸚↦Ɂ⣦㜀ợ䒌濇⍓偡Ṿ㋃⚳ ⮳ⶹɁ 組立図/Setup diagram/Diagramme d’installation/Diagrama de instalación/Montagezeichnung/Schema di montaggio/ 2 ハンドル Handle Poignée Griff Asa Maniglia スクリーンポール Screen Pole Poteau de l’écran Leinwandstütze Mástil de la pantalla Asta dello schermo 1 1 日本語 1. 左右のスタンドを 90°回転させて、水平な床に置く。 2. スクリーンポールを垂直に立てる。 3. ハンドルを持ってスクリーン面を引き出し、両手でハンドルを持ちな がらスクリーンポールヘッドに掛ける。 4. アジャスターのロックをはずし、スクリーンポールを伸ばしてスク リーン面の高さを調整する。 ご注意 • 高さ調整時は、スクリーンポールをしっかり握ってください。 • 高さを調整した後やスクリーン収納時は、必ずアジャスターをロッ クしてください。 • スクリーン収納後は、スクリーンポールがはずれないように、スク リーンポールクリップにしっかりと押し込んでください。 付属品 主な仕様 取扱説明書(本書) 80 インチ対応ワイドスクリーン 外形寸法 1811(W) × 1775(H) × 300(D) mm 収納寸法 1811(W) × 110(H) × 128(D) mm スクリーンサイズ 1771(W) × 997(H) mm 質量 5.1 kg ピークゲイン 2.1 ± 20% 半値角 20° 最大投影サイズ 80 インチ Español Coloque la pantalla del proyector cuando haya terminado de montarla. Para guardar la superficie de la pantalla, siga los procedimientos en orden inverso, de 4 a 1. La amplitud de la visualización al colocar la pantalla variará en función de la distancia de proyección del proyector. Para obtener información detallada, consulte las instrucciones de funcionamiento del proyector. 1Gire 90º los soportes de ambos lados de la pantalla y, a continuación, ponga la pantalla sobre un suelo nivelado. 2Extraiga el mástil de la pantalla y colóquelo en posición vertical. 3Extraiga la superficie de la pantalla sujetando el asa con ambas manos y, a continuación, cuelgue el asa en el cabezal del mástil de la pantalla. 4Desbloquee el ajustador y, a continuación, ajuste la altura extendiendo el mástil. Notas •Sujete firmemente el mástil de la pantalla mientras ajusta la altura. •No olvide bloquear el ajustador cuando termine de ajustar la altura o cuando guarde la superficie de la pantalla. •Asegúrese de que el mástil de la pantalla esté bloqueado firmemente en la pinza del mástil cuando guarde la pantalla. Accesorios suministrados Manual de instrucciones (este manual) Especificaciones Pantalla panorámica compatible con imágenes de 80 pulgadas Dimensiones máximas 1811 (Ancho) × 1775 (Alto) × 300 (Profundidad) mm (71 3/8 (Ancho) × 70 (Alto) × 11 7/8 (Profundidad) pulgadas) Dimensiones para almacenamiento 1811 (Ancho) × 110 (Alto) × 128 (Profundidad) mm (71 3/8 (Ancho) × 4 3/8 (Alto) × 5 1/8 (Profundidad) pulgadas) Tamaño de la pantalla 1771 (Ancho) × 997 (Alto) mm (69 3/4 (Ancho) × 39 3/8 (Alto) pulgadas) Peso 5,1 kg (11 lb 04 oz) Ganancia pico 2,1 ± 20% Ángulo de ganancia media 20° Tamaño máximo de proyección 80 pulgadas 4 アジャスター Adjuster Ajusteur Klemme Ajustador Dispositivo di regolazione スクリーン面 Screen Surface Surface de l’écran Leinwandfläche Superficie de la pantalla Superficie dello schermo スタンド Stands Socles Ständer Soportes Sostegni スクリーンポールクリップ Screen Pole Clip Clip du poteau de l’écran Leinwandstützenklammer Pinza del mástil de la pantalla Gancio per l’asta dello schermo Français Set the projector screen after you have finished assembling it. To store the screen surface, carry out the procedures in the order from 4 to 1. The visual range while setting the screen will differ depending on the projecting distance of the projector. For details, see the operating instruction of your projector. 1Turn the stands on both sides of the screen 90 degrees, and then put the screen on a level floor. 2Pull out the screen pole and make it stand vertical. 3Pull out the screen surface by holding the handle with both hands, and then hang the handle on the screen pole head. 4Unlock the adjuster, then adjust the height by extending the screen pole. Deutsch Réglez l’écran du projecteur après l’avoir assemblé. Pour enrouler la surface de l’écran, suivez la procédure en remontant du point 4 au point 1. La portée visuelle lors du réglage de l’écran dépend de la distance de projection du projecteur. Pour plus de détails à ce sujet, consultez le mode d’emploi de votre projecteur. 1Faites pivoter les socles de chaque côté de l’écran de 90 degrés, puis posez l’écran sur une surface plane. 2Sortez le poteau de l’écran et mettez-le en position verticale. 3Déroulez la surface de l’écran en tenant la poignée des deux mains, puis accrochez la poignée à la tête du poteau de l’écran. 4Déverrouillez l’ajusteur, puis réglez la hauteur en étirant le poteau de l’écran. Notes Stellen Sie die Projektorleinwand auf, nachdem Sie sie fertig montiert haben. Zum Verstauen der Leinwandfläche führen Sie die Schritte in der Reihenfolge von 4 bis 1 aus. Die Bildgröße bei der Aufstellung der Leinwand hängt von der Projektionsentfernung des Projektors ab. Einzelheiten dazu finden Sie in der Bedienungsanleitung Ihres Projektors. 1Drehen Sie die Ständer auf beiden Seiten der Leinwand auf einen Winkel von 90°, und stellen Sie dann die Leinwand auf einen ebenen Boden. 2Ziehen Sie die Leinwandstütze in Senkrechtstellung heraus. 3Ziehen Sie die Leinwandfläche mit beiden Händen am Griff heraus, und hängen Sie dann den Griff an den Leinwandstützenkopf. 4Entriegeln Sie die Klemme, und stellen Sie dann die Höhe durch Ausziehen der Leinwandstütze ein. Remarques •Hold the screen pole securely when adjusting the height. •Be sure to lock the adjuster after you finish adjusting the height or store the screen surface. •Be sure the screen pole is locked securely into the screen pole clip when you store the screen. Supplied accessories Specifications 3 スクリーンポールヘッド Screen Pole Head Tête du poteau de l’écran Leinwandstützenkopf Cabezal del mástil de la pantalla Testa dell’asta dello schermo English プロジェクタースクリーンの組み立てを行ってから設置してください。 収納時は、4 から 1 の順番で手順を行ってください。 設置のときの視距離は、プロジェクターの投射距離によって異なります。 詳しくはお使いのプロジェクターの取扱説明書をご覧ください。 スクリーンポール /Screen Pole/Poteau de l’écran/Leinwandstütze/Mástil de la pantalla/Asta dello schermo/ Operating Instruction (this manual) 80 inch image compatible wide screen Maximum dimensions 1811 (W) × 1775 (H) × 300 (D) mm (71 3/8 (W)× 70 (H)× 11 7/8 (D) inches) Storage dimensions 1811 (W) × 110 (H) × 128 (D) mm (71 3/8 (W)× 4 3/8 (H)× 5 1/8 (D) inches) Screen Size 1771 (W) × 997 (H) mm (69 3/4 (W)× 39 3/8 (H) inches) Mass 5.1 kg (11 lb 04 oz) Peak Gain 2.1 ± 20% Half Gain Angles 20° Maximum Projecting Size 80 inches •Tenez le poteau de l’écran fermement lorsque vous réglez la hauteur. •Assurez-vous de bien verrouiller l’ajusteur une fois la hauteur ajustée ou lors du stockage de la surface de l’écran. •Assurez-vous du verrouillage sécurisé du poteau de l’écran dans son clip lorsque vous stockez l’écran. Accessoires fournis Fiche technique Note •Nel regolare l’altezza, afferrare saldamente l’asta dello schermo. •Dopo aver regolato l’altezza o smontato la superficie dello schermo, bloccare il dispositivo di regolazione. •Nello smontare lo schermo, prestare attenzione a bloccare saldamente l’asta dello schermo inserendola nell’apposito gancio. Accessori in dotazione Istruzioni per d’uso (questo manuale) Caratteristiche tecniche Schermo grande adatto a immagine da 80 pollici Dimensioni massime 1811 (L) × 1775 (A) × 300 (P) mm Dimensioni smontato 1811 (L) × 110 (A) × 128 (P) mm Dimensioni dello schermo 1771 (L) × 997 (A) mm Peso 5,1 kg Guadagno massimo 2,1 ± 20% Angolo di metà guadagno 20° Massima dimensione di proiezione 80 pollici 設置位置例 /Example of installation position/Exemple d’une position d’installation/Beispiel der Installationsposition/Ejemplo de posición de instalación/Esempio di posizione di installazione/ 安装位置示例 •Halten Sie die Leinwandstütze beim Einstellen der Höhe sicher fest. •Verriegeln Sie die Klemme, nachdem Sie die Höhe eingestellt oder die Leinwandfläche verstaut haben. •Vergewissern Sie sich beim Verstauen der Leinwand, dass die Leinwandstütze einwandfrei in die Leinwandstützenklammer eingerastet ist. Mode d’emploi (ce manuel) Écran large compatible avec une image de 80 pouces Dimensions max. 1811 (L) × 1775 (H) × 300 (P) mm (71 3/8 (L) × 70 (H) × 11 7/8 (P) pouces) Dimensions lors du stockage 1811 (L) × 110 (H) × 128 (P) mm (71 3/8 (L) × 4 3/8 (H) × 5 1/8 (P) pouces) Taille de l’écran 1771 (L) × 997 (H) mm (69 3/4 (L) × 39 3/8 (H) pouces) Poids 5,1 kg (11 lb 04 oz) Gain max. 2,1 ± 20% Angle du gain moyen 20° Taille maximale de projection 80 pouces Mitgeliefertes ZubehörBedienungsanleitung (vorliegendes Handbuch) 80-Zoll-Bild-kompatible Breitleinwand Technische Daten Maximale Abmessungen 1811 (B) × 1775 (H) × 300 (T) mm Lagerabmessungen 1811 (B) × 110 (H) × 128 (T) mm Leinwandfläche 1771 (B) × 997 (H) mm Gewicht 5,1 kg Peak-Gain 2,1 ± 20% Half-Gain Winkel 20° Maximale Projektionsgröße 80 Zoll ᶮ㔈 Italiano Mettere in posizione lo schermo dopo averlo montato completamente. Per smontare la superficie dello schermo, seguire la procedura nell’ordine dal passo 4 al passo 1. La visibilità dello schermo sarà diversa in funzione della distanza di proiezione del proiettore. Per i dettagli, vedere le istruzioni d’uso del proiettore utilizzato. 1Girare di 90° i sostegni sui due lati dello schermo, quindi mettere lo schermo su un pavimento in piano. 2Estrarre l’asta dello schermo e metterla in posizione verticale. 3Estrarre la superficie dello schermo afferrando la maniglia con ambedue le mani, quindi appendere la maniglia alla testa dell’asta dello schermo. 4Sbloccare il dispositivo di regolazione, quindi regolare l’altezza allungando l’asta dello schermo. Hinweise 學⚩久塆⬍㈖⻲㚻⯐ⷖ⎏嬿⬛㈖⻲㚻⯐ⷖɝ⫙㒿⯐ⷖ曣㕷澔㊊䃨㫦樥 5 兴 2 䘅査⸐㑎ờɝ 嬿⬛⯐ⷖ㕷䘅⍰奇劄♵ẛ㞺㋯㈖⻲㚻䘅㈖⻲嵞䤼侍㚊㇁ᶎ⎍ɝ 㚊孧乇℆⬺澔學⍃奂㈖⻲㚻䘅ἀ䒩孵㖏㙹ɝ 1!⮇⯐ⷖᶥἨ䘅⸖⸨㕌廭 :1澔䂷⎏⮇⯐ⷖ㒿⚩㮵ⷴ䘅⚱㜀ᶋɝ 2!㉊ⅻ⯐ⷖ㒰㝲ⷷἀ✃䙵䩗䩌ɝ 3!䒩ᶥ㇌㍢Ố㇌㝅⮇⯐ⷖ曣㉊ⅻ澔䂷⎏⮇㇌㝅㊃⚩⯐ⷖ㒰㝲⢵ᶋɝ 4!奤日宄刃◩撂⬛澔䂷⎏徛彈ẹ⯐ⷖ㒰㝲㛦宄刃橙⸧ɝ 㱩 •!宄刃橙⸧㕷澔學䇣♻㍢Ố⯐ⷖ㒰㝲ɝ •!⬍㆑橙⸧宄刃㆗⯐ⷖ曣⫙㒿⎏澔學∢⽆撂⬛宄刃◩ɝ •!⫙㒿⯐ⷖ㕷學∢⽆嬪⯐ⷖ㒰㝲䇣♻⚱撂⬛⚩⯐ⷖ㒰㝲⢺℆ɝ 昐㚻旅ṷ! 奅㞽! !! !! !! !! !! !! !! !! !! !! ἀ䒩孵㖏㙹澐㚭㇌ℍ澑 91!割⭹⬺⬾⯐ⷖ 㚁⢨⮻⭹ 2922!) ⬾ *!2886!) 橙 *411!) 㵲 *nn ⫙㒿⮻⭹ 2922!) ⬾ *!221!) 橙 *239!) 㵲 *nn ⯐ⷖ⮻⭹ 2882!) ⬾ *!!::8!) 橙 *nn 岩慐ɛ6/2!lh ⱱ᾽⠟䙋ɛ3/2! !31& ⋋⠟䙋奓⸧ɛ31 㚁⢨㈖⻲⮻⭹ɛ91 割⭹ 単位:mm(インチ)/Unit: mm (inches)/Unité : mm (pouces)/Einheit: mm (Zoll)/Unidad: mm (pulgadas)/Unità: mm (pollici)/ a b c d e f アイレベル プロジェクター設置高さ 最短投射距離 最適視距離 スクリーンセンター * スクリーン全高 eye level height of projector niveau des yeux hauteur du projecteur minimum projection distance optimum viewing distance height of the center of screen* distance optimale de height of the whole screen Augenhöhe Höhe des Projektors hauteur totale de l’écran altura del proyector distance minimale de projection vision nivel de los ojos altezza degli occhi altezza del proiettore minimale Projektionsentfernung distancia mínima de proyección optimale Betrachtungsentfernung 500 (19 3/4) 2400 (94 1/2) Höhe der Leinwandmitte* altura de la pantalla completa ottimale altezza totale dello schermo altezza del centro dello schermo* * 3500 — 4000 (137 7/8 — 157 1/2) 650 (25 5/8) * a と b の高さの中心に e がくるように設置ください。最適な映像をお楽しみいただけます。 * Set the screen so that height of e is at the midpoint of height of a and b. The best picture quality can be enjoyed. * Réglez l’écran pour que la hauteur e soit au milieu des hauteurs a et b afin de bénéficier d’une qualité optimale de l’image. * Stellen Sie die Leinwand so ein, dass die Höhe von e am Mittelpunkt der Höhe von a und b liegt. So kommen Sie in den Genuss der besten Bildqualität. * Coloque la pantalla de modo que la altura de e se encuentre en el punto medio de altura entre a y b. Así disfrutará de la mejor calidad de imagen. * Posizionare lo schermo in modo che l’altezza di “e” sia a metà fra “a” e “b”. Così si otterrà la migliore qualità dell’immagine. * Höhe der gesamten Leinwand distancia óptima de visión altura del centro de la distanza di visualizzazione pantalla* minima distanza di proiezione 850 — 950 (33 1/2 — 37 1/2) hauteur du centre de l’écran* 1382 (54 1/2)
© Copyright 2026 Paperzz