Linux Deployment Guide
How to Use the Subscription
Management Tool for
SUSE Linux Enterprise 11
В®
Manage Updates and Compliance
www.novell.com
Contents
Contents...........................................................................................................................................................................2
Overview of the Subscription Management Tool for SUSE Linux Enterprise 11 .............................................................4
Installation and Basic Configuration.................................................................................................................................6
Managing the Subscription Management Tool...............................................................................................................10
Configuring Clients to Use the Subscription Management Tool.....................................................................................13
Jobs and Client Status Monitoring..................................................................................................................................15
Staging............................................................................................................................................................................19
Compliance Monitoring with Subscription Management Tool Reports...........................................................................21
Supportconfig Proxy.......................................................................................................................................................22
Mirroring Updates for Red Hat Enterprise Linux.............................................................................................................23
Mirroring SUSE Linux Enterprise 9 Updates..................................................................................................................23
Custom Repositories......................................................................................................................................................24
Disconnected Subscription Management Tool Servers..................................................................................................27
Registration Data Synchronization with Novell Customer Center...................................................................................29
Publish Update Repositories on the Internet for Mobile Workstations...........................................................................30
Preloading Repositories..................................................................................................................................................31
Server Tuning.................................................................................................................................................................32
Backup of Subscription Management Tool Servers........................................................................................................32
Conclusion......................................................................................................................................................................32
References.....................................................................................................................................................................33
2
What Can the Subscription Management Tool for
SUSE Linux Enterprise Do For You?
The Subscription Management Tool for SUSEВ® Linux Enterprise allows enterprise customers to optimize the
management of SUSE Linux Enterprise software updates and subscription entitlements. It establishes a proxy system
for Novell Customer Center with repository and registration targets. This helps you centrally manage software
В®
updates within the firewall on a per-system basis, while maintaining your corporate security policies and regulatory
compliance
The tool allows you to provision updates for all of your devices running a product based on SUSE Linux Enterprise. By
downloading these updates only once and distributing them throughout the enterprise, you can set more restrictive
firewall policies and, where applicable, avoid significant network usage stemming from repeated downloads of the
same updates by each device. The tool is fully supported and available as a download to customers with an active
SUSE Linux Enterprise product subscription.
The Subscription Management Tool for SUSE Linux Enterprise 11 is a good choice for you if you:
•
would like to have one tool that updates both SUSE Linux Enterprise and Novell Open Enterprise Server, as
well as your Red Hat Enterprise Linux servers
•
want to be on top of your company's license compliance
•
don't want to connect all your machines to Novell Customer Center to register and retrieve updates for
bandwidth and/or security reasons
•
have SUSE Linux Enterprise hosts that are restricted and difficult to update without having to invent your own
update management solutions
•
want to integrate additional software update repositories (either external or internal) into your update solution
•
would like an out-of-the box staging solution for testing updates before releasing them to the masses
•
want to be able to get a quick overview of the patch status of your SUSE Linux Enterprise 11 servers and
desktops
This document targets medium experienced SUSE Linux Enterprise administrators and describes how to use the
Subscription Management Tool for SUSE Linux Enterprise 11 from Novell. We strongly advise reading each chapter
at least once before performing the actions described within. The author will not accept any responsibility for any
incorrect information within this document, nor for any damage that information might cause when applied. Do not
forget, most how-to documents are the result of volunteers who devote time and resources to their creation.
3
Overview of the Subscription Management Tool for SUSE Linux Enterprise
11
With the release of the SUSE Linux Enterprise 10 platform back in 2006, Novell introduced a new mechanism for
keeping systems up to date. By registering each individual host with Novell Customer Center during or after
installation, the machines regularly query the nu.novell.com update services and catalogs to see if new updates have
been released.
Not only does this process potentially consume considerable Internet bandwidth, it can also make it difficult to enforce
security policies at the firewall level. Another challenge is that in an increasing number of customer installations, there
are SUSE Linux Enterprise hosts, which are restricted from Internet access.
In addition, new patches are often required to undergo testing within a limited group of machines before they are
made available to the general public.
The Subscription Management Tool addresses all of the above issues. Furthermore, the reporting feature provides
means for license tracking across large deployments as well as effective measurement of subscription utilization. This
makes it easier to determine how many entitlements need to be renewed at the end of a billing cycle.
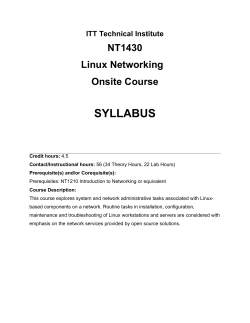
Figure 1: Subscription Management Tool Overview
The Subscription Management Tool supports products based on SUSE Linux Enterprise 10 SP2 (and later). For a sixmonth period after these products are released, the tool also supports their previous support pack version. In addition
to this, the Subscription Management Tool supports products based on SUSE Linux Enterprise 9.
At the time of writing, the Subscription Management Tool is able to mirror updates for the following products:
SUSE Linux Enterprise 11:
•
SUSE Linux Enterprise Server 11
•
SUSE Linux Enterprise Desktop 11
•
SUSE Linux Enterprise 11 Software Development Kit
4
SUSE Linux Enterprise 10:
•
SUSE Linux Enterprise Server 10 SP2 and SP3
•
SUSE Linux Enterprise Desktop 10 SP2 and SP3
•
SUSE Linux Enterprise 10 SP2 Software Development Kit
•
Novell Open Enterprise Server 2 Support Pack 1
SUSE Linux Enterprise 9:
•
SUSE Linux Enterprise Server 9
•
Novell Linux Desktop 9
•
SUSE Linux Enterprise 9 Software Development Kit
•
Novell Linux Point of Service
Furthermore, you can configure mirroring of:
•
Installation sources for SUSE Linux Enterprise 10 and 11 products
•
Custom external repositories like third-party hardware driver updates
•
Self-created update repositories
Depending on the workload, a single server scales up to handling 1,000+ clients, although it may require some minor
tuning efforts (discussed in a later section).
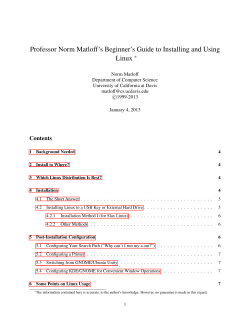
The product is mostly written in Perl and plain shell scripts, creates a MySQL database and publishes its repositories
via Apache. It communicates with Novell Customer Center in https, while the clients are served via https (registration
process) and http (update retrieval).
Figure 2: Components of the Subscription Management Tool for SUSE Linux Enterprise 11
5
Installation and Basic Configuration
The Subscription Management Tool must be installed on SUSE Linux Enterprise Server 11 (an active SUSE Linux
Enterprise maintenance subscription is required). It is available for the i586, x86_64 and s390x architectures. In
addition to the normal system requirements for SUSE Linux Enterprise Server 11, the server must have a valid DNS
host name, such as smt.mycompany.com. This name must be resolvable to the clients for the certificates involved to
work. Finally, as a rough estimate, it is recommended that you have 10 GB of available storage space per product to
be mirrored (more if the sources are also to be mirrored).
The Subscription Management Tool is provided as an add-on product to SUSE Linux Enterprise Server 11. While it
can also be installed during the initial SUSE Linux Enterprise Server installation phase (see section 1.1 in the
Subscription Management Tool guide) this article discusses installing it on top of an already installed system. The
installation ISO image can be downloaded from http://download.novell.com/
Before starting the installation, you should have the mirroring credentials available. How to find them is described in
section 3.1 of the Subscription Management Tool guide, available at http://www.novell.com/documentation/smt11/.
The installation is described in section 1.2 and 1.3 of the Subscription Management Tool guide and flows as follows:
•
Start it by invoking the Add-on module in the Software group in the YaST Control Center (yast2 add-on).
•
Select the Subscription Management Tool medium you have downloaded as the installation source and start
the installation.
•
Accept the license agreement in the dialog and click Next.
•
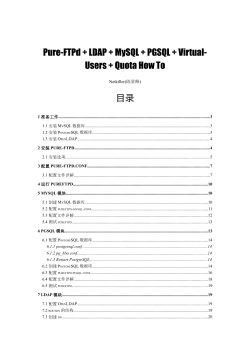
The software management dialog appears. At first glance it looks like nothing is being installed. But if you
scroll down in the Patterns window, the Subscription Management Tool and the five packages that constitute
the Subscription Management Tool will be marked for installation.
Figure 3: YaST Software Management Dialog
•
When you select Accept, YaST may install additional required packages to meet the prerequisites of the
Subscription Management Tool.
•
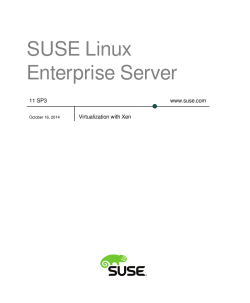
When the package installation is completed, the Subscription Management Tool configuration wizard (section
1.3 of the Subscription Management Tool guide) is launched.
6
Figure 4: Subscription Management Tool Configuration Wizard-1/2
•
In the first step, fill in the NU user and NU password with your mirror credentials.
•
Click the Test button to verify that the credentials entered are valid. It should result in a success message.
•
Enter the e-mail address that is registered in the Novell Customer Center and linked to the mirror credentials.
•
Verify that your SMT server URL points to the server (http://server-fq-dns-name)
•
Click Next.
Figure 5: Subscription Management Tool Configuration Wizard-2/2
7
•
The second step of the wizard prompts you to enter the desired password of the smt user that gets created in
the MySQL database configuration
•
Here you can also add e-mail addresses that the Subscription Management Tool reports should be sent to.
•
Select Next.
•
If the system has not yet been registered in Novell Customer Center, the following dialog appears.
Figure 6: Novell Customer Center Credentials Dialog
•
The reason for this new dialog is that the installation of SUSE Linux Enterprise 11 does not automatically
generate the machine-specific GUID and password that the previous versions did. This information is now
stored in /etc/zypp/credentials.d/NCCcredentials, which corresponds to /etc/zmd/deviceid and
/etc/zmd/secret on SUSE Linux Enterprise 10, created by the ZENworksВ® Management Daemon. In SUSE
Linux Enterprise 11 the ZENworks Management Daemon has been replaced by zypper, which has no need
for these credentials.
•
For normal Subscription Management Tool servers with access to the Internet, select the default option to
register in Novell Customer Center.
•
The option to generate Novell Customer Center credentials is useful when configuring isolated Subscription
Management Tool servers that are not able to contact Novell Customer Center.
•
The use case for the option to skip registration is currently unknown to the author.
•
Click Next.
8
Figure 7: Writing Subscription Management Tool Configuration
After the Novell Customer Center registration (if applicable) the initial configuration reaches its final stage.
•
You will be prompted to enter the MySQL root user password to set up the Subscription Management Tool
database.
•
If the file /srv/www/htdocs/robots.txt is detected a warning appears. This file (usually installed with apache2example-pages) prevents the clients from accessing the repository key files of the Subscription Management
Tool. Handling this is described in section 8.3.1 of the Subscription Management Tool guide.
•
Now the configuration is written and an initial synchronization of products and entitlements from Novell
Customer Center is performed in the background.
This may take a few minutes.
The last step is to perform an update of the Subscription Management Tool packages. A few of the features described
in this document require these versions (or newer) to work correctly:
•
yast2-smt-2.17.22
•
smt-client-0.0.13
To install the updates follow these steps:
1.
Open a terminal window.
2.
As the root user, verify that you have an enabled Subscription Management Tool repository:
# zypper lr
A line like this should appear in the output (the initial repository number varies):
7 | nu_novell_com:SLE11-SMT-Updates /--/ | SLE11-SMT-Updates | Yes | Yes
3.
It is recommended to install all available updates with the command:
# zypper up -y
If you only want to install the updates from the SLE11-SMT-Updates repository, use this command instead:
# zypper up -y -r nu_novell_com:SLE11-SMT-Updates
9
4.
Reload the Subscription Management Tool service with the command:
# rcsmt restart
Now your Subscription Management Tool server is configured and ready to use.
Managing the Subscription Management Tool
A new benefit of the Subscription Management Tool for SUSE Linux Enterprise 11 is that a lot of the day-to-day
management can be done via the Subscription Management Tool Server Management YaST module (yast2 smt). The
Subscription Management Tool Server Configuration module (yast2 smt-server) is used for global configuration of
things like Subscription Management Tool report recipients and cron job scheduling.
The Subscription Management Tool Server Management module contains three tabs —Repositories, Staging and
Client Status—as shown below:
Figure 8: Subscription Management Tool Server Management, Repositories Tab
On the Repositories tab you can toggle the mirroring and staging status of the individual repositories, which are
available for mirroring to the server. It is also possible to mirror just one selected repository by clicking Mirror Now.
This new feature is particularly useful if many repositories are already enabled for mirroring and you have just enabled
a new one and only want to mirror that one. The remaining two tabs will be discussed in later sections.
In addition to the YaST modules, the main command line interface is /usr/sbin/smt, which takes subcommands and
parameters for these. /usr/sbin/smt calls smt-subcommand executables in /usr/sbin/ which in turn then call tools in
/usr/lib/perl5/vendor_perl/5.10.0/SMT/.
If the smt command is used alone, it prints out a list of all available subcommands. There are man pages for all smt-*
commands and invoking
•
# smt help subcommand
or
10
•
# smt -h subcommand
•
# smt-subcommand -h
or
also shows the syntax and options for the specific command.
For daily work, one may find it handy to use smt-subcommand instead of smt subcommand since it enables tab
completion. The smt subcommands are:
repos
List available repositories, enable/disable them for mirroring and staging
client
Shows information about registered clients
delete-registrations
Delete one or more registrations
job
Manage client jobs
list-products
List all products in Subscription Management Tool database
list-registrations
List all hosts registered with this Subscription Management Tool server
mirror
Perform the actual mirroring of products based on SUSE Linux Enterprise 10 and
11
mirror-sle9
Mirroring of products based on SUSE Linux Enterprise 9
ncc-sync
Download products, targets, repositories, subscriptions and registration
information from Novell Customer Center to the Subscription Management Tool
database
register
Register all currently unregistered and updated clients with Novell Customer
Center
report
Generate extensive reports of the smt data
setup-custom-repos
Enable and disable non-NU catalogs to be mirrored
staging
Manage patch filters and testing/production repositories
support
Support config archive management
In addition to these "catalogs", a symlink to "repos" and "setup-custom-catalogs" is linked to "setup-custom-repos" as
a convenience for administrators, who are used to the Subscription Management Tool for SUSE Linux Enterprise 10
commands.
Examples:
•
List all repos for the sles-10-x86_64 target that you are entitled to mirror
# smt-repos -m '' sles-10-x86_64 (single quotes)
•
Enable mirroring of a repository
# smt-repos -e SLES10-SP2-Updates sles-10-x86_64
•
Show the repos that are marked for mirroring
# smt-repos -o
11
•
Perform a mirror of the enabled SUSE Linux Enterprise 10 repos with verbose output and logging
# smt-mirror -d -L /var/log/smt/smt-mirror.log
•
Perform mirroring of the SUSE Linux Enterprise 9 products with verbose output and logging
# smt-mirror-sle9 -d -L /var/log/smt/smt-mirror-sle9.log
•
Create a report of the Subscription Management Tool and Novell Customer Center data based on
information in the local database.
# smt-report --local
•
List the products in the database and their IDs
# smt-list-products
•
Configure a non-Novell Update repository for mirroring
# smt-setup-custom-repos --productid 824 --name 'corp_updates' \
--exturl 'http://apps.mycompany.com/corp_updates/' \
--description 'Updates for my applications'
For information on which repositories to enable for mirroring see TID 7001199 - Which software catalogs to mirror with
Subscription Management Tool
Important Files and Directories
The main configuration file is /etc/smt.conf. Since it is well documented in section 7.2.1 of the Subscription
Management Tool guide we will not discuss it here except for a few parameters.
If source RPM packages are not relevant to your organization, then considerable time and disk space can be saved
by disabling mirroring of these. This is done by changing the parameter MirrorSRC = true to MirrorSRC = false in the
[LOCAL] section of /etc/smt.conf.
(# sed -i 's/MirrorSRC \= true/MirrorSRC \= false/g' /etc/smt.conf)
In case the Subscription Management Tool should use different HTTP and HTTPS proxy servers than the global
settings propose, this can also be configured with parameters in the [LOCAL] section.
Besides /etc/smt.conf, other files and directories worth knowing about are:
File/Directory
Description
/etc/smt.d/novell.com-smt
Cron file - symlinked into /etc/cron.d/
/etc/smt.d/smt-cron.conf
Parameters for cron jobs (7.2.2 in manual)
/srv/www/htdocs/smt.crt
Server certificate copied from
/etc/ssl/certs/YaST-CA.pem
/srv/www/htdocs/repo/$RCE/
Production (Novell) repositories
/srv/www/htdocs/repo/full/
Download directory for staged repositories
/srv/www/htdocs/repo/keys/
Directory for repo signing keys
/srv/www/htdocs/repo/RPMMD/
Custom repositories
/srv/www/htdocs/repo/testing/
Testing repositories
/srv/www/htdocs/repo/tools/clientSetup4SMT.sh
Script to import SMT server certificate and adapt
12
/etc/suseRegister.conf
/usr/sbin/smt*
Command line utilities to manage SMT
/usr/share/doc/manual/sle-smt_en/
Online documentation
/usr/share/doc/packages/smt/
Very useful other documentation
/var/spool/smt-support/
Incoming supportconfig archives
/var/log/smt/
Log files from the scheduled smt commands
The /var/log/smt/smt-* files get logrotated
In some scenarios it is not feasible to place the Subscription Management Tool certificate and repository directories
inside the Apache 2 DocumentRoot structure. It can for instance be security policies that prohibit even creating
symbolic links to the Subscription Management Tool data within the DocumentRoot. Check out the article How to
clean SMT completely out of apache DocumentRoot for instructions on how to configure that.
Configuring Clients to Use the Subscription Management Tool
The Subscription Management Tool is primarily designed for products based on SUSE Linux Enterprise 10 Service
Pack 2 and later versions. All machines running SUSE Linux Enterprise10 SP2 or later can be configured to register
with and download updates from the Subscription Management Tool instead of having to communicate with the
external Novell Customer Center and nu.novell.com servers.
Since the registration process against the Subscription Management Tool server uses https, the certificate of the
server needs to be installed in the client certificate store as part of the configuration.
There are four different ways to configure these clients to use the Subscription Management Tool, all described in
section 7 of the Subscription Management Tool guide.
1.
Novell Customer Center wizard (yast inst_suse_register) (SUSE Linux Enterprise 11 and later versions).
Can be done during normal installation (interactive) or at any time later.
Select the Advanced option in the Customer Center dialog to get the Local registration server dialog:
Figure 8a: Local Registration Server Dialog in Novell Customer Center Wizard
Here you can enter the full URL of the Subscription Management Tool server (e.g.
https://mysmt.blip.com/center/regsvc) and if the server certificate is in a non-default location, it can also be
13
specified. After this, you will be prompted to trust the certificate of the Subscription Management Tool server
and additional keys stored on it (if any).
2.
Kernel parameters (SUSE Linux Enterprise10 SP2 and newer)
Provide the regurl and optionally regcert kernel parameters during machine boot at installation time.
regurl is the URL of the Subscription Management Tool server and must be specified in the following format:
https://FQDN/center/regsvc/ with FQDN being the fully qualified hostname of the Subscription Management
Tool server which again must match the FQDN of the Subscription Management Tool server certificate.
Example: regurl=https://smt2.nts.com/center/regsvc/
regcert can be used to specify the location of the Subscription Management Tool server's CA certificate in
case you are not using the default location of http://smt-server-FQDN/smt.crt.
If clients are installed from DVDs, they could be remastered to include these parameters. Add these
parameters to the existing list in the "append" line for the install section in /boot/<arch>/loader/isolinux.cfg.
For inspiration look at TID 7001823 - Creating an auto-installing SLE 10 DVD.
3.
AutoYaST profile (SUSE Linux Enterprise10 SP2 and newer)
This method is much less error-prone and the preferred way for new clients to be installed.
It is possible to use the Autoinstallation GUI front end in YaST to create a section in an AutoYaST profile to
handle this. In SUSE Linux Enterprise 10 it is called "customer_center", but has been renamed to
"suse_register" in SUSE Linux Enterprise 11.
Create an xml block like the following to include in the profiles used to install SP2 based clients:
<!-- replace $section-name depending on SLE version -->
<!-- SLE 10 : customer_center
-->
<!-- SLE 11 : suse_register
-->
<$section-name>
<do_registration config:type="boolean">true</do_registration>
<reg_server>https://smt2.nts.com/center/regsvc</reg_server>
<reg_server_cert></reg_server_cert>
<register_regularly config:type="boolean">false</register_regularly>
<registration_data/>
<submit_hwdata config:type="boolean">false</submit_hwdata>
<submit_optional config:type="boolean">false</submit_optional>
</$section-name>
Adapt the reg_server and reg_server_cert as the corresponding kernel parameters described above.
4.
The clientSetup4SMT.sh script (SUSE Linux Enterprise 10 SP1 and newer)
The /srv/www/htdocs/repo/tools/clientSetup4SMT.sh script can be used to configure a client machine to use
a Subscription Management Tool server instead of Novell Customer Center or to reconfigure it to use a
different Subscription Management Tool server.
clientSetup4SMT.sh should be executed as root and takes the Subscription Management Tool server host
name or the full registration URL as parameter like this:
# ./clientSetup4SMT.sh --host smt_server_FQDN
or
# ./clientSetup4SMT.sh https://smt_server_FQDN/center/regsvc
The script first downloads the Subscription Management Tool server's CA certificate and prompts for
acceptance of it before installing it in the certificate store.
If it finds key files in /srv/www/htdocs/repo/keys/, the user is then prompted to accept them. Then it modifies
the url parameter in /etc/suseRegister.conf to point to the specified Subscription Management Tool server.
Now the client is ready to register against the Subscription Management Tool server. The script prompts the
user to run the suse_register command to register it.
Depending on the existence of key files in repo/keys/ a script like the following can be used to download and
execute the clientSetup4SMT.sh script without user intervention:
#!/bin/bash
# Add a Y below for each key file in /repo/keys/
14
wget -O /tmp/clientSetup4SMT.sh smt2.nts.com/repo/tools/clientSetup4SMT.sh
bash /tmp/clientSetup4SMT.sh --host smt2.nts.com<<EOF
Y
Y
EOF
rm /tmp/clientSetup4SMT.sh
# Work around service refreshing issue on SLE 11 (TID 7003779)
if [[ `grep -i version /etc/SuSE-release | grep 11` ]] ;then zypper ref -s
fi
The only way to configure products based on SUSE Linux Enterprise 10 SP1 (and earlier versions) to use
Subscription Management Tool is using the clientSetup4SMT.sh script. The parameters for the kernel and AutoYaST
profiles are only implemented from SUSE Linux Enterprise10 SP2 and later versions.
Jobs and Client Status Monitoring
For each client that is registered against the Subscription Management Tool server, Subscription Management Tool
creates a job queue. In order for this to be of any use to the clients, the smt-client package (only available for SUSE
Linux Enterprise11) needs to be installed on them. It could be installed during client installation time with an AutoYaST
script.
Installing the Client During System Installation
Although the original packages for the different architectures are shipping on the Subscription Management Tool for
SUSE Linux Enterprise 11 installation medium in CD1/clients/SLE11/, updated versions have been published in the
regular SLE?11-Updates repositories for SUSE Linux Enterprise Desktop /SUSE Linux Enterprise Server 11. Please
take the newest ones.
To avoid having to update the AutoYaST scripts that are used to install the clients, you can simply create a copy of the
packages without the version information in /repo/tools/ and name them smt-client.x86_64.rpm, smt-client.i586.rpm
etc. so that they can be retrieved with http.
Then add this tiny init-script to the <scripts> section of the AutoYaST profile while replacing the obvious:
<init-scripts config:type="list">
<script>
<filename>install-smt-client.sh</filename>
<interpreter>shell</interpreter>
<source><![CDATA[
zypper in -y http://my-smt-server/repo/tools/smt-client.x86_64rpm
]]>
</source>
</script>
</init-scripts>
During installation of smt-client package, a cron job gets created. This job by default kicks off the client executable
(/usr/sbin/smt-agent) every three hours. The agent then asks the server if it has any jobs in the queue belonging to
this client, and executes these jobs. When there are no more jobs in the queue, the agent terminates completely. It is
important to understand that jobs are not pushed directly to the clients when they get created, but are not executed
until the client asks for them in the preconfigured intervals of the cron job. Therefore, a delay of several hours may
occur from the creation time of a job on the server until the job gets executed on the client.
Every job can have its parent job, which means that the (child) job only runs after the parent job successfully finished.
It is also possible to configure advanced timing and recurrence/persistence of jobs, but this and many other details are
15
explained in the section about the smt-job command (7.1.2) of the Subscription Management Tool guide, on the man
page of smt-job and by executing smt-job -h.
When creating jobs, the GUID of the target clients must be specified using the -g <GUID>parameter. Although the -g
parameter can be specified multiple times on a single command, there is no "wild card" functionality to assign a job to
all clients.
Currently the following types of jobs are relevant:
Execute
Run commands on the client
Eject
Open, close or toggle the CD tray of the client
Patchstatus
Report the status of installed patches
Reboot
Reboot the client (requires smt-client-0.0.13-0.1)
Softwarepush
Install packages
Update
Install available updates (requires smt-client-0.0.13-0.1)
By default only softwarepush, patchstatus and update jobs are allowed. To allow more types of jobs, append the job
type to the ALLOWED_AGENTS list in /etc/sysconfig/smt-client.
All clients that register against a Subscription Management Tool server automatically get a persistent patchstatus job
added to their job queue. This unfortunately also counts for clients that are not SUSE Linux Enterprise 11 clients,
although there are no smt-clients for them. These clients will forever appear with a patchstatus of "Unknown" in the
client lists. The patchstatus jobs for clients that are not SUSE Linux Enterprise 11 are not required and clients can
safely be deleted (if you want to clean up the output of smt-job). Just remember that if you update a machine to SUSE
Linux Enterprise 11 later, you will have to create the patchstatus job manually if it is used on that client.
The most obvious use for this is to monitor the patch status of clients. Whenever the client runs a patchstatus job, it
compares the currently installed updates with what is available in the repositories on the Subscription Management
Tool server. The job then reports back the number of missing patches that need to be installed in each of the four
categories:
•
•
•
•
Security
Package Manager
Recommended
Optional
A summary of the status of all registered clients is available on the clients tab of the Subscription Management Tool
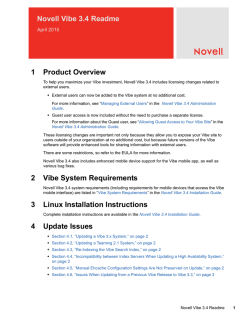
Server Management YaST module (see screenshot figure 9 below):
16
Figure 9: Subscription Management Tool Server Management, Clients Tab
For the host xsles11a there are two package manager patches and two optional patches available. Security and
package manager updates are considered critical, and recommended and optional updates will be flagged with
"Updates available.”
The status of the hosts xres47a and xres52a is unknown, because these are Red Hat servers for which there is no
smt-client package available. The same applies to SUSE Linux Enterprise 10 clients.
NOTE: Package manager patches can "hide" other patches, since they might be a prerequisite to other patches in
such a way that these do not show up as available until the package manager patch(es) have been installed.
In the example above, there are many security and recommended patches available for the xsles11a host, but they do
not show up until the package manager patches have been installed.
The date and time in the “Last Contact” column is the real last time contact of the server, even if it only ran the regular
registration update script (see the "register regularly" switches during registration and in AutoYaST). This date is not
the date of the last patchstatus report. The command line tool smt-client prints the correct date and calls it “Patch
Status Date” (smt-client -v will print both dates, the patchstatus date and the last contact of the client system).
TIP: To install a package (and its dependencies), the job type softwarepush is used. When creating this type of job, it
is a good habit to always add the --agreelicense option. The reason for this is that if a package displays a license
agreement and expects it to be accepted, the job will just skip the package unless --agreelicense has been specified.
The smt-client hands off the installation process to zypper, which does not consider a failed acceptance of a license
agreement to be an error. This results in the job being completed successfully, even though the package might not
have been installed due to this, which is a bit misleading.
Another practical example of using jobs would be using a combination of execute and update jobs.
NOTE: Execute jobs are not enabled by default, since they allow commands to be executed on the host. Extreme
caution should be used before deploying this in production. The same applies to reboot jobs. While they might be
17
handy, rebooting can have serious implications if you submit a job that reboots your CEO's machine in the middle of a
board meeting.
This idea is to configure selected clients to subscribe to the update repositories in the testing environment and then
perform an update. In the scenario below, the client to update is named host1, which has the GUID
fc9a5b43ead542fba9cedb7b00d20647. On the SMT server we have created the script
/srv/www/htdocs/repo/tools/switch-to-testing-repos.
It reconfigures /etc/suseRegister.conf, performs a suse_register and launches an update like this:
#!/bin/bash
/usr/bin/sed -i '/^register/ c\register = command=register\&namespace=testing'
/etc/suseRegister.conf
/usr/bin/suse_register
/usr/bin/zypper ref -s
/bin/logger SMT : Now switched to testing repositories
/bin/logger SMT : Installing available updates
/usr/bin/zypper up -y –l
First, ensure that the job type "execute" is listed in ALLOWED_AGENTS in /etc/sysconfig/smt-client on the client.
Second, create a job that downloads the script to the client and executes it:
# smt-job --create -t execute --verbosejob -g fc9a5b43ead542fba9cedb7b00d20647 \
-X "wget smt11a/repo/tools/switch-to-testing-repos -O /tmp/switch-to-testing-repos ; \
bash /tmp/switch-to-testing"
Successfully created new job. The job id is: 14
Then create an update child job that runs when the above job has successfully completed.
# smt-job --create -t update --verbosejob -g fc9a5b43ead542fba9cedb7b00d20647 \
--parent 14
To avoid waiting for the next cron-initiated launch of the client agent and to monitor its log file, simply issue the
command:
# smt-agent & tail -f /var/log/smtclient.log
Since --verbosejob was specified when creating the jobs, stderr and stdout will be shown in the log file (once the
commands have finished).
If you want to monitor the zypper update process itself, run tail -f /var/log/zypper.log.
This is just the beginning; with some creativity, many tasks can be completed with Subscription Management Tool
jobs.
One thing to keep in mind is that Subscription Management Tool abstracts tasks by letting you run high-level
commands like "update" or "install-software". It does not know how they are updated on the target client; only the
agents in the smt-client package know that. So although you can tunnel shell scripts through the smt-jobs layer, it may
break the target system independency.
18
Staging
When a repository has been mirrored, it can be used for staging. That means that testing and production repositories
can be created based on the "full" mirrored repository. This way it is possible to test new patches from Novell on a
limited number of clients before releasing them to the public. It is also possible to simply prevent individual patches
from ever being "released" internally. Although this is all manageable with smt commands, the easiest way is to use
the staging tab in the Subscription Management Tool server management module:
Figure 10: Subscription Management Tool Server Management, Staging Tab
The flow in using staging goes as follows:
•
Mirror a repository
•
Enable the repository for staging
•
Mirror it again to create the staging structure
•
Select the patches to be included in a testing snapshot by clicking "Change Status" and selecting "All
listed..." and "Enable." Individual patches can then be disabled by selecting them and clicking "Toggle Patch
Status."
•
When the filtering is completed, a testing snapshot is created by clicking "Create Snapshot" and selecting
"From full mirror to testing"
•
Redirect selected clients towards the testing environment. This is done by changing the register command
in /etc/suseRegister.conf to:
register = command=register&namespace=testing
and executing the suse_register command.
The Namespace column in the output of the smt-list-registrations provides an overview of which staging
environment the clients are registered against.
•
Now install the available updates on the clients and test, test, test
19
•
Once the patches in the testing environment have been tested and approved, a production snapshot can be
created. This is done by clicking "Create Snapshot" and selecting "From Testing to Production."
A visual representation of the flow might help:
Figure 11: Staging Illustrated
In the figure above, there is a dotted line between the clients and the full repository. That is because in some
situations it might be feasible for a client to have access to all updates from Novell as soon as they occur (for instance
if using the IS&T department as alpha testers). This is possible by appending "&namespace=full" to the register
command in /etc/suseRegister.conf.
The full-blown staging feature is only supported for SUSE Linux Enterprise 11 repositories. Since not all of the SUSE
Linux Enterprise 10 repositories support selective staging (patch filtering), the testing environment must be managed
manually. This is described briefly in section 3.4 of the Subscription Management Tool guide and the concept is the
same as for the SUSE Linux Enterprise 11 repositories. However, there is no filtering of patches available and the
snapshots must be created manually.
The scenario to use the testing environment looks like the following:
•
Perform an smt-mirror to the $MirrorTo/repo/testing/ structure:
# smt-mirror --directory /srv/www/htdocs/repo/testing ...
•
Now reconfigure the test clients to use the test environment:
•
Change the register command in /etc/suseRegister.conf to:
register = command=register&namespace=testing
•
Register the client against the testing service/repos and verify that the testing service has been added and
that the corresponding repos have been subscribed. For SUSE Linux Enterprise 10 clients, use the
following commands:
20
# yast2 inst_suse_register (or suse_register)
# rug service-list
# rug catalogs
The service name should have "/testing/" appended to the Subscription Management Tool server URL. For
SUSE Linux Enterprise 11 clients, use the following commands:
#
#
#
#
yast2 inst_suse_register (or suse_register)
zypper ref -s
zypper ls -u
zypper lr -u
On SUSE Linux Enterprise11 it is not possible to verify that the client is in testing namespace from the
client side. This has to be verified with the smt-list-registrations command on the Subscription
Management Tool server, which shows the namespace information.
Now testing can begin. Perform the desired level of testing and once you are done testing, deploy the contents of the
testing environment. This could effectively be done with an rsync command like:
# rsync -av /srv/www/htdocs/repo/testing/<repository>/ \
/srv/www/htdocs/repo/<repository>/
•
If desired, then reconfigure the test clients to use the production environment by setting the register command
back to default in /etc/suseRegister.conf:
register = command=register
•
Run suse_register / yast inst_suse_register to register back against the production service/repositories and
verify that the service has changed back to normal with the same rug or zypper commands as above
depending on the client platform.
Compliance Monitoring with Subscription Management Tool Reports
To assist customers in monitoring their license compliance, Subscription Management Tool generates a weekly report
based on Subscription Management Tool and Novell Customer Center data. This report contains information about
statistics of the registered machines, products used, and of the active, expiring or missing license subscriptions. In
case subscriptions are about to expire and/or a lack of licenses is observed (e.g., more SUSE Linux Enterprise Server
10 machines are registered than you have purchased licenses for) the report contains warnings about this.
In order to be able to calculate the compliance, the smt-report tool by default downloads information about the
subscriptions and registrations (this can be disabled).
The addresses to send the reports to can be configured on the Database and Reporting tab of the YaST Subscription
Management Tool configuration module. All of the e-mail configuration options are located in the [REPORT] part of
/etc/smt.conf and explained in section 6.2.1 of the Subscription Management Tool guide.
The scheduling of the reports is configured in /etc/smt.d/novell.com-smt and the parameters to use with the cron jobs
are set in REPORT_PARAMS in /etc/smt.d/smt-cron.conf file.
The content of the reports is too comprehensive to cover in this article, but a set of reports can be broken down into
five individual parts. By default, these reports are attached as individual files to the mail on the weekly report run. The
alerts report is a normal text file while the others are in CSV format. The reports can also be created in PDF or XML
by specifying --pdf or --xml as output format.
To generate a set of reports in CSV files based on local data and to display them on stdout, a command like the
following would work:
21
# smt-report --local --csv --file /tmp/smt-local-rep
Generates:
/tmp/smt-local-rep-product_subscription_active.csv
/tmp/smt-local-rep-product_subscription_alerts.txt
/tmp/smt-local-rep-product_subscription_expired.csv
/tmp/smt-local-rep-product_subscription_expiresoon.csv
/tmp/smt-local-rep-product_subscription_summary.csv
NOTE: If you have multiple Subscription Management Tool servers deployed in your environment, the reports may
not represent all of the Subscription Management Tool servers or machines in your environment. For the complete
statistics of all your registered machines, refer to the information in the Novell Customer Center.
The smt-report tool takes into consideration if forwarding of registration data to Novell Customer Center has been
disabled (forwardRegistration = false in /etc/smt.conf) and then sets the type of report to --local.
For more information about types of reports, output formats and targets refer to section 6 of the Subscription
Management Tool guide.
Supportconfig Proxy
The supportconfig utility from the supportutils package (available here) is used to create archive files containing
system configuration information. These archive files are used by Novell engineers working on service requests to
troubleshoot customer issues. The supportconfig utility is capable of uploading these files directly to the novell.com
servers, so that they get attached to the ongoing service requests records in the Novell call tracking system.
The Subscription Management Tool for SUSE Linux Enterprise 11 is able to act as a proxy for clients (SUSE Linux
Enterprise and Novell Open Enterprise Server), by acting as store-and-forward agent for the archive files. Before
submitting the archives to Novell, they could be analyzed for known issues by the Novell Support Advisor utility.
Issues, which get identified by the Novell Support Advisor, could then be resolved without further involvement by
Novell.
The flow would be as follows:
•
supportconfig creates an archive on the host being investigated and uploads it to the Subscription Management
Tool server
•
An administrator runs Novell Support Advisor against the archive directory on the Subscription Management
Tool server to identify known issues
•
Individual archive files can be repacked with new or updated metadata as they are uploaded
On the "Scheduled SMT jobs" tab of the Subscription Management Tool server configuration module, it is also
possible to add a predefined job to simply upload supportconfig archives to novell.com. Click the Add button and
select "Uploading Support Configs" and set a schedule. The Subscription Management Tool will then upload all the
archives from /var/spool/smt-support/ to novell.com without any modifications when the job runs.
22
Mirroring Updates for Red Hat Enterprise Linux
Customers who have purchased SUSE Linux Enterprise Server Subscription with Expanded Support (see
http://www.novell.com/products/server/expandedsupport/offering_summary.html for details) are entitled to mirror
updates for Red Hat 3.9, 4.7 and 5.2 as described in the terms above.
How to configure the Subscription Management Tool server and the Red Hat clients to use Subscription Management
Tool as their update source is described in TID 7004324 - How to update Red Hat Enterprise Linux with SMT 11.
Mirroring SUSE Linux Enterprise 9 Updates
Although the Subscription Management Tool is primarily designed to manage products based on SUSE Linux
Enterprise 10 (and later) update repositories, Novell has added basic functionality to enable mirroring of products
based on SUSE Linux Enterprise 9 as well. By using this functionality, the Subscription Management Tool server can
act as a SUSE Linux Enterprise Server 9 YaST Online Update (YOU) server, which your SUSE Linux Enterprise
Server 9 servers can be pointed against. This way the need for having a dedicated SUSE Linux Enterprise Server 9
server running the YOU service is eliminated.
The smt-mirror-sle9 tool creates a structure in $MirrorTo/repo/YOU9 that is similar to /var/lib/YaST2/you/mnt on a
SUSE Linux Enterprise Server 9 YOU server and stores the updates there.
The repositories to mirror are configured in /etc/smt.conf and by default it mirrors everything accessible on
https://you.novell.com/update/ for each product.
It is important to note that all updates and sources for a product since it was released will be mirrored. This means
that the repositories may consume up to 10 times more than what is needed by a freshly configured YOU server (e.g.
27 G for SUSE-CORE 9 versus 2 G respectively).
For SUSE-CORE 9 this includes:
/x86_64/update/SUSE-CORE/9/
/x86_64/update/SUSE-CORE/9/images (irrelevant)
/x86_64/update/SUSE-CORE/9/patches
/x86_64/update/SUSE-CORE/9/patches.obsolete (irrelevant)
/x86_64/update/SUSE-CORE/9/rpm
/x86_64/update/SUSE-CORE/9/scripts
/x86_64/update/SUSE-CORE/9/sources (relevant for some)
And inconsistent index.html* files in all directories
The irrelevant directories above can be excluded from download by creating the file /var/lib/smt/.wgetrc containing one
line with comma-separated directories to omit, e.g.,
exclude_directories = /update/x86_64/update/SUSE-CORE/9/images,
/update/x86_64/update/SUSE-CORE/9/patches.obsolete,
/update/x86_64/update/SUSE-SLES/9/sources
(All on one line)
Another difference between the mirroring of SUSE Linux Enterprise 10 and SUSE Linux Enterprise 9 updates is that
while the SUSE Linux Enterprise 10 updates reside on the nu.novell.com servers, which are globally mirrored by an
external IP application accelerator, the SUSE Linux Enterprise 9 servers get downloaded from you.novell.com.
23
This leads to considerably slower download rates (especially during the initial download of the repositories). But for
the users of smt-mirror-sle9 this small hitch may be counteracted by the fact that it is possible to mirror SUSE Linux
Enterprise 9 updates with the Subscription Management Tool.
So how do we get it to work?
1.
Enable mirroring of the products and architectures desired to mirror in /etc/smt.conf. As an example, if you want to
mirror the updates for SUSE Linux Enterprise Server 9 i386 and x86-64 architectures, the following changes should
be applied to both the [YOU9-SUSE-CORE] and [YOU9-SUSE-SLES] sections:
Change mirror = false to mirror = true
Change mirror_archs to only reflect those you need - e.g. :
mirror_archs = i386,x86_64
Set credentials to those in /var/lib/YaST2/you/password on your YOU server - e.g. :
credentials = my-ncc-account-name:password
2.
(Optional) Create the file /var/lib/smt/.wgetrc to exclude undesired directories as described above.
3.
Perform the actual mirror. To run it with verbose output and logging to a file that gets logrotated, use a command
like:
smt-mirror-sle9 -d -L /var/log/smt/smt-mirror-sle9.log
4.
Schedule regular execution of smt-mirror-sle9 by e.g. adding a line like this to /etc/smt.d/novell.com-smt:
33 3 * * 1 root /usr/sbin/smt-mirror-sle9 -L /var/log/smt/smt-mirror-sle9.log
This executes it at 3:33 a.m. every day.
5.
Configure the client SUSE Linux Enterprise Server 9 servers to retrieve updates from your Subscription
Management Tool server. This is done in the online update module in YaST, where the URL should point to the
repository on the Subscription Management Tool server, e.g., http://smtsrv.your.domain/repo/YOU9
NOTE : An update for the smt package is also needed for proper mirroring of SLES 9 updates, but the version and
release date is not set at the time of writing this document.
Custom Repositories
The Subscription Management Tool also includes functionality to mirror custom repositories that are not available at
Novell Customer Center. These might be your own in-house developed applications or third-party driver/software
repositories like close source hardware drivers that Novell for is not shipping with the products (for legal reasons).
When configuring custom repositories to be mirrored with smt-mirror, all repositories must be associated with one or
more Novell product IDs. This ID can be determined using the smt-list-products command:
#
|
|
|
|
|
smt-list-products | grep SLED
1223 | SUSE_SLED
1222 | SUSE_SLED
1221 | SUSE_SLED
1220 | SUSE_SLED
1224 | SUSE_SLED
/-/
/-/
/-/
/-/
/-/
|
|
|
|
|
11
11
11
11
11
|
|
|
|
|
i386
i486
i586
i686
x86_64
|
|
|
|
|
-
|
|
|
|
|
0
0
0
0
0
|
|
|
|
|
This shows that the product ID for i686 based SUSE Linux Enterprise Desktop 11 is 1220 and for the x86_64
architecture it is 1224.
To verify the installed product on a SUSE Linux Enterprise 11 system, use zypper to dump the product data in xml
format. This can be difficult to understand, but if we grep and awk it a little it becomes more user-friendly:
# zypper --xml products -i |grep SUSE_ | awk '{print $2" "$3}'
name="SUSE_SLED" version="11"
24
On SUSE Linux Enterprise 10 the product IDs can be a bit confusing:
#
|
|
|
smt-list-products | grep SUSE-Linux-Enterprise-Server-SP2 | grep x86
824 | SUSE-Linux-Enterprise-Server-SP2
| 10 | x86_64 | 839 | SUSE-Linux-Enterprise-Server-SP2
| 10 | x86_64 | online
809 | SUSE-Linux-Enterprise-Server-SP2-migration
| 10 | x86_64 | -
|
|
|
5 |
0 |
1 |
As the output above shows, multiple IDs can exist for the same product, depending on the release, which basically
represents the way that the SUSE Linux Enterprise product has been installed. “Online” is an upgraded product, e.g.,
a machine originally installed from SUSE Linux Enterprise Server 10 SP1 and then updated online to SP2.
To determine the release of a SUSE Linux Enterprise 10 SP2 product installed on a system, execute the following
command on it:
# /usr/lib/zypp/zypp-query-pool products @system
i|product|SUSE_SLES_SP2|10.2-0|x86_64|SUSE-Linux-Enterprise-Server-SP2|10-SP2|base|
SLES 10 SP2|SUSE Linux Enterprise Server 10 SP2
The 8th field is the release
base = "-" in smt-list-products
online = online in smt-list-products
So for the machine above, the product ID would be 824.
To associate a catalog with multiple product IDs, just add more --productid ID# parameters. As an example :
# smt-setup-custom-repos --productid 824 --productid 839 \
--name "My_own_SLES10_SP2_APP_UPDATES" \
--exturl "http://download.my.company/SLES10-SP2" \
--description "Private SLES updates"
When deleting a custom catalog, the ID to provide for this step is the GUID. Find it with the smt-repositories command
in verbose mode:
# smt-repos -v VLC_SLED10_SP2 |grep ID
CatalogID: 657e1ad399d8cf69a8f7202baeb05db8c8835c93
and then delete the catalog from the local Subscription Management Tool database with:
# smt-setup-custom-repos –delete \ 657e1ad399d8cf69a8f7202baeb05db8c8835c93
If the custom catalog/repository is unsigned, the clients will fail to subscribe to them for security reasons.
On SUSE Linux Enterprise 11 clients you will be presented with a prompt like the following when trying to register an
unsigned repository:
File 'repomd.xml' from repository 'Corp-Updates' is unsigned, continue? [yes/NO]:
After accepting this, the repository will be added.
SUSE Linux Enterprise 10 clients do not allow the use of unsigned repositories at all unless their configuration gets
changed to allow this explicitly. This is done by executing the following command:
#rug set security-level checksum
This may be a security concern to your company, but custom repositories are beyond the control of Novell. How to
deal with this issue is something you need to work out on your own.
25
Repository Signing
Although it is possible to accept unsigned repositories, they should be avoided because they make the systems
vulnerable to security threats.
When refreshing the repositories, the zypper package manager in SUSE Linux Enterprise 11 handles repository
signing differently than the ZENworks Management Daemon (rug) does on SUSE Linux Enterprise 10. The goal is to
enable silent addition of custom repositories that are signed with unknown keys. These are keys that are not provided
by Novell.
In SUSE Linux Enterprise 10, the options to handle repositories that are signed with unknown keys are:
1.
Import the key with
# rpm --import <keyfile>
This can be done during the installation with a post-script in AutoYaST (or later).
2.
Lower the security level check from signature to checksum in ZMD with:
# rug set security-level checksum
This is also possible through AutoYaST.
In SUSE Linux Enterprise 11 the options are:
1.
Import the key with
# rpm --import <keyfile>
This can be done during the installation with a post-script in AutoYaST (or later).
2.
Download the key during registration with the Subscription Management Tool server.
Place a copy of the key used in /repo/keys/ on the Subscription Management Tool server. The registration
process with the Subscription Management Tool server will then pick up the key and display a dialog similar to
this:
/tmp/smtsetup-lxl52yc6/.gnupg/pubring.gpg
----------------------------------------pub 1024D/C8A57A4A 2008-10-14 [expires: 2010-10-14]
Key fingerprint = 3730 C2A0 E2A5 2778 A22C BEA4 B19C 56D8 C8A5 7A4A
uid Update Administration (Repository key1) <[email protected]>
sub 2048g/CCB57776 2008-10-14 [expires: 2010-10-14]
Trust and import this key? [y/n]
For security reasons every key does require user acceptance and this dialog cannot be avoided.
3.
If the key is not imported, then the user will be prompted to accept the key the first time the repository is
queried.
For more information about mirroring custom repositories with the Subscription Management Tool for SUSE Linux
Enterprise 11, refer to smt-setup-custom-repos -h or section 3.2.5 in the Subscription Management Tool guide.
If you would like to create your own repository with updates and publish it with the Subscription Management Tool, the
article Creating a YUM repository and publishing it with SMT explains all the steps (currently only based on SUSE
Linux Enterprise 10).
26
Disconnected Subscription Management Tool Servers
In some restricted environments it is not possible for the Subscription Management Tool servers to access the Internet
because they are located in disconnected or isolated networks. By using some special parameters on the Subscription
Management Tool commands and a mobile disk, it is possible to accommodate for this.
This option works by having one Subscription Management Tool server that mirrors the repositories, which are
needed on the isolated servers. Then these internal servers can "mirror" from the external servers (through the mobile
storage medium) a concept which is also sometimes referred to as "sneaker-netting."
The scenario can be illustrated like this:
Figure 12: Isolated Subscription Management Tool Setup
The initial setup of this special solution requires some extra configuration, but the regular update synchronization with
nu.novell.com and distribution to isolated servers is relatively simple. While the details in the configuration are covered
later, a quick overview might be useful first.
The steps required during the initial setup consist of:
•
Installation and configuration of the external Subscription Management Tool server "by the book"
•
Installation of the internal server
•
Modification of smt.conf and cron setup on the internal server
•
Creation of a copy of the Novell Customer Center data on the external Subscription Management Tool server
and importing it to the internal Subscription Management Tool server
•
Enabling and disabling of catalogs on the internal server
•
Creation of a Subscription Management Tool database replacement file (which can be used instead of the
normal MySQL Subscription Management Tool database when performing the mirror jobs) on the internal
server
The day-to-day operation includes:
27
•
On the external server run an smt-mirror job based on the database replacement file that writes to the mobile
disk.
•
Synchronization of the mirrored repositories from the mobile disk to the internal Subscription Management Tool
server.
We will now describe the individual steps in detail, considering the information about installation and configuration of
the Subscription Management Tool discussed earlier in this document.
•
On the external server
•
Install and configure the Subscription Management Tool "by the book"
•
Enable the repositories to be consumed by the internal Subscription Management Tool servers
•
Perform a normal mirror (smt-mirror) from Novell Customer Center
•
Attach a removable disk to the server and mount it
•
Export the required Novell Customer Center data to a directory on that disk:
•
Create the directory to hold the data
•
Grant permissions to that directory. Since the smt commands execute as the smt user (of which the
numeric uid can differ between the servers), we need to ease up the permissions for the directories on
the mobile disk.
# chmod o+w </path-to-ncc-dir-on-mobile-disk>
•
Export the Novell Customer Center data:
# smt-ncc-sync --export </path-to-ncc-dir-on-mobile-disk>
•
Set up a directory for repositories:
•
Create the directory
# mkdir </path-to-repository-on-mobile-disk>
•
Grant permissions as above
# chmod o+w </path-to-repository-on-mobile-disk>
•
•
Unmount and detach the removable disk
Install and configure the internal server:
•
Ensure you have a working SUSE Linux Enterprise Server 11 installation source
•
Install the Subscription Management Tool as on the external server with the following exceptions:
•
•
Select "Generate new NCC credentials" in the "NCC Credentials" dialog
•
Ignore the error about running the synchronization script in the "Writing SMT Configuration" phase of
the wizard
•
Abort the Novell Customer Center Configuration wizard and then click OK in the list of installed add-on
products
Re-launch the YaST Subscription Management Tool Server Configuration module (yast2 smt-server) and
go to the "Scheduled SMT Jobs" tab
•
Delete "NCC Registration" and "Synchronization of Updates" jobs
•
Hit OK to finish the wizard, provide the Subscription Management Tool user password and acknowledge
the sync error again.
•
Prevent registration data upstream sync to Novell Customer Center
set forwardRegistration = false in /etc/smt.conf
•
Prevent sync with Novell Customer Center before creating reports
•
Insert "--nonccsync" at the beginning of the REPORT_PARAMS list in /etc/smt.d/smt-cron.conf
# sed -i 's/REPORT_PARAMS=\"/REPORT_PARAMS=\"--nonccsync /g' \
/etc/smt.d/smt-cron.conf
•
Connect the mobile disk and mount it
28
•
Populate the Subscription Management Tool database with the Novell Customer Center data just created
•
Enable mirroring of the desired repositories
# smt-ncc-sync --fromdir </path-to-ncc-dir-on-mobile-disk>
smt-repos -e ...
•
Create a database replacement file on the mobile hard disk
# smt-ncc-sync --createdbreplacementfile \
</path-to-dbrepl-file-on-mobile-disk>
•
Unmount and detach the removable disk
•
Now the configuration is complete, but the update repository is empty
•
After one iteration of the day-to-day operation, the update repositories are synchronized and the internal
server is ready to serve clients
Day-to-day operation:
•
On the external server:
•
Connect the mobile disk and mount it
•
Perform a mirror based on the file on the mobile disk and to a directory on the mobile disk:
# smt-mirror --dbreplfile </path-to-dbrepl-file-on-mobile-disk> \
--fromlocalsmt --directory </path-to-repository-on-mobile-disk> \
-L /var/log/smt/smt-mirror-<you-name-it>.log
•
Update the database on the mobile disk with product and subscription info from Novell Customer Center:
# smt-ncc-sync --export </path-to-ncc-dir-on-mobile-disk>
•
•
Scan the mobile disk for virus and/or other unwanted content if desired
•
Unmount and disconnect the mobile disk
On the internal server:
•
Connect the mobile disk and mount it
•
Update the Novell Customer Center data on the server
# smt-ncc-sync --export </path-to-ncc-dir-on-mobile-disk>
•
Mirror from the mobile disk to the server
# smt-mirror --fromdir </path-to-repository-on-mobile-disk>
•
Update the Novell Customer Center data on the mobile disk with local changes in the mirror status since
the last synchronization
# smt-ncc-sync --createdbreplacementfile \
</path-to-dbrepl-file-on-mobile-disk>
•
Unmount and disconnect the mobile disk
If the isolated Subscription Management Tool server has mirrored the SUSE Linux Enterprise Server 11-Updates and
SUSE Linux Enterprise 11-SMT-Updates for its own target/architecture, it can be registered to consume locally
available updates as described in TID 7004388 - Configuring SMT11 servers to use self-hosted repositories.
Registration Data Synchronization with Novell Customer Center
By default, information about registered clients is sent from the Subscription Management Tool to Novell Customer
Center every 15 minutes. Some customers have concerns about disclosing information about internal resources to
Novell. They can set the parameter
29
forwardRegistration = false
in /etc/smt.conf to effectively disable this. The Subscription Management Tool tools take the setting of this parameter
into account when communicating with Novell Customer Center.
If you are really concerned, disable the "NCC registration" cron job in the YaST Subscription Management Tool
configuration module. This deletes the smt-repeated-register job from /etc/smt.d/novell.com-smt and since this file is
marked as a configuration file, updates to the Subscription Management Tool should not overwrite it. (Checking after
applying updates to the Subscription Management Tool never hurts.)
Publish Update Repositories on the Internet for Mobile Workstations
Some enterprises have many clients (workstations) that only occasionally are connected to the internal network. The
obvious way to make the update repositories accessible to these machines would be to expose the Subscription
Management Tool server to the public. However publishing the restricted files from the update repositories on the
internet would violate the copyright/licensing agreement with Novell and is liable for legal prosecution.
The Subscription Management Tool offers a way to legally meet this business need by using the authentication
feature available and adding a tweak to the registration handler configuration.
Before implementing this solution it is crucial that the fully qualified domain name of the Subscription Management
Tool server is be the same internally as externally. Otherwise the SSL communication between the server and the
clients will fail.
Start the configuration by adding the following three lines in the
<Location /center/regsvc> section of the /etc/smt.d/smt_mod_perl.conf file:
Order Deny,Allow
Deny from all
Allow from <network-address/subnet-mask>
This is normal apache2 configuration and the address can also be specified using CIDR notation.
The section could for example look like this:
<Location /center/regsvc>
# perl cgi mode
# Limit access to registration service
Order Deny,Allow
Deny from all
Allow from 192.168.0.0/24
SetHandler perl-script
HostnameLookups On
PerlResponseHandler SMT::Registration
</Location>
Please be aware that although /etc/smt.d/smt_mod_perl.conf is marked as a configuration file, it may get
changed when applying updates to SMT. So keep in mind to verify that your changes are still in the file after an
update.
Then configure /etc/smt.conf to require authentication by changing the default
requiredAuthType = none
to
requiredAuthType = lazy
30
or
requiredAuthType = strict
Depending on how strict policies are desired. See section “7.2.1 /etc/smt.conf” of the Subscription Management Tool
guide for details.
Finally restart the Subscription Management Tool service with the command :
# rcsmt restart
This changes the behavior, so that the clients must authenticate with the Subscription Management Tool server when
accessing the updates. The userid and password being used for this are what is stored in
/etc/zypp/credentials.d/NCCcredentials.
The 32-digit hexidecimal username is the “Unique ID” that the client is registered with in the Subscription Management
Tool database.
Now the configuration is completed. Test it by trying to register against the Subscription Management Tool server from
a client on an unauthorized network.
If clients from unauthorized networks try to register against the restricted Subscription Management Tool server,
errors like this will appear:
sles11pv:~ # suse_register
ERROR: 403: Access forbidden!
You don't have permission to access the requested object. It is either
read-protected or not readable by the server.
If you think this is a server error, please contact the webmaster.
Error 403
smt11a.nts.com
Mon Nov 16 13:32:47 2009
Apache/2.2.10 (Linux/SUSE)
Forbidden
(2)
At the same time a message like this will be logged in /var/log/apache2/access.log of the Subscription
Management Tool server:
[Mon Nov 16 13:32:47 2009] [error] [client 192.168.1.25] client denied by server
configuration: /srv/www/htdocs/center
Preloading Repositories
Although the nu.novell.com servers are accelerated as mentioned previously and you may have lots of Internet
bandwidth, deploying multiple Subscription Management Tool servers may become time consuming if each new
Subscription Management Tool server must mirror the same repositories.
To save time when deploying new Subscription Management Tool servers, the catalogs can be preloaded from
another server/disk instead.
The steps to do that are:
•
Enable the catalogs to be mirrored with the Subscription Management Tool - example:
# smt-repos -e SLES1-Updates sle-11_x86_64
31
•
Perform a dry run of smt-mirror to get the repository directories created
# smt-mirror -d --dryrun -L /var/log/smt/smt-mirror.log
•
Using the repository above and the default MirrorTo, this will create:
/srv/www/htdocs/repo/repoindex.xml
/srv/www/htdocs/repo/$RCE/SLES11-Updates/sle-11-x86_64/*
•
Now you can copy over the repositories for instance from another Subscription Management Tool server example:
# rsync -av 'smt10:/srv/www/htdocs/repo/\$RCE/SLES11-Updates/sle-11-x86_64/' \
'/srv/www/htdocs/repo/$RCE/SLES11-Updates/sle-11-x86_64/'
•
To get the repodata fixed up perform a normal smt-mirror like:
# smt-mirror -d -L /var/log/smt/smt-mirror.log
Be prepared for errors like “repomd.xml is the same, but repo is not valid. Start mirroring.” These errors occur,
since the metadata about the preloaded repositories in the server's database is incorrect until this initial mirror
of the repositories has completed.
Server Tuning
The /usr/share/doc/packages/smt/Server-Tuning.txt contains very useful tips about different ways of tuning
Subscription Management Tool server performance.
Here you will find tips on increasing number of clients for Apache 2, increasing mysqld connections and also how to
speed up the database connection by installing the perl-Apache-DBI module from the SUSE Linux Enterprise 11
Software Development Kit.
Backup of Subscription Management Tool Servers
For many of us, the last thing we think of is creating a backup. In case of loss of a Subscription Management Tool
server, the update repositories can be re-mirrored, but the Subscription Management Tool MySQL database will be
gone and it is not possible to recover or synchronize it back from Novell Customer Center.
This database contains important information about clients, registrations, machine data, which catalogs that are
enabled for mirroring, custom catalogs, etc.
Thus it is highly recommended to include a backup of at least your Subscription Management Tool database and
possibly also the update repositories into your normal backup solution. Since the database is MySQL based, the
easiest way to produce a restorable backup is to create a cron job that performs a simple mysqldump of it with a
command like:
# mysqldump -uroot -p<smt-db-pwd> smt > /some-directory/smt-db-backup.sql
and include the file in your normal backup jobs.
Conclusion
The Subscription Management Tool for SUSE Linux Enterprise Server 11 comes with several exciting and innovative
capabilities in systems management. These capabilities include the:
•
Possibility of staging patches to internal managed areas under full control of the site administrator. This gives
the administrator the option to carry out integration testing before they fully enable the new patches onsite.
•
Ability to centrally push packages to managed devices
32
•
Improved setup and the facilitated operation for fully disconnected ("sneakernet") configurations
•
New support for System z as server hosting architecture (in addition to x86 and x86-64)
•
Full integration with the new supportability infrastructure delivered with SUSE Linux Enterprise (Novell Support
Link integrated in SUSE Linux Enterprise 11 and Novell Support Advisor from Novell Technical Services). This
helps facilitate problem reporting and troubleshooting.
Support for the Subscription Management Tool for SUSE Linux Enterprise 11 is included with any SUSE Linux
Enterprise subscription at no additional cost. The support level available is applicable to your active SUSE Linux
Enterprise subscription.
We hope that this deployment guide has helped demonstrate how easy it is to use the Subscription Management
Tool, and has also provided you with some tips that can be useful when deploying the Subscription Management Tool
in your specific environment.
References
•
Subscription Management Tool for SUSE Linux Enterprise 11 guide available online and in
/usr/share/doc/manual/sle-smt_en/.
•
Documents in /usr/share/doc/packages/smt/
•
Subscription Management Tool for SUSE Linux Enterprise Web page
•
Frequently Asked Questions for Subscription Management Tool for SUSE Linux Enterprise
В© 2009 Novell, Inc. All Rights Reserved. Novell, the Novell logo, the N logo, SUSE and ZENworks are registered trademarks of
Novell, Inc. in the United States and other countries. All third-party trademarks are the property of their respective owners.
33
© Copyright 2026 Paperzz