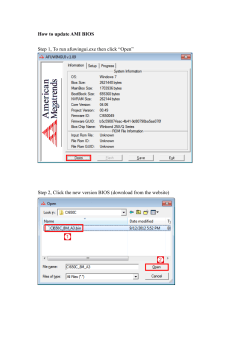
How to change the MFP BootUp Screen How to change the BootUp Screen • Use to customize the BootUp Screen displayed upon machine start-up. • Use this feature when changing the Konica Minolta logo displayed on the control panel upon start-up to a client company logo or others for client’s intended use of the machine. • Register logo data in the machine’s flash ROM via a USB memory device. The following are the logo data specifications that should be met: - Image Format: PNG Format - File Extension: *.png - File Name: BootupScreen.png - Image Size: 800 x 480 dots - Color: 256 Colors (Palette that the machine specifies is used). The following programs are needed: - PictBear: Graphic Software (pb20H[H) - Binary Editor: Any HEX editor like Hex Editor Neo. (free-hex-editorneo) - Boot Up Screen Conversion Tool: (PNG2CPP.exe) Note: • When making the logo data, use the %RRW6FUHHQ&RQYHUWHU. • If a USB memory device is not connected or a nonconforming USB memory device is connected, “USB NG” is displayed and logo data cannot be registered. • If the name of the logo data does not confirm to the above specifications, “File NG” message is displayed and logo data cannot be registered.   How to create the image: 1. 8VH PictBear SEH[H which can also be downloaded from the Internet. 2. Open PictBear.   Note: 800 x 480 is the optimal resolution. Other resolutions can be used, but might not fill the screen correctly.     3. Open the image you want the machine to display during boot up. NOTE: Not all image files will work. This is indicated by a black screen after the hourglass when booting. Please use the included Canada_800x480.bmp file to test the conversion procedure. This file has been tested and works. 4. Open Palette Edit Screen: Image → Image Type → Index Color → Custom 5. Select Open then Select Palette and browse to the Mosel_256_01.plt file. Note: If you do not see the Mosel_256_01.plt, copy and paste it in the following location: C:\Program Files\Fenrir Inc\PictBear Second Edition\palettes\palettes\Mosel_256_01.plt 6. Press OK, then change the color. 7. Select File → Save as, then select PNG file type and save the image. 8. Open the command prompt and change the directory, which includes the PNG2CPP.exe file. 9. Execute PNG2CPP.exe by typing “PNG2CPP.exe xxx.png” then pressing Enter. 10. PNG2CPP creates an image.bin file. (neither image.cpp nor image.h are needed) 11. Note the number in error message, 00002000 and another number in the message. In this case, it’s 000201DC PNG2CPP.exe application converted image(PNG) file. and Execute by “PNG2CPP.exe xxx.png”format. this case “PNG2CPP.exe sunset800.png”. Check the message. In this case, need “00002000” and “000201DC”. Image.bin will be created. In 12. Open the newly created .bin file with the hex editor tool and change the following: < Before > < After > Note: Change only the highlighted bits 5, 6, 7 and 8 to: 00 02 5E 54 13. Save the image.bin as BootUpScreen.bin. 14. Save BootUpScreen.bin in the USB memory stick root for updating the logo data on the MFP. Note: Be sure to save the data in the root directory as the machine cannot detect data saved in other directories 15. Insert the USB memory stick into the USB port behind the control panel (NOT the service USB port), then access the Service mode. 16. Access System2 → BootUp Screen. 17. Select “SET”. 18. Press the Start key then END. 19. After “OK” message is displayed, power OFF the machine. 20. Remove the USB memory stick then power ON the machine. 21. The new Boot up logo will be displayed when booting up instead of the default Konica Minolta display. To delete the logo from MFP: 1. Access Service mode → Open System2 → BootUp Screen  → select “Del.” and press “Fix”. 2. After “OK” message is displayed, power OFF the machine. 3. Original logo will be displayed at next boot up.
© Copyright 2026 Paperzz