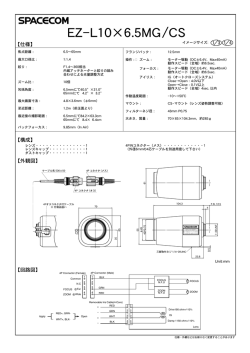
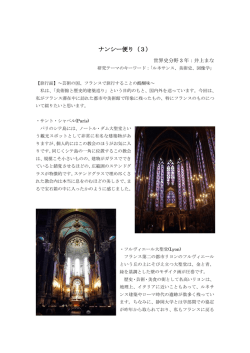
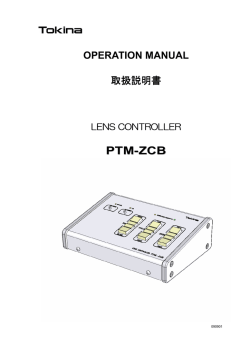
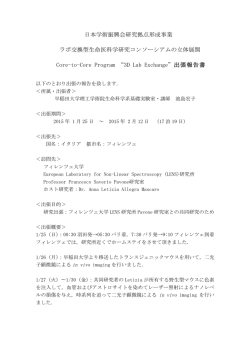
4-413-949-01 (1)
FZ Power Zoom
Lens 14.0X
SCL-Z18X140
お買い上げいただきありがとうございます。
電気製品は安全のための注意事項を守らないと、
火災や人身事故になることがあります。
この取扱説明書には、事故を防ぐための重要な注意事項と製品の
取り扱いかたを示してあります。この取扱説明書をよくお読みのうえ、
製品を安全にお使いください。お読みになったあとは、
いつでも見られるところに必ず保管してください。
© 2011 Sony Corporation
取扱説明書
JP
Operating Instructions
GB
日本語
安全のために
ソニー製品は安全に充分配慮して設計されています。し
かし、電気製品は、まちがった使いかたをすると、火災
警告表示の意味
や感電などにより死亡や大けがなど人身事故につながる
取扱説明書および製品で
ことがあり、危険です。
は、次のような表示をし
事故を防ぐために次のことを必ずお守りください。
ています。表示の内容を
よく理解してから本文を
安全のための注意事項を守る
お読みください。
4 ページの注意事項をよくお読みください。
定期点検をする
長期間、安全にお使いいただくために、定期点検をする
ことをおすすめします。点検の内容や費用については、
お買い上げ店またはソニーのサービス窓口にご相談くだ
さい。
この表示の注意事項を守
らないと、感電やその他
の事故によりけがをした
り周辺の物品に損害を与
えたりすることがありま
す。
故障したら使わない
すぐに、お買い上げ店またはソニーのサービス窓口にご
行為を禁止する記号
連絡ください。
万一、異常が起きたら
• 煙が出たら
• 異常な音、においがしたら
• 内部に水、異物が入ったら
• 製品を落としたり、キャビネットを破損したときは
m
a本機が取り付けられているビデオカメラの電源を切る。
b本機を取りはずす。
cお買い上げ店またはソニーのサービス窓口に連絡する。
2
行為を指示する記号
目次
注意 ............................................................................................................4
概要 ..................................................................................................................4
各部の名称と働き ............................................................................................. 5
レンズをカメラに取り付ける ........................................................................... 6
フランジバックを調整する .............................................................................. 8
アイリスを調整する ......................................................................................... 9
手動でアイリスを調整する ....................................................................................... 9
自動でアイリスを調整する ....................................................................................... 9
フォーカスを調整する .................................................................................... 10
FULL MF モード ................................................................................................... 10
MF モード .............................................................................................................. 10
AF モード ............................................................................................................... 11
ズームを操作する ........................................................................................... 12
JP
手動でズームを操作する ........................................................................................ 12
電動でズームを操作する ........................................................................................ 12
手ぶれ補正(Steady Shot)を有効にする ................................................. 13
付録 ................................................................................................................14
レンズフードを取りはずす ..................................................................................... 14
使用上のご注意 ....................................................................................................... 14
保証書とアフターサービス ..................................................................................... 15
主な仕様 ................................................................................................................. 16
目次
3
注意
概要
スーパー 35mm 相当のイメージセンサー
を搭載したビデオカメラ用ソニー FZ マ
ウントの沈胴式 14 倍ズームレンズです。
本レンズは、手動/電動ズーム、マニュ
分解や改造をしない
分解や改造をすると、火災や
感電、けがの原因となること
があります。内部の点検や修
理は、お買い上げ店またはソ
ニーのサービス窓口にご依頼
ください。
内部に水や異物を入れない
水や異物が入ると火災や感電
の原因となります。
万一、水や異物が入ったとき
は、すぐに本機が取り付けら
れているカメラの電源を切り、
電源コードや接続コードを抜
いて、お買い上げ店またはソ
ニーのサービス窓口にご依頼
ください。
レンズの取り付けは確実に
レンズはレンズ固定リングを
しっかり締めて取り付けてく
ださい。取り付けかたがゆる
いとレンズがはずれてけがの
原因となることがあります。
この取扱説明書に記されて
いるカメラに取り付ける
FZ マウントのカメラに取り付
けてお使いください。規定外
のカメラでのご使用は、火災
やけがの原因となることがあ
ります。
4
注意/概要
アル/オートフォーカス、マニュアル/
オートアイリス機能と手ぶれ補正
(Steady Shot)機能を搭載しています。
各部の名称と働き
a レンズフード (14 ページ)
g マウントピン(7 ページ)
b フォーカスリング(10、11 ページ)
h レンズマウント
手動で焦点を合わせるときは、FOCUS
i STEADY SHOT(手ぶれ補正)ボ
スイッチを MANUAL に切り換え、リン
グを回して被写体に焦点を合わせます。
c ズームリング(12 ページ)
手動でズームを操作するときは、ZOOM
スイッチを MANUAL に切り換え、リン
グを回してズームを調節します。
d アイリスリング(9 ページ)
手動でアイリスを調整するときは、IRIS
スイッチを MANUAL に切り換え、リン
グを回してアイリスを調節します。
タン(13 ページ)
j IRIS(アイリス切り換え)スイッ
チ(9 ページ)
k PUSH AF(ワンプッシュオート
フォーカス)ボタン (11 ページ)
l FOCUS(フォーカス切り換え)ス
イッチ(10、11 ページ)
m フォーカスリングスライドスイッ
チ(10、11 ページ)
e F.f(フランジバック)調整ボタン
(8 ページ)
フォーカスモードに合わせて、フォーカ
フランジバック(レンズ取り付け面から
スライドします。
結像面までの距離)を調整するときに、
使用します。F.f. 調整ボタンと STEADY
n ZOOM(ズーム切り換え)スイッ
チ(12 ページ)
SHOT ボタンを同時に長押しして調整し
o レンズフード固定ネジ(14 ページ)
ます。
レンズフードを取りはずすときはネジを
f フランジバック調整ランプ
ゆるめます。
スリングの位置をレンズ側/カメラ側に
(8 ページ)
フランジバック調整中に点滅します。
各部の名称と働き
5
3
レンズをカメラに
取り付ける
カメラのレンズマウント変換アダプ
ターを矢印の方向に回し、取りはず
す。
レンズマウント変換アダプター
カメラにレンズマウント変換アダプター
が取り付けられている場合は、取りはず
してからレンズを取り付けます。
ご注意
レンズをカメラに取り付ける前に、手順
1、2 に従ってカメラ側のレンズインター
フェースの設定を確認してください。
1
2
カメラの電源を入れる。
CAMERA SETメニューのLens IFを
Type C に設定する。
レンズマウント変換
アダプターが固定さ
れている状態
レンズマウント変換
アダプターの固定が
解除された状態
6
レンズをカメラに取り付ける
4
レンズからマウントキャップを取り
はずす。
6
矢印の方向へ回して取りはずしま
す。
レンズ固定リングを矢印の方向に回
し、カメラとレンズを固定する。
レンズ固定リングのつま
みを矢印の方向に回す
マウント
キャップ
5
レンズを下から支え、マウントピン
をカメラの溝に合わせ、はめ込む。
レンズとカメラが
固定された状態
溝
マウントピン
取りはずしは逆の手順で行ってくださ
い。
レンズをカメラに取り付ける
7
フランジバック調整ランプ
フランジバックを
調整する
レンズをカメラに取り付けたら、フラン
ジバック(レンズマウントの取り付け面
から結像面までの距離)を調整します。
フランジバックの調整は、カメラでのメ
F.f 調整ボタン
ニュー操作、またはレンズ側の F.f 調整ボ
タンを押すことで自動的に調整できます。
フランジバックの自動調整を実行する
と、レンズズームの広角端、望遠端でそ
れぞれ自動でフォーカス合わせを実施
し、フォーカス調整後にズーム位置を変
1
2
カメラの電源スイッチを ON にする。
レンズのIRISスイッチをAUTOに切
り換える。
更してもフォーカスが合ったまま保持さ
れるよう、フランジバックを調整し結果
3
を保存します。
ご注意
フランジバック調整用チャートな
ど、コントラストのはっきりした被
写体を約 3 m 離れた位置に置き、適
正な映像出力が得られるように照明
する。
• コントラストの不鮮明な被写体を使用
ズームの望遠端で、被写体が画面中
央になるように置いてください。ま
た、広角端で被写体より距離が近い
ものが画面内に入らないようにして
ください。
したり、調整中にカメラや被写体を動
かすと調整が正しく行われません。調
整開始後は完了するまでレンズやカメ
ラに触れないでください。
• CAMERA SET メニューの Slow
Shutter の Setting が On になっている
場合は、Off にしてから調整を行って
ください。
ft
太陽、明るい窓などの光源が、画枠に
10
5
7
8
2.5
3
10
15
30
約 3m
映り込まないようにしてください。
m
• フランジバック調整中に、照明器具や
1.1
4
3.7 1.3
1.2
4.5
1.5
5
1.7
6
2
• フランジバックの自動調整後にカメラ
のフランジバック調整ネジを回すとフ
ランジバックがずれます。調整後はフ
ランジバック調整ネジを回さないでく
ださい。
8
フランジバックを調整する
4
レンズの ZOOM スイッチを SERVO
に切り換える(電動ズームモード)
。
5
レンズの F.f 調整ボタンと STEADY
SHOT ボタンを同時に長押しする。
フランジバックの自動調整が始まり
ます。
調整中は、レンズのフランジバック調
整ランプが点滅し、カメラの画面には
実行中メッセージが表示されます。
フランジバックの自動調整が正常に
終了すると、完了メッセージが表示
アイリスを調整す
る
被写体の明るさに応じてアイリスの開度
を調整します。
アイリスリング
され、フランジバック調整ランプが
消灯します。
カメラのメニューからフランジバッ
ク調整を実行する
1 手順 4 のあと、カメラの MENU ボ
タンを押してメニューモードに切
り換える。
2
で LENS FILE メニューを選
択し、メニューから Auto FB
Adjust を選択する。
IRIS スイッチ
3 Execute を選択する。
LENS FILE
00:00
I n f ormat i on B
Opera t i o n B
B
Set t i ng
Auto FB Adjust Execute
Cancel
メニュー操作について詳しくは、カメラの
取扱説明書をご覧ください。
調整中にカメラの CANCEL ボタンを
押すと
手動でアイリスを調整す
る
1
2
IRIS スイッチを MANUAL に切り換
える。
アイリスリングを回し、アイリスの
開度を調整する。
アイリスの調整について詳しくは、カメ
ラの取扱説明書をご覧ください。
フランジバックの自動調整処理は中断
し、実行前の状態に戻ります。
フランジバック調整が正しく行われ
なかった場合は
自動でアイリスを調整す
る
エラーメッセージが表示されます。
IRIS スイッチを AUTO に切り換えると、
被写体や照明の状態を確認して、調整を
被写体の明るさに応じて自動的にアイリ
もう一度やり直してください。
スを調整します。
アイリスを調整する
9
持たせています。無限遠の被写体を MF
フォーカスを調整
する
モードまたは FULL MF モードで撮影す
る場合は、カメラのビューファインダー
画面で確認しながらフォーカスを合わせ
てください。
本レンズには、次の 3 種類のフォーカス
調整があります。フォーカスを設定する
と、選択されたフォーカスモードがカメ
FULL MF モード
ラのビューファインダー画面に表示され
FULL MF モードに設定します。
ます。
フォーカスリングを後方(カメラ側)に
スライドさせ、フォーカスリングを回し
てフォーカスを合わせます。
1 1.5 2
3 4 5
7 10
ご注意
• フォーカスリングを後方にスライドさ
FULL MF(フルマニュアルフォーカ
ス)モード
フォーカスリングによるフォーカス合わ
せのみ有効です。
∞∼最短撮影距離までリングを持ち直さ
ずに回して、フォーカスを合わせること
ができます。
せると、フォーカスが目盛の位置に瞬
時に移動します。
• FULL MF モードは、リングの距離指
標が有効です。フォーカスの合う距離
はフォーカスリングの絶対位置に対応
します。
フォーカスリングスライドスイッチ
MF(マニュアルフォーカス)モード
フォーカスリングによるフォーカス合わ
せが有効です。
PUSH AF ボタンを押したときのみ、一
時的にオートフォーカスが起動します。
AF(オートフォーカス)モード
常にオートフォーカスが働きます。一時
的なフォーカスリングの操作や、PUSH
フォーカスリングの位置:後方
AF ボタンも有効です。
ご注意
温度変化によるフォーカスの移動を補正
するため、無限遠(∞)位置には余裕を
10
フォーカスを調整する
MF モード
MF モードに設定します。
フォーカスリングを使ってフォーカスを
一時的にオートフォーカスを働かせる
合わせます。
PUSH AF ボタンを押すと一時的にオー
フォーカスリングを前方(レンズ側)に
トフォーカスが起動します(ワンプッ
スライドさせ、FOCUS スイッチを
シュオートフォーカス)
。
MANUAL に切り換えると、必要なとき
ワンプッシュオートフォーカスは、
のみオートフォーカスを働かせることも
フォーカスが合った時点で終了します。
できます。
AF モード
ご注意
MF モードでは、リングの距離指標は無
AF モードに設定します。
効です。
フォーカスリングを前方(レンズ側)に
スライドさせ、FOCUS スイッチを
AUTO に切り換えます。
ご注意
AF モードでは、リングの距離指標は無
効です。
F.f.
STEADY
SHOT
FOCUS
スイッチ
IRIS
MANUAL AUTO
FOCUS
MANUAL AUTO
PUSH
AF
ボタン
PUSH AF
フォーカスリングスライドスイッチ
フォーカスリングの位置:前方
フォーカスを調整する
11
ズームを操作する
手動または電動でズームを操作します。
ズームリング
F.f.
FOCUS
スイッチ
STEADY
SHOT
IRIS
MANUAL AUTO
FOCUS
MANUAL AUTO
PUSH AF
フォーカスリングスライドスイッチ
ZOOM スイッチ
手動でズームを操作する
フォーカスリングの位置:前方
1
AF モードでは、映像の変化を常に観測
し、変化があったと判断する度にオート
フォーカスを起動します。フォーカスが
2
ZOOM スイッチを MANUAL に切り
換える。
ズームリングを回し、ズームを調整
する。
合った時点でフォーカス動作を終了し
て、また映像に変化があるまで待機しま
す。
電動でズームを操作する
ZOOM スイッチを SERVO 側にすると、
電動ズームが有効になります。
電動ズームの操作について詳しくは、カ
メラの取扱説明書をご覧ください。
12
ズームを操作する
ご注意
• 電動でズームを操作する場合、ズーム
を速い速度で調整すると、動作音が録
音される場合があります。
• ズームを低速で調整すると、ズームス
手ぶれ補正
(Steady Shot)
を有効にする
ピードが遅くなったり、速くなったり
するなど、ズームスピードにムラが出
手ぶれ補正を設定することで、撮影時の
ることがあります。
細かな動きによる画像のぶれを抑えるこ
• 手動でズームを操作する場合、レンズ
とができます。
を上側または下側に向けたときに、レ
ンズ可動部がレンズの重みで自然に動
く場合があります。
STEADY SHOT
ボタン
1
STEADY SHOT ボタンを押す。
手ぶれ補正がオンになり、手ぶれ補
正マークが画面に表示されます。
手ぶれ補正をオフにする場合は、も
う一度押します。
1 1.5 2
3 4 5
7 10
• Steady Shot は、ソニーの登録商標です。
ご注意
三脚に載せて安定した状態で使用すると
きは、手ぶれ補正をオフにしてくださ
い。
手ぶれ補正(Steady Shot)を有効にする
13
運搬するときは、レンズフード、フー
ドキャップ、マウントキャップを取り
付け、レンズ鏡筒を両手で持つ
付録
レンズやレンズマウント部を保護するた
レンズフードを取りはずす
めに、レンズフード、フードキャップ、
マウントキャップを取り付けた状態で運
下図のように、レンズフード固定ネジを
搬してください。また、レンズが落下し
ゆるめてレンズからレンズフードを取り
ないように両手で確実に持って運搬して
はずします。
ください。
ズーミング時にレンズ可動部分を持た
ない
ズーミング時に前方に繰り出す可動部分
を持つと、レンズにダメージを与える場
合があります。
レンズを取り付ける際に指を挟まない
ように注意する
レンズフード
固定ネジ
レンズを取り付けるとき、取りはずすと
きに、指を挟まないように注意してくだ
さい。
お手入れ
使用上のご注意
レンズの表面に付着したゴミやほこり
取り扱い・保管上のご注意
外装の汚れは、乾いた柔らかい布で拭き
強い衝撃を与えない
少し含ませた布で拭いた後、カラ拭きし
内部構造や外観の変形などの損傷を受け
ることがあります。
動作中は布などで包まない
内部の温度が上がり、好ましくありませ
ん。
レンズを太陽光に向けて放置しない
太陽光がレンズを通して内部に焦点を結
び、火災の原因となることがあります。
14
付録
は、プロアーで吹き払います。
取ります。ひどい汚れは、中性洗剤液を
ます。アルコール、ベンジン、シンナー
などの薬品類は、表面が変質したり、塗
料がはげることがありますので、使わな
いでください。
レンズ表面にゴミ、ホコリがついたと
きは
カメラ用ブロアーで吹き飛ばすか、柔ら
かい刷毛で軽く払ってください。
レンズ表面に油がついたときは
風の強い日やホコリの多いところでは
洗いざらした綿布やレンズクリーニング
レンズの取り付け/取りはずしを手早く
ペーパー(シルボン紙)などに、市販の
行い、レンズマウント内にホコリが入ら
レンズクリーナーを少ししみこませて、
ないようにご注意ください。
レンズの中心から周辺へ向けて、軽く、
渦を巻くようにしながら、ぬぐいとって
ください。
携帯電話などによる電波障害を防止す
るために
携帯電話などを本機の近くで使用する
万一、異常が生じたときは
と、誤動作を引き起こしたり、映像、音
お買い上げ店かソニーのサービス窓口に
声などに影響を与えることがあります。
ご相談ください。
本機の近くでは、携帯電話などの電源は
できるだけ切ってください。
使用場所・保管場所
水平な場所、空調のある場所に保管して
ください。
次のような場所での使用・保管は避けて
保証書とアフターサービス
ください。
保証書
• 極端に寒い所、暑い所(使用温度は
• この製品には保証書が添付されていま
0 ℃∼ 40 ℃)。
真夏、窓を閉め切った自動車内は 50
℃を越えることがあります。
すので、お買い上げの際お受け取りく
ださい。
• 所定の事項の記入および記載内容をお
• 湿気、ほこりの多い所。
確かめのうえ、大切に保存してくださ
• 雨があたる所。
い。
• 激しく振動する所。
• 強い磁気を発生するものの近く。
• 強力な電波を発生するテレビやラジオ
の送信所の近く。
• 直射日光が長時間当たる場所や暖房器
具の近く。
アフターサービス
調子が悪いときはまずチェックを
この説明書をもう一度ご覧になってお調
べください。
湿気の多い場所で使用したあとは
それでも具合が悪いときは
乾いた布で拭き、乾燥剤とともにビニー
お買い上げ店、または添付の「ソニー業
ル袋に入れ、十分湿気を取り除いてくだ
務用製品のご相談窓口のご案内」にある
さい。
お近くのソニーのサービス窓口にご相談
ください。
雨天で使用するときは
防水対策をご配慮ください。
付録
15
保証期間中の修理は
手ぶれ補正
保証書の記載内容に基づいて修理させて
ON / OFF 可能、シフトレ
ンズ方式
フィルター取り付けネジ
M 82 mm ピッチ 0.75 mm
マウント方式
ソニー FZ マウント
いただきます。詳しくは保証書をご覧く
ださい。
保証期間経過後の修理は
修理によって機能が維持できる場合、ご
要望により有料修理させていただきま
す。保証期間中の修理など、アフター
仕様および外観は、改良のため予告なく
変更することがありますが、ご了承くだ
さい。
サービスについてご不明な点は、お買い
上げ店、またはソニーのサービス窓口に
お使いになる前に、必ず動作確認を
お問い合わせください。
行ってください。故障その他に伴う営
業上の機会損失等は保証期間中および
保証期間経過後にかかわらず、補償は
いたしかねますのでご了承ください。
主な仕様
質量
動作温度
保存温度
外形寸法
付属品
約 2,250 g(レンズフード除く)
0 ℃ ∼ + 40 ℃
− 20 ℃ ∼ + 60 ℃
17 ページ参照
取扱説明書(1)
保証書(1)
フランジバック調整チャート
(1)
レンズフード(1)
フードキャップ(1)
マウントキャップ(1)
焦点距離 18 mm ∼ 252 mm
ズーム比 14 倍
電動/手動切り換え可能
最大口径比
T3.9(Wide 端)∼ T6.8
(Tele 端)
絞り
T3.9 / T6.8 ∼ T22 および
Close
自動/手動切り換え可能
フォーカス
範囲 1.05 m ∼ ∞
(結像面より)
自動/手動切り換え可能
16
付録
外形寸法
単位:mm
50.5
173.5 (Wide)
M82 × 0.75
(FILTER SCREW)
Φ114
216.1(Tele)
付録
17
English
Before operating the unit, please read this
manual thoroughly and retain it for future
reference.
For the customers in the U.S.A.
This equipment has been tested and found
to comply with the limits for a Class A
digital device, pursuant to Part 15 of the
FCC Rules. These limits are designed to
provide reasonable protection against
harmful interference when the equipment is
operated in a commercial environment.
This equipment generates, uses, and can
radiate radio frequency energy and, if not
installed and used in accordance with the
instruction manual, may cause harmful
interference to radio communications.
Operation of this equipment in a residential
area is likely to cause harmful interference
in which case the user will be required to
correct the interference at his own expense.
You are cautioned that any changes or
modifications not expressly approved in
this manual could void your authority to
operate this equipment.
All interface cables used to connect
peripherals must be shielded in order to
comply with the limits for a digital device
pursuant to Subpart B of Part 15 of FCC
Rules.
This device complies with Part 15 of the
FCC Rules. Operation is subject to the
following two conditions: (1) this device
may not cause harmful interference, and (2)
this device must accept any interference
received, including interference that may
cause undesired operation.
For the customers in Canada
This Class A digital apparatus complies
with Canadian ICES-003.
Pour les clients au Canada
Cet appareil numérique de la classe A est
conforme à la norme NMB-003 du Canada.
18
For the customers in Europe
This product with the CE marking complies
with the EMC Directive issued by the
Commission of the European Community.
Compliance with this directive implies
conformity to the following European
standards:
• EN55103-1 : Electromagnetic
Interference (Emission)
• EN55103-2 : Electromagnetic
Susceptibility (Immunity)
This product is intended for use in the
following Electromagnetic Environments:
E1 (residential), E2 (commercial and light
industrial), E3 (urban outdoors), E4
(controlled EMC environment, ex. TV
studio).
Pour les clients en Europe
Ce produit portant la marque CE est
conforme à la Directive sur la compatibilité
électromagnétique (EMC) émise par la
Commission de la Communauté
européenne.
La conformité à cette directive implique la
conformité aux normes européennes
suivantes :
• EN55103-1 : Interférences
électromagnétiques (émission)
• EN55103-2 : Sensibilité
électromagnétique (immunité)
Ce produit est prévu pour être utilisé dans
les environnements électromagnétiques
suivants : E1 (résidentiel), E2 (commercial
et industrie légère), E3 (urbain extérieur) et
E4 (environnement EMC contrôlé, ex.
studio de télévision).
Für Kunden in Europa
Dieses Produkt besitzt die CEKennzeichnung und erfüllt die EMVRichtlinie der EG-Kommission.
Angewandte Normen:
• EN55103-1: Elektromagnetische
Verträglichkeit (Störaussendung)
• EN55103-2: Elektromagnetische
Verträglichkeit (Störfestigkeit)
Für die folgenden elektromagnetischen
Umgebungen: E1 (Wohnbereich), E2
(kommerzieller und in beschränktem Maße
industrieller Bereich), E3 (Stadtbereich im
Freien) und E4 (kontrollierter EMVBereich, z.B. Fernsehstudio).
For the customers in Europe
The manufacturer of this product is Sony
Corporation, 1-7-1 Konan, Minato-ku,
Tokyo, Japan.
The Authorized Representative for EMC
and product safety is Sony Deutschland
GmbH, Hedelfinger Strasse 61, 70327
Stuttgart, Germany.
Pour les clients en Europe
Le fabricant de ce produit est Sony
Corporation, 1-7-1 Konan, Minato-ku,
Tokyo, Japon.
Le représentant autorisé pour EMC et la
sécurité des produits est Sony Deutschland
GmbH, Hedelfinger Strasse 61, 70327
Stuttgart, Allemagne.
Für Kunden in Europa
Der Hersteller dieses Produkts ist Sony
Corporation, 1-7-1 Konan, Minato-ku,
Tokyo, Japan.
Der autorisierte Repräsentant für EMV und
Produktsicherheit ist Sony Deutschland
GmbH, Hedelfinger Strasse 61, 70327
Stuttgart, Deutschland.
GB
19
Table of Contents
Features ................................................................................................................21
Location and Function of Parts ..........................................................................22
Attaching a lens to the camcorder .....................................................................23
Adjusting the Flange Focal Length ....................................................................25
Adjusting the Iris .................................................................................................26
Adjusting the Iris Manually ...........................................................................26
Using the Auto Iris ........................................................................................26
Adjusting the Focus .............................................................................................27
FULL MF mode ............................................................................................27
MF mode .......................................................................................................27
AF mode ........................................................................................................28
Adjusting the Zoom .............................................................................................29
Adjusting the Zoom Manually ......................................................................29
Using Power Zoom (SERVO) .......................................................................29
Eliminating Picture Blurring (Steady Shot) .....................................................30
Appendixes ...........................................................................................................30
Removing the Lens hood ...............................................................................30
Precautions ....................................................................................................30
Specifications ................................................................................................31
20
Table of Contents
Features
The SCL-Z18X140 is a collapsible 14x
zoom lens that can be mounted via the
existing FZ mount of a super 35 mm or
equivalent camcorder.
The lens features manual/auto zoom,
manual/auto focus, manual/auto iris, and
elimination of picture blurring (Steady
Shot).
Features
21
Location and Function of Parts
a Lens hood (page 30)
b Focus ring (pages 27, 28)
When you focus manually, set the FOCUS
switch to MANUAL and turn this ring to
focus in the subject.
c Zoom ring (page 29)
When you zoom manually, set the ZOOM
switch to MANUAL and turn this ring to
zoom in or out.
d Iris ring (page 26)
When you adjust iris manually, set IRIS
switch to MANUAL and turn this ring to
obtain a proper iris.
e F.f adjustment button (page 25)
Use this button when adjusting the flange
focal length (distance between the lens
attachment plane and the imaging plane).
Press and hold the E.f. adjustment button
and STEADY SHOT button for 2 seconds
or longer.
22
Location and Function of Parts
f Flange focal length adjustment
indicator (page 25)
The indicator flashes while the flange focal
length is being adjusted.
g Lens mount pin (page 23)
h Lens mount
i STEADY SHOT button (page 30)
j IRIS switch (page 26)
k PUSH AF (momentary auto focus)
button (page 28)
l FOCUS switch (pages 27, 28)
m Focus ring slide switch (pages 27, 28)
Slide the position of the focus ring forward
or rearward to suit the focus mode.
n ZOOM switch (page 29)
o Lens hood fixing screw (page 30)
To remove the lens hood, loosen the set
screw and pull the lens hood away.
Attaching a lens
to the camcorder
3
Turn a lens mount adaptor of the
camcorder in the direction of the
arrow, then remove it.
Lens mount adaptor
If the camcorder has a lens mount adaptor
attached, remove the adaptor from the
camcorder and attach the lens.
Note
Before attaching a lens to the camcorder,
check if the lens interface setting of the
camcorder according to the procedure in
steps 1 and 2 is correctly selected.
1
2
Set the power switch to the ON
position.
Lens mount adaptor
is locked.
Set “Lens IF” on the CAMERA SET
menu to “Type C.”
Lens mount adaptor
is unlocked.
Attaching a lens to the camcorder
23
4
Remove the mount cap from the mount
section.
Turn the mount cap in the direction of
the arrow and remove.
6
Turn the lens fixing ring in the
direction of the arrow to secure the
lens.
Turn the tab of the lens fixing ring
in the direction of the arrow
Mount cap
5
While holding the lens, align the lens
mount pin of the lens with the recess at
the top of the mount section of the
camcorder and set the lens in place.
Recess
Lens and camcorder
is locked.
Lens mount pin
To detach the lens, reverse the above
procedure.
24
Attaching a lens to the camcorder
Flange focal length
adjustment indicator
Adjusting the
Flange Focal
Length
1
2
3
Notes
Set the IRIS switch of the lens to
AUTO.
Place a high-contrast subject, such as a
flange focal length adjustment chart,
about 3 m (10 ft.) away from the
camcorder, and light it well enough to
provide a sufficient video output level.
ft
10
10
5
15
30
Approx. 3 m (10 ft.)
m
Frame the subject so that it is located in
the center at the telephoto end of the
zoom. Make sure that any object
located closer to the lens than the
subject is out of frame at the wideangle end.
8
7
2
6
1.7
5
1.5
4.5
4
3.7 1.3
1.2
1.1
• If a subject of insufficient contrast is
used, or if the camcorder or subject
moves during the adjustment, adjustment
cannot be made properly. Once the
adjustment begins, do not touch the
camcorder body or lens until it ends.
• When “Setting” of the “Slow Shutter” of
the CAMERA SET menu is “On,” be
sure to set it to “On” before starting the
adjustment.
• Be careful that no light source, such as a
lamp, the sun, or a bright window, is in
field of view during flange focal length
adjustment.
• If the adjustment screw of the camcorder
for flange focal length is rotated after
automatic adjustment of flange focal
length, the adjusted flange focal length is
shifted. Be careful not to rotate the
adjustment screw after automatic
adjustment.
Set the power switch of the camcorder
to ON.
3
When automatic adjustment of flange focal
length is activated, focusing is performed
both at the wide-angle and telephoto ends of
the zoom for flange focal length adjustment
and the result is stored so that the in-focus
condition is maintained even if you change
the zoom position after focusing.
F.f adjustment
button
2.5
After attaching the lens to the camcorder,
adjust the flange focal length (distance
between the lens mount attachment plane
and the imaging plane). The flange focal
length can be automatically adjusted by
pressing the F.f adjustment button of the
lens or by menu operation of the camcorder.
4
Set the ZOOM switch to SERVO
(Power Zoom mode).
Adjusting the Flange Focal Length
25
5
Press and hold the E.f. adjustment
button and STEADY SHOT button for
2 seconds or longer.
Adjusting the Iris
The adjustment begins.
During adjustment, the flange focal
length adjustment indicator of the lens
flashes and the in-progress message is
displayed.
When the adjustment is finished, the
completion message is displayed and
the flange focal length adjustment
indicator goes dark.
Adjust the iris opening according to the
brightness of the subject.
Iris ring
To activate automatic
adjustment of the flange focal
length from the menu of the
camcorder
IRIS switch
1 Press the MENU button of the
camcorder to set the camcorder to
Menu mode.
2 Select
(the LENS FILE menu)
then “Auto FB Adjust” from the
menu.
3 Select “Execute.”
LENS FILE
00:00
I n f ormat i on B
Opera t i o n B
B
Set t i ng
Auto FB Adjust Execute
Cancel
For details on menu operations, refer to the
instructions supplied with your camcorder.
If you press the CANCEL button of
the camcorder during adjustment
Automatic adjustment of the flange focal
length is aborted and the condition before
starting the adjustment is resumed.
If the adjustment fails
An error message is displayed.
Check the conditions of the subject and
lighting then perform the adjustment again.
26
Adjusting the Iris
Adjusting the Iris Manually
1
2
Set the IRIS switch to MANUAL.
Rotate the iris ring for the desired iris
opening.
For details on adjusting the iris, refer to the
instructions supplied with your camcorder.
Using the Auto Iris
When the IRIS switch is set to AUTO, the
lens adjusts the iris automatically according
to the brightness of the subject.
FULL MF mode
Adjusting the
Focus
Set FULL MF mode.
Slide the focus ring rearward (toward the
camcorder body) and rotate the focus ring
until the subject comes into focus.
You can select any of three modes for focus
adjustments on the lens. The current focus
mode is displayed on the viewfinder of the
camcorder when you set the focus mode.
1 1.5 2
3 4 5
7 10
Notes
• The focus instantly moves to the range
index position when you slide the focus
ring rearward.
• The range index of the focus ring is
effective in FULL MF mode. The
distances correspond to the focus ring
positions.
Focus ring slide switch
FULL MF (Full Manual Focus)
mode
Only adjustment with the focus ring is
effective in this mode.
You can adjust the focus from to the
minimum length by rotating the ring. The
ring rotates endlessly in the both directions.
MF (Manual Focus) mode
Adjustment with the focus ring is effective
in this mode.
Auto focus can be temporarily activated by
pushing the PUSH AF button.
AF (Aut Focus) mode
Auto focus functions continuously in this
mode. The focus ring operation temporarily
and the PUSH AF button can also be used..
Note
The infinity position has some margin to
compensate for focus change caused by
variation in ambient temperature. When
shooting an image at infinity in MF or
FULL MF mode, adjust the focus while
observing the image in the viewfinder.
FOCUS ring: Rearward
MF mode
Set MF mode. The focus ring can be used.
When you slide the focus ring forward
(toward the lens) then set the FOCUS
switch to MANUAL, auto focus will be
activated by pushing the PUSH AF button.
Note
The range index of the ring is invalid in MF
mode.
Adjusting the Focus
27
Note
The range index of the ring is invalid in AF
mode.
F.f.
STEADY
SHOT
FOCUS
switch
IRIS
MANUAL AUTO
FOCUS
MANUAL AUTO
PUSH AF
F.f.
STEADY
SHOT
PUSH
AF
button
FOCUS
switch
IRIS
MANUAL AUTO
FOCUS
MANUAL AUTO
PUSH AF
Focus ring slide switch
Focus ring slide switch
FOCUS ring: Forward
FOCUS ring: Forward
To momentarily activate auto
focus
Push the PUSH AF button. Auto focusing
momentarily activates (One-Push Auto
Focusing).
One-Push Auto Focusing is terminated
when the subject comes in focus.
AF mode
Set AF mode.
Slide the focus ring forward (toward the
lens) then set the FOCUS switch to AUTO.
28
Adjusting the Focus
In AF mode the camcorder continuously
checks changes of images and activates
auto focusing each time it detects a change.
The auto focus adjustment is terminated
when the subject comes into focus, and the
camcorder stands by until the next change is
detected.
Adjusting the
Zoom
You can adjust the zoom manually or using
power zoom (servo mode).
Zoom ring
Notes
• When zooming quickly in power zoom
mode, the camcorder may record
operating noise.
• When zooming slowly, change in
zooming effect may be uneven.
• If you direct the lens upward or
downward while zooming manually,
weight of the lens will contribute slightly
to how for it extends.
ZOOM switch
Adjusting the Zoom
Manually
1
2
Set the ZOOM switch to MANUAL.
Rotate the zoom ring to adjust the
zoom.
Using Power Zoom
(SERVO)
Setting the ZOOM switch to SERVO Servo
mode activates power zoom.
For details on power zoom operations, refer
to the instructions supplied with your
camcorder.
Adjusting the Zoom
29
Eliminating
Picture Blurring
(Steady Shot)
By activating the Steady Shot function,
blurring of images due to camera shaking
can be reduced.
Appendixes
Removing the Lens hood
Loosen the lens hood set screw and pull the
lens hood away from the lens, as shown
below.
STEADY SHOT
button
Lens hood fixing
screw
1
Press the STEADY SHOT button.
The Steady Shot function is set to On.
The Steady Shot function is displayed
on the viewfinder of the camcorder.
To deactivate the Steady Shot
function, press the button again.
Precautions
Use and Storage
Do not subject the unit to severe
shock
1 1.5 2
3 4 5
7 10
• Steady Shot is a registered trademark of Sony
corporation.
Note
If the camcorder is fixed to a tripod for
stable condition, deactivate the Steady Shot
function.
30
The internal mechanism may be damaged
or the body warped.
Do not cover the unit while
operating
Putting a cloth, for example, over the unit
can cause excessive internal heat build-up.
Do not leave the lenses facing the
sun
Direct sunlight can enter through the lenses,
be focused in the camcorder, and cause fire.
Eliminating Picture Blurring (Steady Shot) / Appendixes
Do not hold moving parts of the
lens when zooming
If you hold moving parts of the lens when
zooming, the lens may be damaged.
Carrying
Attach the lens hood, hood cap, and the
mount cap to the lens to protect the lens and
lens mount.
Hold the lens body in both hands to carry.
Note on attaching the lens
Be careful not to pinch a finger when
attaching the lens to the camcorder
Care of the unit
Remove dust and dirt from the surfaces of
the lens using a blower.
If the body of the unit is dirty, clean it with
a soft, dry cloth. In extreme cases, use a
cloth steeped in a little neutral detergent,
then wipe dry. Do not use organic solvents
such as alcohol or thinner, as these may
cause discoloration or other damage to the
finish of the unit.
On lens
• Clean the lens with a blower or lens
tissue. Avoid excessive cleaning.
• Remove oil stains with a piece of the lens
cleaning tissue moistened with a cleaning
solution. Wipe the lens lightly from the
center outward in a circular motion.
In the event of operating problems
If you should experience problems with the
unit, contact your Sony dealer.
•
•
•
•
•
•
the windows closed can easily exceed
50ºC (122ºF).
In damp or dusty locations
Locations where the unit may be exposed
to rain
Locations subject to violent vibration
Near strong magnetic fields
Close to radio or TV transmitters
producing strong electromagnetic fields.
In direct sunlight or close to heaters for
extended periods
On the circumstances
• When the lens is used in a humid location
for any length of time, wipe its various
parts with a dry cloth, and put it in a
plastic bag together with a desiccating
agent. Take extra cautions when using
the lens in the rain.
• When using the lens outdoors in adverse
weather conditions, attach and remove
the lens as quickly as possible to prevent
the intrusion of foreign objects.
To prevent electromagnetic
interference from portable
communications devices
The use of portable telephones and other
communications devices near this unit can
result in malfunctions and interference with
audio and video signals.
It is recommended that the portable
communications devices near this unit be
powered off.
Specifications
Use and storage locations
Store in a level, ventilated place. Avoid
using or storing the unit in the following
places:
• In excessive heat or cold (operating
temperature range: 0ºC to 40ºC or 32ºF to
104ºF)
• Remember that in summer in warm
climates the temperature inside a car with
Mass
Approx. 2,250 g (not included the
lens hood)
Operating temperature
0 ºC to + 40 ºC (32 ºF to 104 ºF)
Storage temperature
–20 ºC to + 60 ºC (–4 ºF to 140 ºF)
Dimensions
See page 00
Supplied accessories
Appendixes
31
Operating Instructions (1)
Flange focal length adjustment
chart (1)
Lens hood (1)
Hood cap (1)
Mount cap (1)
Focal length
18 mm to 252 mm
Zoom ratio
14 ×
Servo/Manual selectable
Maximum relative aperture
T3.9 (WIDE end) to
T6.8 (TELE end)
Iris
T3.9/T6.8 to T22 and Close
Auto/Manual selectable
Focus Ranges: 1.05 m to ∞
(from the imaging plane)
Auto/Manual selectable
Picture stabilizing function
Steady Shot ON/OFF possible,
shift-lens system
Filter mounting screw
M 82 mm, pitch 0.75 mm
Mount system
Sony FZ mount
Design and specifications are subject to
change without notice.
Always verify that the unit is operating
properly before use. SONY WILL NOT
BE LIABLE FOR DAMAGES OF ANY
KIND INCLUDING, BUT NOT
LIMITED TO,
COMPENSATION OR
REIMBURSEMENT ON ACCOUNT
OF THE LOSS OF PRESENT OR
PROSPECTIVE PROFITS DUE TO
FAILURE OF THIS UNIT, EITHER
DURING THE WARRANTY PERIOD
OR AFTER EXPIRATION OF THE
WARRANTY, OR FOR ANY OTHER
REASON WHATSOEVER.
32
Appendixes
Dimensions
Unit: mm (inches)
50.5 (2)
173.5 (6 7/8) (Wide)
M82 × 0.75
(FILTER SCREW)
ø114
216.1 (8 5/8) (Tele)
Appendixes
33
Sony Corporation
Printed in Japan
© Copyright 2026 Paperzz