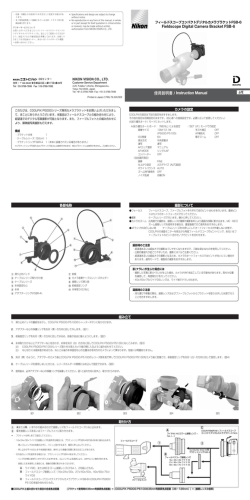
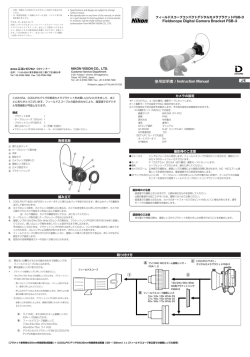
FSB-1 Bracket (2DE) 05.3.17 13:23 ページ1
・ 仕様・外観などは改善のため予告なしに変更する場合があ
ります。
・ 本「使用説明書」に掲載されている文章・イラスト等の無
断転載を禁じます。
アフターサービスについて
お買い上げいただきましたニコンフィールドスコープコンパク
トデジタルカメラブラケットを、安心してご愛用いただきます
よう、固定ネジなどの補充部品を準備しております。在庫につ
きましては当社サービス部、あるいはニコンのサービス機関へ
お問い合わせください。
• Specifications and design are subject to change
without notice.
• No reproduction in any form of this manual, in whole
or in part (except for brief quotation in critical articles
or reviews), may be made without written
authorization from NIKON VISION CO., LTD.
フィールドスコープコンパクトデジタルカメラブラケットFSB-1
Fieldscope Digital Camera Bracket FSB-1
NIKON VISION CO., LTD.
サービス部
住所:〒142-0043 東京都品川区二葉1丁目3番25号
Tel:03-3788-7699 Fax:03-3788-7692
Customer Service Department
3-25, Futaba 1-chome, Shinagawa-ku,
Tokyo 142-0043, Japan
Tel: +81-3-3788-7699 Fax: +81-3-3788-7698
使用説明書 / Instruction Manual
Printed in Japan (159K) 52-5X/2DE
このたびは、COOLPIX 5200/4200専用カメラブラケットをお買い上げいただきまして、
まことにありがとうございます。フィールドスコープとの組み合わせにより、超望遠での
デジタル写真撮影が可能となります。
構成
・ブラケット本体
・ケーブルレリーズ
・滑り止めパッド
組み立て
1.
2.
3.
4.
1
1
2(予備1を含む)
COOLPIX 5200/4200のシャッターボタンに滑り止めパッドを貼り付けます。滑り止めパッドの裏紙を
はがして貼り付けます。
カメラのレンズ部を、カメラレンズ部挿入口に差込み、カメラの三脚ネジ穴にカメラ固定ネジをねじ込んで
固定します。注)カメラのグリップ部をブラケットに接触させて固定してください。
ケーブルレリーズ取付座にケーブルレリーズをねじ込みます。
フィールドスコープに取り付けられた接眼レンズに、接眼レンズ挿入口を合わせて差込み、押しつけながら
固定ネジで固定します。
撮影時のご注意
・フォーカス
シングルフォーカスに設定します。フィールドスコープで仮のピントを合わせ、最終ピント
はカメラのオートフォーカスで行います。
フォーカスエリア選択は、「オート」ではなく、「中央」を選択します。
「マニュアル」の選択も可能です。
・モード
オート撮影モードにセットします。
・撮影
ケーブルレリーズで行います。静かに押してください。
・カメラのズーム 広角側での撮影は、接眼レンズの種類により画面の四隅に影が出ます。MC・MCⅡズーム接
眼レンズを使用の場合は、最望遠側での使用をお勧めします。
各部名称
1 滑り止めパッド
2 ケーブルレリーズ取付座
3 本体
4 固定ネジ
5 カメラレンズ部挿入口
6 接眼レンズ挿入口
撮影時のご注意
7 カメラ固定ネジ
・超望遠での撮影となりますので、三脚は頑丈なものを使用してください。
・比較的像揺れが起こりやすいため、撮影には十分ご注意ください。
・超望遠での撮影となるため、カメラのオートフォーカスではピントが合いにくい場合があります。複数
枚の撮影をお勧めします。
取り付け方
1: AあるいはBのどちらかの組み合わせで接眼レンズを
A
フィールドスコープにねじ込みます。
2: Cを接眼レンズに取り付ける。
*:ブラケットは接眼レンズに押しつけて固定のこと。
A: ワイドMC、またはMCⅡズーム接眼レンズに
FSA-1, 2を組んだもの。
B: フィールドスコープ接眼レンズ(24x/30x,
40x/50x, 60x/75x)ワイドDS
C: デジタルカメラブラケットFSB-1にCOOLPIX
5200/4200を組み合わせたもの。
ワイドMC・MCⅡズーム接眼レンズ +
FSA-1, 2
フィールドスコープ
1
2
B
フィールドスコープ接眼レンズ
24x / 30x Wide DS
40x / 50x Wide DS
60x / 75x Wide DS
[ブラケット使用時の35mm判換算焦点距離] = [COOLPIX 5200/4200の35mm判換算焦点距離(38∼114mm)] x [フィールドスコープ各口径での接眼レンズの倍率]
C
COOLPIX 5200/4200 +
デジタルカメラブラケットFSB-1
J/E
FSB-1 Bracket (2DE) 05.3.17 13:23 ページ2
Thank you for purchasing the Nikon Fieldscope Digital Camera Bracket for COOLPIX
5200/4200. Use of your digital camera in combination with a Fieldscope enables you
to take super-telephoto digital pictures.
Items supplied
• Bracket x 1
• Cable release x 1
• Non-skid pad x 2 (spare included)
Attaching the Fieldscope to the digital camera
1. Remove the sheet from the adhesive side of the non-skid pad, and affix the pad to the shutter
release button of the COOLPIX 5200/4200.
2. Put the lens of the camera into the camera lens socket and tighten the camera fixing screw to fix it
in place.
Note: When fixing the bracket, the grip of the camera and the bracket should come into contact.
3. Screw the cable release into the cable release socket.
4. Put the eyepiece attached to the Fieldscope into the eyepiece socket and tighten the fixing screw to
fix it in place while pressing the bracket against the eyepiece.
Nomenclature
1
2
3
4
5
6
7
Setting for shooting
• Focusing
Set for single focusing. Focus first using the controls on the Fieldscope, then make fine
adjustments with the camera’s AF function.
Set the camera’s AF Area Mode to “Center-focus” instead of “Auto”.
“Manual” can also be selected.
• Shooting mode
Set for “Auto” mode.
• Shooting
Use cable release. Depress the cable release gently.
• Camera zoom setting
When shooting with the zoom at the widest-angle setting, shade will appear in the four
corners of the image depending on the type of eyepiece in use, giving it a rounded
appearance. We recommend the use of maximum telephoto setting when MC or MC II Zoom
Eyepiece is used.
Non-skid pad
Cable release socket
Bracket
Fixing screw
Camera lens socket
Eyepiece socket
Camera fixing screw
Notes for shooting
• Use solid tripod during super-telephoto shooting for steady images.
• Beware of camera shake as small vibrations at high magnification can ruin a photograph.
• With super-telephoto shooting, it may be difficult to obtain focus with the camera’s AF
function. We recommend that you take a series of pictures of the same subject, to ensure you
capture the desired image.
Attachment
1 Screw the eyepiece (either A or B) into the
eyepiece socket.
2 Attach the assembly in C to the eyepiece.
* Keep the bracket pressed against the eyepiece while
fixing it in place.
A Wide MC or MC II Zoom Eyepiece with FSA-1
and FSA-2 attached.
B Fieldscope Eyepiece (24x/30x, 40x/50x,
60x/75x) Wide DS.
C COOLPIX 5200/4200 with Digital Camera
Bracket FSB-1 attached.
C COOLPIX 5200/4200 +
A
Digital Camera Bracket FSB-1
Wide MC or MC II Zoom Eyepiece +
FSA-1&-2
Fieldscope
1
2
B Fieldscope Eyepiece
24x / 30x Wide DS
40x / 50x Wide DS
60x / 75x Wide DS
[Focal length (35mm [135] format equivalent) with FSB-1] = [Focal length (35mm [135] format equivalent) of the COOLPIX 5200/4200 (38-114mm)] x [magnification of eyepiece]
© Copyright 2026 Paperzz