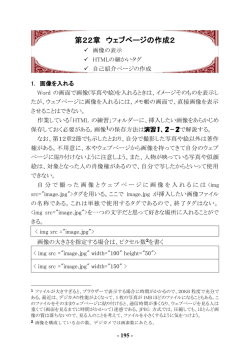
+13-10_Adding images.txt
・Adding images
You can add images to your websites to make them look fancy.
We use an image tag, like so: <img>. This tag is a bit different from the others.
Instead of putting the content between the tags, you tell the tag where to get the
picture using src. It's also different because there is no ending tag. It has / in the
tag to close it: <img src="url" />.
Check out the tag to the right—it adds a picture of a rubber duck to the page!
(You can see it by clicking on the Preview button.)
See the web address (or URL) after src=? It's
"http://s3.amazonaws.com/codecademy-blog/assets/f3a16fb6.jpg". That tells
the <img> tag where to get the picture from!
Every image on the web has its own image URL. Simply right-click on an image
and choose "Copy image URL." Paste that URL in quotes after src= to insert with
your <img> tag.
・Instructions:
Add a second image below the first one. (Make sure it's before the closing
<body> tag!)
If you can't think of a good picture, use this ninja:
http://s3.amazonaws.com/codecademy-blog/assets/ninja_zpsa5dbe37a.jpg
○まとめ&補足
・画像/写真/絵 を、Webページに貼り付けよう!
画像を使って、あなたのWebページを、おしゃれ/ファンシー にすることができます。
1/4 ページ
+13-10_Adding images.txt
そのためには、
<img>
このタグを使います。
image(イメージ) ・・・ im(a)g(e)・・・ img ですね。
このタグは、他のタグとは、ちょっと違うところがあります。
それは、タグ(tag)の間に、内容(content)を置く代わりに、
<img>タグの中で、「src」を使って、
/ src とは、sourceのこと
/ source: ソース、源、情報源
<img>タグ に、
どこから、その画像をゲットしてくるのかを教える、、、という使い方をします。
そして、終了タグ(ending tag)も、必要ありません。
こんな風に書きましょう。
<img src="url" />
// <img src="画像がある アドレス/住所" />
つまり、
1. 終了タグがない!
2. > の前に、/ を書く!
3. ということで、内容(content)は、ありません。
========================================
<!DOCTYPE html>
<html>
<head>
<title></title>
</head>
<body>
<img src="http ・・・ /f3a16fb6.jpg" />
</body>
</html>
========================================
右側のHTMLコードの <img>タグ を、⾒てください。(↑)
<img src="http ・・・ /f3a16fb6.jpg" />
このコードによって、
2/4 ページ
+13-10_Adding images.txt
Webページに、
ゴム製のアヒルの画像 を、加えています。
(右上の「View Preview」をクリックすると、そのアヒルを⾒ることができます.)
さて、どこからこの画像を、Webページに取り込んでいるのかを⾒てみましょう。
それは、
scr=
の後に、
"http:// ・・・ /f3a16fb6.jpg"
ってのが、あるのが分かると思います。
これは、その画像のある、ソース/アドレス/住所 を示しています。
Webページにある画像(image)はどれも、その画像ある場所(URL)
/ URL: 情報の存在場所を示すコード
を、持っています。
ちょっと、その、アヒルの画像を、右クリック してみてください。
そしてその中の選択肢の中から、
画像 URL をコピー(O)
// O ・・・ Alt + O
ってのを選びますと、その アドレス を クリップボード に、コピーしてくれます。
クリップボード に、コピーされるということは、
つまり、今度
「貼り付け」
を、することによって、HTMLコードに、そのアドレスを、書きこむことが、
出来るようになります。
なので、
src=
の後の、引用符(quotes)/"〜" の中に貼り付ければ、
簡単に、
<img src="〜" />
の中に、画像のある場所 を、書きこむことができます。
・Instructions: あなたへのミッション
========================================
3/4 ページ
+13-10_Adding images.txt
<!DOCTYPE html>
<html>
<head>
<title></title>
</head>
<body>
<img src="http ・・・ /f3a16fb6.jpg" />
</body>
</html>
========================================
右のエディタ(↑)にある、<image>タグ の下に、
// <img src="~" /> の下
に、
もうひとつ、画像を加えるために、<img>タグ を書きましょう。
(これは、<body>タグの「終了タグ」 より、上に来ますよ!)
もし、いい画像が、思い当たらなかったら、
この忍者君を使ってね。↓
http://s3.amazonaws.com/codecademy-blog/assets/ninja_zpsa5dbe37a.jpg
(忍者君の画像のありかを示すアドレス)
4/4 ページ
© Copyright 2026 Paperzz