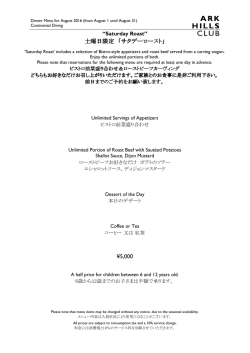
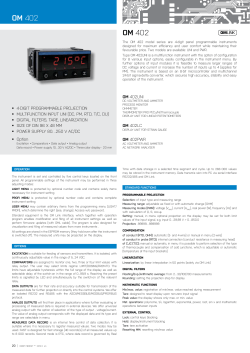
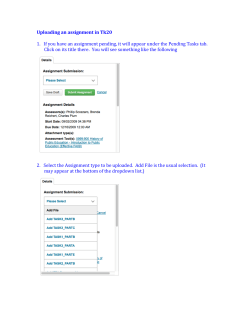
M380E 07.10.NF.6(2/2) DS Camera Control Unit DS-L2 DS Camera Head DS-Fi1 / DS-5M/DS-2Mv / DS-2MBW DS Cooled Camera Head DS-Qi1Mc / DS-5Mc / DS-2MBWc < Quick Reference > (Ver. 3.2) Setup and Startup 1. Setting up External Equipment Connect the DS camera head, AC adapter, and USB mouse to the DS-L2, and insert a USB memory into the USB connector, or a CF card into the CF card connector. DS-L2 main unit CF card USB mouse USB memory DS camera cable DS camera head AC AC adapter Install the DS-L2 by extracting the stand arm. 2. Starting Turn on power by pressing the power switch located on the right side. Power switch -1- Setup and Startup 3. Displaying Menus Right-clicking the mouse displays a menu. What menu appears depends on where you click the mouse. Upper third of screen : Main menu Center of screen : Main menu or shortcut menu Lower third of screen : Shortcut menu Main menu Shortcut menu Status bar The status bar appears when a menu appears for the first time after the DS-L2 is started. In this document, the term “DS camera head” refers collectively to the DS-Fi1, DS-5M, DS-2Mv, * DS-2MBW, DS-5Mc, DS-2MBWc, and DS-Qi1Mc. -2- Initial Settings When you use the DS-L2 for the first time, set date/time, etc. 1. Displaying the SETUP Menu Open the SETUP menu by selecting the [SETUP] tab from the main menu. 2. Select the [SETUP] tag. Selecting a Scene Mode Type Select menu. PowerOn Set… and specify the type of scene modes to be displayed in the main Selects a type of scene menu. Industrial type: The CAM menu includes wafer/IC-chip, metal ceramic, circuit board, and FPD scene modes. Biological type: The CAM menu includes dark field/fluorescent, bright field, differential interference/phase contrast, HE stained specimen, and enzyme labeled antibody method scene modes. Other type: The CAM menu includes asbestos specimens (2 types) scene modes. When finished, click Save to save the settings. -3- Initial Settings 3. Setting Date and Save Destination Select Additional… and set date and time. Then assign the [ Save to Media] function to the CAPTURE button. Sets date and time. Assigns the function to the CAPTURE button. When finished, click Save to save the settings. -4- Initial Settings 4. Specifying the Save Folder and File names Select File Set… and name the folder and file where you want to save photographed images. Names a save folder. To specify a folder name: In the [ Media Dir ] field, specify a folder name of up to eight characters. If the [ Auto ] check box is checked, a folder will be automatically created based on the save date. (The folder name consists of the two first characters specified in the [Media Dir] field, followed by six characters denoting the date.) Names a save file. To specify a file name: Specify the first string of up to four When finished, click Save characters. This string will be followed by to save the an automatically assigned serial number, settings. Finally, click which together form the name of the save Ret. to Window in the top right of the window to return to the original image view. file. If the [ Auto ] check box is checked, the name of the file name will consist of eight characters representing the day, hours, minutes, and seconds. -5- Photographing 1. Preparations Before Photographing 1.1 Adjusting White Balance To adjust white balance, observe an evenly white subject, such as the transparent part of a preparation. With this subject, select [CAM] from the main menu and click WB on the CMP. row, or click the WB button in the shortcut menu. WB button 1.2 Setting File Format and Size Use [ REC ] in the main menu to select the format and size of the file you want for photographing images. Selects a file format. Selects a file size. -6- Photographing 2. Photographing 2.1 Selecting a Scene Mode The [ CAM] menu in the main menu provides scene mode call buttons, allowing you to select a scene mode appropriate for the specimen to be photographed. Scene mode call buttons For details of scene modes, see the following. ● Industrial specimen scene modes [Wafer IC-chip] Suitable for wafer or IC chip. [Metal Ceramic] Bright parts of a metal specimen are expressed as white, and dark parts are expressed as transparent. This mode can also be used for ceramic and plastic specimens. [Circuit Board] Suitable for photographing of mounting defects on a part-mounted circuit board. Clipping of highlights in component leads and solder joints are suppressed, allowing defects to be easily detected. This mode is also suitable for high-contrast subjects such as gears and other metal components. -7- Photographing [FPD] : This mode is suitable for photographing the color filters for flat display devices, such as liquid crystal display and plasma display. FPD scene mode, better color reproduction could be obtained by setting color temperature of the * On display to 5000K, which is close to the lamp temperature of microscope, when you display images on an external screen. If setting the color temperature on the display is difficult, a better result could also be obtained by setting B of the color balance adjustment to 80. However, there would be a difference in histogram curve even after white balance adjustment. ● Biological specimen scene modes [DF / FL] : Dark field photography/fluorescent photography Use this mode to photograph a dark subject. The camera operability for position or focus adjustment is improved by increasing the camera’s sensitivity. High-resolution images can be obtained from the photographed data. [BF] : Bright field photography Intended for general stained specimens. In the case of EVG staining, a good result may be obtained by setting R of the color balance adjustment to 94. [DIC / PH] Contrast is enhanced for differential interference and phase contrast photography purposes. [HE] Provided for photographing of HE stained specimens. This mode is optimized for color reproduction specific to HE. [ELA] Provided for photographing of ELA (Enzyme labeled antibody method). This mode is optimized for color reproduction specific to DAB. ● Other scene modes [Asbestos / Red] Provided for photographing of asbestos specimens. This mode is optimized for the colors specific to chrysotile (immersed in a liquid with refractive index of 1.550), crocidolite (immersed in a liquid with refractive index of 1.680), and amosite (immersed in a liquid with refractive index of 1.680). [Asbestos / Blue] Provided for photographing of asbestos specimens. This mode is optimized for the colors specific to crocidolite (immersed in a liquid with refractive index of 1.700). DS-5Mc may cause poorer reproducibility than using DS-Fi1 or DS-2Mv for some asbestos * Using specimen. We recommend using DS-Fi1 or DS-2Mv for asbestos observation. -8- Photographing 2.2 Adjusting Brightness To adjust brightness, select [CAM] from the main menu and click click the exposure compensation button in the shortcut menu. +0.3 on the CMP. row, or Exposure compensation button When you click the exposure compensation button, its design changes to . Click the + or - button to adjust the brightness. 2.3 Photographing To photograph and save an image, select [ CAM] from the main menu and click , or click the Medium save button. Medium save button -9- Photographing 3. Reviewing a Saved Image To review (display) a photographed image, click [ VIEW ] on the main menu and select the desired file name. Alternatively, move the desired file name to the top by clicking scroll buttons and click , or click the data reproduction button in the shortcut menu. Data reproducton button Scroll buttons - 10 - Measurement 1. Performing Calibration and Saving Values In the main menu, select [TOOL ] - [REG>> ] - [OTHER ]. Click desired calibration mode: Calib1 or Calib2 . Calibration , and then select the 1.1 Manual Mode Calibration in this mode is performed based on the value converted from the known length of a scale (for example, an objective micrometer). 1) 2) 3) 4) 5) Specify, by clicking, the start point and end point of the displayed micrometer. Click in the numeric display field, and using the soft keyboard that appears, enter the actual length between the points specified in step 1), and then click Ent to fix the entry. Select the desired unit of measurement. Remove any check mark that may be shown in the E field. Click in the [Info] field, and using the soft keyboard that appears, enter a comment (*), and then click Ent to fix the entry. Select the desired save destination number. Finally, click Save . 5) 2) 3) 4) - 11 - Measurement 1.2 Optical Mode Calibration in this mode is performed based on the value converted from the magnifications of the objective and relay lenses. 1) For each of the objective lens and relay lens, click in the magnification field. When the soft keyboard appears, enter the magnification, and then click Ent to fix the entry. 2) Click in the [ Info] field, and using the soft keyboard that appears, enter a comment (*), and then click Ent to fix the entry. 3) Select the desired save destination number. Finally, click Save . 3) 1) 2) * ( ) The comment is saved as a name for m1 through m7 as specified by selecting [ TOOL] [ MAIN ] . - 12 - Measurement 2. Displaying a Scale In the main menu, select [TOOL ] and select the approximate size of the subject. Scale . A scale appears, allowing you to measure 1) From [ TOOL] in the main menu, select the calibration number you want to use, by clicking one of the options m1 to m7 . 2) Select Scale to display the scale in the lower right of the screen. 2) 1) - 13 - Measurement The scale length and color can be changed: 1) Select Scale in the main menu, move the cursor over the displayed scale and left-click the mouse. 2) A menu for changing the scale length and color appears. 3) To change the length, enter the desired value using the software keyboard, and then press Ent . 4) To change the color, select one from the six colors: red, green, yellow, blue, white, and black. The unit cannot be changed. If you change the scale length to a value out of the display range, * the scale will be displayed as a length multiplied or divided by a factor of 10, resulting in 10x, 100x, …, or 1/10, 1/100, …. To render the scale in the saved image or a printout, use the main menu and select [TOOL] - [ REG>> ] - [ OTHER ] . In the [ Paste to Image ] area, add a checkmark to [ Scale ] . - 14 - En Symbol for separate collection applicable in European countries This symbol indicates that this product is to be collected separately. The following apply only to users in European countries. • This product is designated for separate collection at an appropriate collection point. Do not dispose of as household waste. • For more information, contact the retailer or the local authorities in charge of waste management. De Symbol für getrennte Wertstoff-/Schadstoffsammlung in europäischen Ländern Dieses Symbol zeigt an, dass dieses Produkt separat entsorgt werden muss. Folgendes gilt für Verbraucher in europäischen Ländern: • Dieses Produkt darf nur separat an einer geeigneten Sammelstelle entsorgt werden. Eine Entsorgung im Hausmüll ist unzulässig. • Wenden Sie sich für nähere Informationen bitte an Ihren Händler oder die örtlich für Abfallentsorgung zuständigen Behörden. Fr Symbole pour la collecte sélective applicable aux pays européens Ce symbole indique que ce produit doit être collecté séparément. Les mesures suivantes concernent uniquement les utilisateurs européens. • Ce produit doit être jeté séparément dans un point de collecte approprié. Ne jetez pas ce produit dans une poubelle réservée aux ordures ménagères. • Pour plus d’information, contactez le détaillant ou les autorités locales responsables de la gestion des ordures. Es Símbolo para recogida separada aplicable en países Europeos No Symbol for kildesortering i europeiske land Dette symbolet indikerer at produktet skal kildesorteres. De nedenstående punktene gjelder for alle europeiske brukere. • Dette produktet skal kildesorteres og innleveres til dedikerte innsamlingspunkter. Må ikke kastes med normalt husholdningsavfall. • For mer informasjon, ta kontakt med din forhandler eller lokale myndigheter. Se Symbol för separat upphämtning i euopeiska länder Den här symbolen anger att produkten måste hämtas separat. Följande gäller bara användare i europeiska länder. • Den här produkten är avsedd för separat upphämtning vid ett lämpligt uppsamlingsställe. Produkten får inte kastas i hushållsavfall. • För mer information, kontakta återförsäljaren eller de lokala myndigheter som ansvarar för avfallshantering. Fi Erillisen keräyksen merkki Euroopan maissa Tämä merkki osoittaa, että tuote kerätään erikseen. Seuraavat maininnat koskevat vain eurooppalaisia käyttäjiä. • Tämä tuote kerätään erikseen asianmukaisista keräyspisteistä. Älä hävitä tuotetta talousjätteiden mukana. • Lisätietoja saat jälleenmyyjältä tai paikallisilta jätehuoltoviranomaisilta. Ru Символ сортировки мусора, использующийся в европейских странах Este símbolo indica que este producto se recogerá por separado. Lo siguiente sólo se aplicará en países Europeos. • Este producto ha sido designado para su recogida en un punto de almacenamiento apropiado. No lo tire como un deshecho doméstico. • Para más información, contacte con el vendedor o autoridades locales al cargo de la gestión de residuos. Данный символ означает, что этот продукт должен утилизироваться отдельно от других. Приведенная ниже информация касается только пользователей из стран Европы. • Данный продукт должен утилизироваться отдельно от других в соответствующих приемных пунктах. Не выбрасывайте данный продукт вместе с бытовым мусором. • Дополнительную информацию Вы можете получить у продавца или у местных властей, отвечающих за утилизацию мусора. Dk Symbol for special bortskaffelse af denne type produkter i de europæiske lande Gr Σύμβολο για την ξεχωριστή αποκομιδή απορριμμάτων στις Ευρωπαϊκές χώρες Dette symbol angiver, at dette produkt skal bortskaffes specielt. Det efterfølgende er kun til forbrugere i de europæiske lande. • Dette produkt skal bortskaffes på fx en genbrugsplads el .lign. Det må ikke smides væk som normalt husholdningsaffald. • For yderligere information kontakt din forhandler eller de lokale myndigheder, som fx teknisk forvaltning. Αυτ το σύμβολο υποδηλώνει τι η αποκομιδή αυτού του προϊντος πρέπει να γίνει ξεχωριστά. Τα κάτωθι απευθύνονται μνο σε Ευρωπαίους χρήστες. • Αυτ το προϊν είναι σχεδιασμένο έτσι ώστε να γίνεται η αποκομιδή του σε ειδικά σημεία. Μην το πετάτε μαζί με τα υπλοιπα απορρίμματα. • Για περισστερες πληροφορίες, επικοινωνήστε με τον διανομέα του προϊντος ή με τις υπεύθυνες τοπικές αρχές για θέματα διαχείρισης απορριμμάτων. Nl Symbool voor gescheiden inzameling zoals dat wordt gebruikt in Europese landen Pl Symbol oznaczający segregowanie odpadów, stosowany w krajach Europy Dit symbool betekent dat dit product apart moet worden ingezameld. Het volgende is alleen van toepassing op gebruikers in Europa • Dit product dient gescheiden ingezameld te worden op een daartoe bestemd inzamelpunt. Niet wegwerpen bij het normale huisvuil. • Neem voor meer informatie contact op met het verkooppunt, of met de lokale instantie die verantwoordelijk is voor het verwerken van afval. Ten symbol oznacza, że produkt musi być wyrzucany oddzielnie. Poniższe uwagi mają zastosowanie tylko dla użytkowników z Europy. • Ten produkt jest przeznaczony do oddzielnej utylizacji i powinien być dostarczony do odpowiedniego punktu zbierającego odpady. Nie należy go wyrzucać z odpadami gospodarstwa domowego. • Aby uzyskać więcej informacji, należy skontaktować się z przedstawicielem przedsiębiorstwa lub lokalnymi władzami odpowiedzialnymi za zarządzanie odpadami. Pt Símbolo para recolha de resíduos em separado utilizado nos países Europeus Este símbolo indica que este produto é para ser recolhido separadamente. Esta norma aplica-se só para os utilizadores nos países Europeus. • Este produto está designado para recolha de resíduos em separado num recipiente apropriado. Não deitar no caixote do lixo doméstico. • Para mais informações, contactar o revendedor ou as autoridades locais responsáveis pela gestão dos resíduos. It Simbolo per la raccolta differenziata applicabile nei paesi europei Questo simbolo indica che il prodotto va smaltito separatamente. La normativa che segue si applica soltanto agli utenti dei paesi europei. • Il prodotto è designato per lo smaltimento separato negli appositi punti di raccolta. Non gettare insieme ai rifiuti domestici. • Per maggiori informazioni, consultare il rivenditore o gli enti locali incaricati della gestione dei rifiuti. Hu Európai országokban érvénes “Elkülönített hulladékgyűjtés” jelzése Ez a jelzés azt jelenti, hogy ezt a terméket elkülönítve kell gyűjteni. Az alábbiak csak az európai országokban élő felhasználókra érvényes. • Ezt a terméket a megfelelő hulladékgyűjtőhelyen, elkülönítve kell gyűjteni. Ne dobja ki háztartási hulladékként. • További információkért forduljon a forgalmazóhoz, vagy a helyi hatóság hulladékgyűjtésért felelős részlegéhez. Cz Symbol pro oddělený sběr odpadu platný v evropských zemích Tento symbol znamená, že tento produkt se má odkládat odděleně. Následující pokyny platí pro uživatele z evropských zemí. • Tento produkt se má odkládat na místě sběru k tomuto účelu určeném. Neodhazujte spolu s domácím odpadem. • Více informací o způsobu zacházení s nebezpečným odpadem vám podá příslušná místní instituce. Jp 䝬䞀䝱䝇䝕䛱䛐䛗䜑ᗣᲘ∸ืᅂ䛴䜻䝷䝠䝯䝢䞀䜳 This symbol is provided for use in the People’s Republic of China, for environmental protection in the fields of electronic information products. 䛙䛴䝢䞀䜳䛵䚮 ୯ᅗ䛴䛐ᐂᵕ䛱ྡྷ䛗䛥䜈䛴䛭䚮 㞹Ꮔሒ⿿ဗฦ㔕䛱 䛐䛗䜑⎌ሾಕ㆜䜘┘Ⓩ䛮䛝䛬䛊䜄䛟䚯 䛙䛴䜻䝷䝠䝯䝢䞀䜳䛵ᮇ⿿ဗ䛒ื䛱ᅂ䛛䜒䛰䛗䜒䛶䛰䜏䛰䛊䛙䛮䜘 ♟䛝䛬䛊䜄䛟䚯 ḗ㡧䛵ᮇ⿿ဗ䜘䝬䞀䝱䝇䝕 䟺㻨㻸䟻 䛭⏕䛟䜑ሔྙ䛱䛴䜅㐲⏕䛛䜒䜄䛟䚯 •㻃 ᮇ⿿ဗ䛵ᣞᏽ䛛䜒䛥㞗ሔᡜ䛭ื䛱ᅂ䛛䜒䜑䜎䛌䛱ᏽ䜇䜏䜒䛬 䛊䜄䛟䚯 ᐓᗖ䜸䝣䛮䛝䛬ᗣᲘ䛝䛰䛊䛭䛕䛦䛛䛊䚯 •㻃 リ⣵䛱䛪䛊䛬䛵㈅⌦ᗉ䜄䛥䛵ᆀᇡ䛴ᗣᲘ∸ฌ⌦ᶭ㛭䛱䛚㏻⤙ 䛕䛦䛛䛊䚯 〒100-8331 東京都千代田区丸ノ内 3-2-3(富士ビル) インストルメンツカンパニー バイオサイエンス統括部 営業部 インストルメンツカンパニー 産業機器統括部 営業部 〒210-0005 川崎市川崎区東田町 8 番地(パレール三井ビル 14 階) 電話(044)223-2170(測定検査機器) ●日本国内の測定検査機器以外の製品については、㈱ニコンインステックにお問い合わせください。 本 社 関 西 支 店 九 州 支 店 札幌営業所 名古屋営業所 〒210-0005 川崎市川崎区東田町 8 番地(パレール三井ビル 13 階) 電話(044)223-2165(バイオ)/(044)223-2164(バイオ・カスタマーセンター) 電話(044)223-2174(産業) 〒532-0003 大阪市淀川区宮原 3-3-31(上村ニッセイビル) 電話(06)6394-8801(バイオ)/(06)6394-8802(産業) 〒813-0034 福岡市東区多の津 1-4-1 電話(092)611-1111(バイオ・産業) 〒060-0051 札幌市中央区南1条東 2-8-2(SR ビル 8F) 電話(011)281-2535(バイオ・産業) 〒460-0002 名古屋市中区丸の内 3-20-17(中外東京海上ビル) 電話(052)954-0165(バイオ・産業) NIKON CORPORATION 2-3, Marunouchi 3-chome, Chiyoda-ku, Tokyo 100-8331, Japan Sales Dept., Bio Science Division, Instruments Company Parale-Mitsui Bldg., 8, Higashida-cho, Kawasaki-ku, Kawasaki, Kanagawa, 210-0005 Japan Tel: +81-44-223-2167 Fax: +81-44-223-2182 Sales Dept., Industrial Instruments Division, Instruments Company Parale-Mitsui Bldg., 8, Higashida-cho, Kawasaki-ku, Kawasaki, Kanagawa, 210-0005 Japan Tel: +81-44-223-2175 Fax: +81-44-223-2182 NIKON INSTRUMENTS INC. 1300 Walt Whitman Road, Melville, NY 11747-3064, U.S.A. Tel: +1-631-547-8500 Fax: +1-631-547-0306 Semiconductor Inspection Technologies Division 1430 W. Auto Drive, Suite 101, Tempe, AZ 85284, U.S.A. Tel: +1-480-403-4100 Fax: +1-480-403-4199 NIKON INSTRUMENTS EUROPE B.V. Schipholweg 321, P.O. Box 222, 1170 AE Badhoevedorp, The Netherlands Tel: +31-20-44-96-222 Fax: +31-20-44-96-298
© Copyright 2026 Paperzz